

This pan-seared strip steak has a deep, crisp crust and a tender, juicy center. Finished with garlic-herb butter, it’s rich, flavorful, and surprisingly easy to make at home.
Important
I developed this recipe for strip steaks 1 to 1 1/2 inches (2.5-3.8 cm) thick. For reverse sear, sous vide, and other cooking methods, see my strip steak recipes.

Why You’ll Love This Pan-Seared Strip Steak
- One of the easiest ways to sear strip steak in a pan
- No butter basting or complicated techniques
- A deep, well-browned crust
- More precise control over the final doneness
- A simple garlic-herb butter finish
Ingredients You’ll Need

For the steak
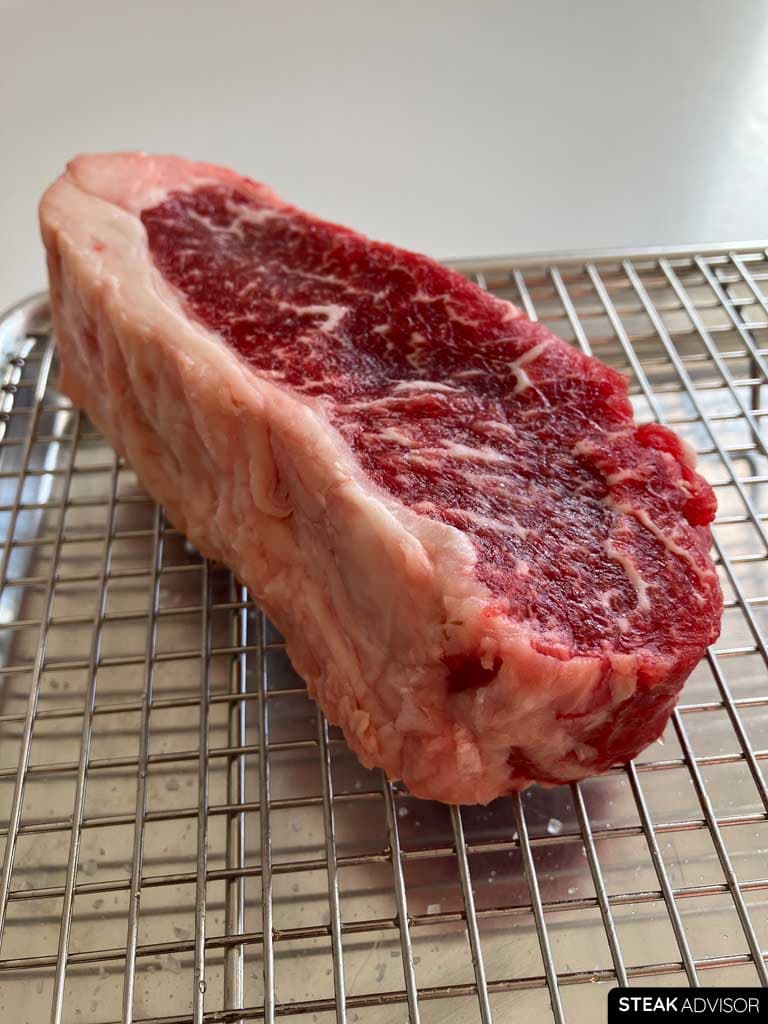
- Strip steak: I developed this recipe for a strip steak (New York Strip) about 10-14 oz (285-400 g) and 1-1 1/2 in (2.5-3.8 cm) thick. A steak about 1 1/2 inches (3.8 cm) thick gives you more room for error and makes it easier to build a good crust without overcooking the inside. When buying strip steak, choose a well-marbled cut; it will be more flavorful, juicy, and tender.
- Oil/Fat: Choose a refined oil or fat that can withstand high heat. Refined avocado oil is my preferred option because of its neutral flavor and high smoke point of about 500°F (260°C). Other suitable choices include refined high-oleic safflower, refined high-oleic canola, refined canola, refined olive, and refined peanut oils. Clarified butter (ghee) is also suitable and adds a richer flavor. Do not use regular butter for searing, as it burns quickly at high temperatures.
- Salt: I recommend kosher salt because its larger crystals are easier to distribute evenly. Use salt equal to about 1% of the steak’s weight. For a 14 oz (400 g) steak, use about 4 g. This is roughly 1 1/2 teaspoons of Diamond Crystal kosher salt or 3/4 teaspoon of Morton kosher salt. If you only have table salt on hand, use about 2/3 teaspoon and sprinkle it evenly, as it is denser and easier to overuse. For the most consistent result, measure the salt by weight the first time. Once you know what the right amount looks like, you can season by eye.
- Black pepper (optional): Use finely ground black pepper. Add it before cooking, or after searing if you are worried about it burning.
For the garlic-herb compound butter:
Made with softened butter, garlic, herbs, salt, and pepper, this compound butter melts over the steak as it rests. It gives you much of the flavor of butter basting with less effort and better control over doneness. For more variations, see my other steak butter recipes.
- Butter: Use 1/2 stick (56 g) of good quality unsalted butter containing at least 80% fat.
- Garlic: Use 2 garlic cloves, finely minced, chopped, or pressed. The smaller the pieces, the more evenly the garlic will blend into the butter.
- Salt: Begin with 1/8 teaspoon (a generous pinch), then taste and adjust as needed. Unsalted butter makes it easier to control the final seasoning.
- Black pepper: About 1/8 teaspoon finely ground black pepper, to taste
- Parsley: Use 1/2 tablespoon of finely chopped fresh parsley or 1/2 teaspoon of dried parsley. I recommend fresh parsley for better color and texture.
- Rosemary: Use 1/2 tablespoon of finely chopped fresh rosemary or 1/2 teaspoon of dried rosemary. Chop fresh rosemary very finely so it spreads evenly through the butter and does not feel tough.
Tools You’ll Need
- Wire rack and baking sheet: I use this setup for dry-brining. The rack lifts the steak off the baking sheet, allowing air to circulate on all sides so the surface dries more evenly.
- Pan: A cast-iron skillet is my top choice because it retains heat well and helps develop a deep crust. A carbon-steel pan or heavy-bottomed stainless-steel skillet also works well. Avoid nonstick pans, as they are not designed for the high heat needed for a proper sear.
- Tongs: I recommend using long, comfortable tongs for flipping and handling the steak safely.
- Meat thermometer: I recommend an instant-read thermometer for quick temperature checks, although a leave-in probe gives you even more control.
How to Pan-Sear a Strip Steak
Salt and prep the steak.
Pat the strip steak dry, then season it evenly on all sides, including the edges, with kosher salt equal to about 1% of the steak’s weight.
For a 14 oz (400 g) strip steak, use about 0.14 oz (4 g) of salt, roughly 1 1/2 teaspoons of Diamond Crystal or 3/4 teaspoon of Morton kosher salt. If you only have table salt, use about 2/3 teaspoon.
Place the steak uncovered on a wire rack set over a baking sheet and refrigerate it.
- If you are short on time: Refrigerate it for at least 1 hour. One hour gives the salt enough time to draw out moisture and let it absorb back into the steak, improving the flavor throughout the meat.
- If you have more time: Refrigerate it for 4 to 6 hours for deeper flavor and a better crust. This is how I prepare most of my steaks, and I highly recommend it.
- If you have less than 1 hour: Do not salt the steak in advance. Season it immediately before searing or after it comes out of the pan.
Salting the steak and leaving it uncovered in the refrigerator is called dry brining.

Make the compound butter.
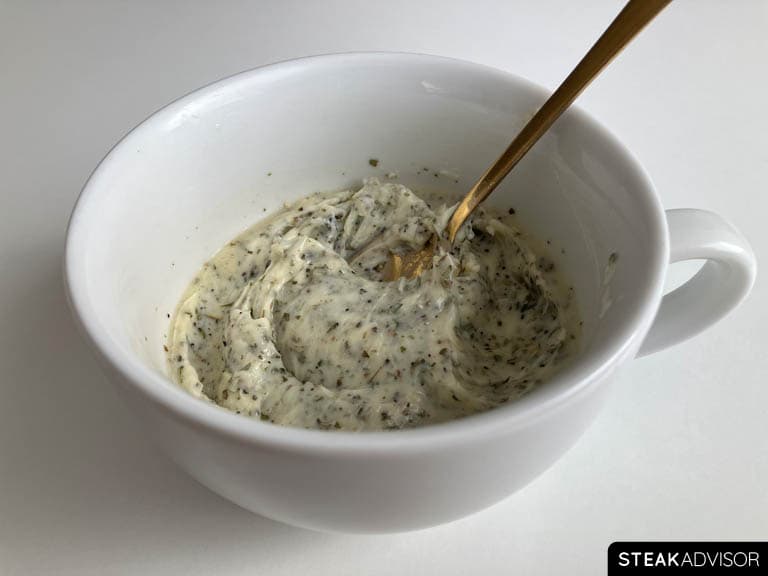
Let the butter soften until easy to mix but still firm enough to hold its shape. The quickest method is to microwave it in 5-second intervals, checking after each one. If you don’t have a microwave, cut the butter into small cubes and leave it at room temperature until softened.
Add the finely chopped or pressed garlic, finely chopped parsley and rosemary, salt, and black pepper. Mix with a fork until combined, then taste and adjust the seasoning.
Refrigerate until needed, then remove it about 15 minutes before cooking the steak.
Preheat the pan.
If the steak was refrigerated after salting, remove it 15 minutes before cooking.
Place a heavy pan (cast-iron, carbon-steel, or heavy-bottomed stainless-steel skillet) over medium-high heat for 3-4 minutes. Add 2 tablespoons of high smoke point oil and let it heat for about 1 more minute.
Pat the steak dry again and season with black pepper, if using.

Sear the steak.
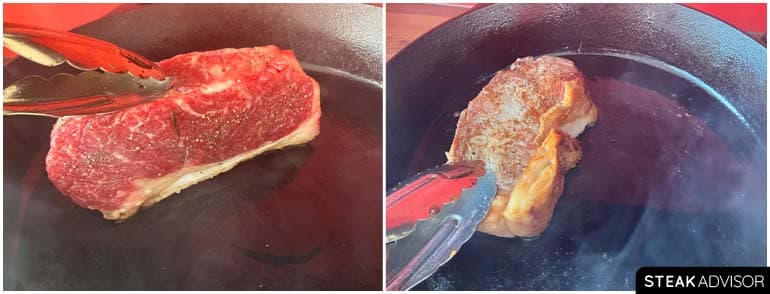
Start by rendering the fat cap for 60-90 seconds, then lay the steak flat and sear, flipping every 30 seconds. Keep cooking until its internal temperature is about 20°F (11°C) below your target doneness.
- 115°F (46°C) for medium-rare,
- 125°F (52°C) for medium,
- or 135°F (57°C) for medium-well.
See the chart later in the article for rare, well-done, and final rested temperatures.
Once your strip steak reaches the pull temperature, turn off the heat, transfer the steak from the pan to a plate or wooden cutting board, and let it rest uncovered for 5 minutes.
Finish with compound butter.
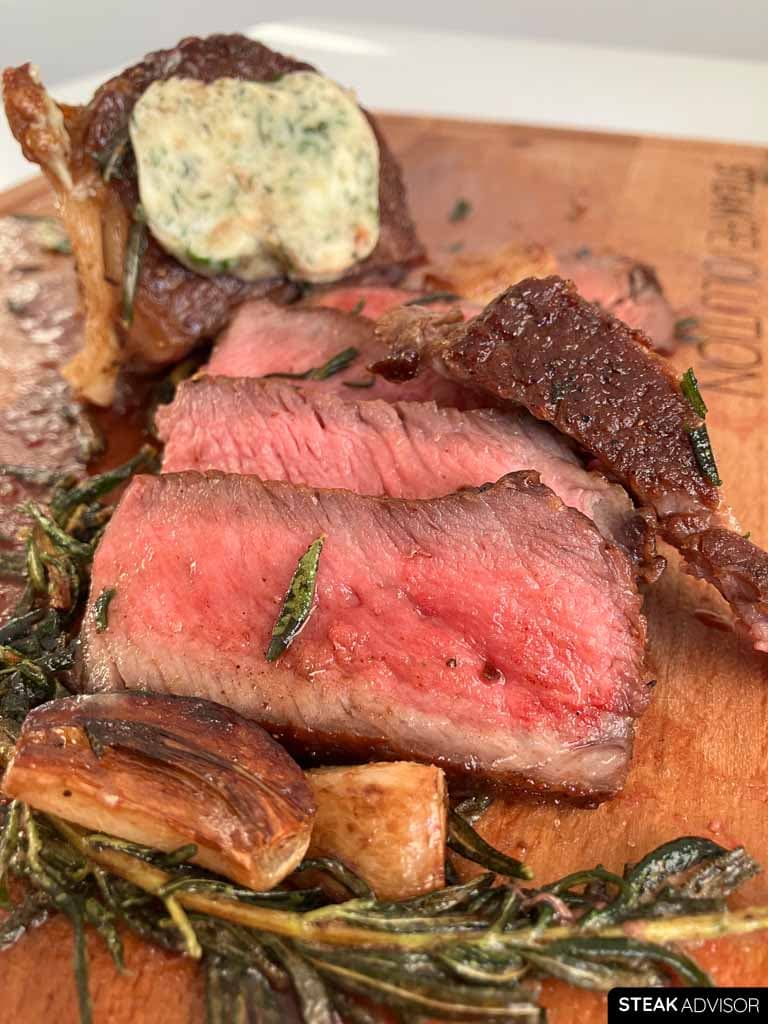
While the steak rests, top it with garlic-herb compound butter. It will slowly melt over the hot steak.
Slice and serve.
After resting for 5 minutes, thinly slice the steak and serve with your favorite sides.

Alternative garlic-and-herb butter finish (optional) if you do not have compound butter.
While the steak rests, place the skillet used for searing over medium heat. Add 1 to 2 tablespoons of oil if there is not enough fat left in the pan, then cook a few peeled garlic cloves until lightly golden.
Turn the heat to low and add 2 tablespoons (30 g) of unsalted butter with a few sprigs of rosemary, thyme, or both. When the butter melts, take the skillet off the heat and spoon it over the sliced steak before serving.
Pan-Seared Strip Steak Temperature Chart
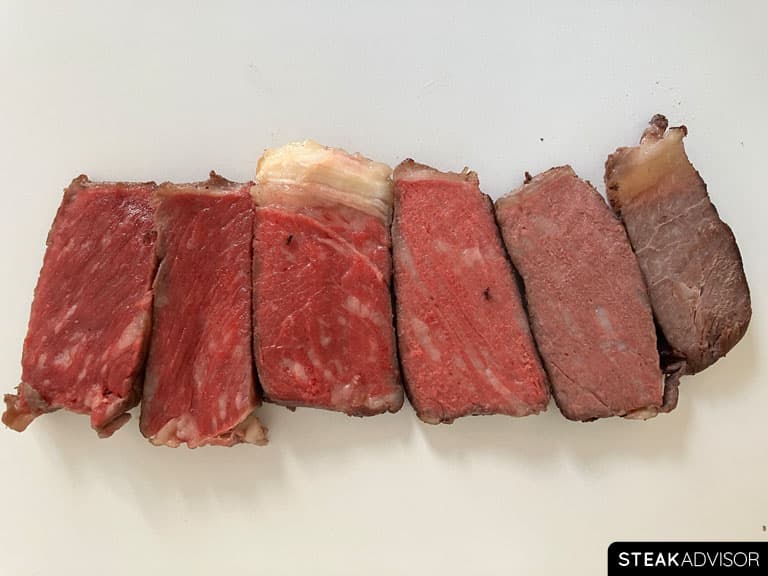
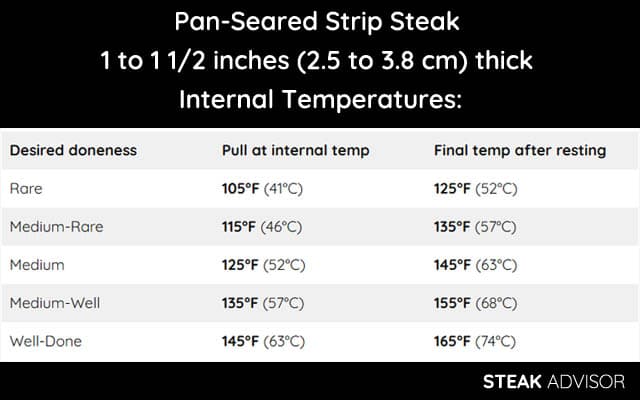
These guidelines apply only to strip steaks, pan-seared exactly as described in this recipe. Use this chart as a pull-temperature guide. The pull temperature is the internal temperature at which you remove the steak from the pan, not the final temperature after resting.
With this recipe, I expect about 20°F (11°C) of carryover cooking during a 5-minute rest for steaks 1 to 1 1/2 inches (2.5-3.8 cm) thick. That’s why I remove the steak from the pan before it reaches the final target temperature.
| Desired doneness | Pull at internal temp | Final temp after resting |
| Rare | 105°F (41°C) | 125°F (52°C) |
| Medium-Rare | 115°F (46°C) | 135°F (57°C) |
| Medium | 125°F (52°C) | 145°F (63°C) |
| Medium-Well | 135°F (57°C) | 155°F (68°C) |
| Well-Done | 145°F (63°C) | 165°F (74°C) |
What is the best doneness for pan-seared strip steak?
Medium-rare to medium is, in my opinion, the best doneness range for strip steak, depending on how well-marbled it is.
For a leaner strip steak, I’d aim for medium-rare. For a really well-marbled strip steak, I’d consider cooking it slightly more, to around 140-142°F (60-61°C). That’s still the lower end of medium, but the extra heat helps melt more of the fat without pushing the steak too far.
Here’s why: a good strip steak has a decent amount of intramuscular fat (marbling). When the steak is undercooked, that fat stays firm and waxy. It starts to melt more significantly at about 130°F (54°C), so cooking the steak to medium-rare or even the lower end of medium gives that fat enough time to soften and render while keeping the steak tender, juicy, and flavorful.
Definitely avoid going too rare, since the fat won’t have enough time to melt properly. On the other hand, cooking a strip steak past medium will start to dry it out, making it noticeably less tender and less flavorful.
To learn more about the different doneness levels, check out my definitive guide to steak doneness, where I explain each level in detail and include examples, descriptions, and temperature charts.
What to Serve with Pan-Seared Strip Steak
I really like serving strip steak with classic sides such as whole boiled potatoes, mashed potatoes, oven-roasted potatoes, or, for the quickest option, French fries cooked in oil. I also like to add something green, most often a simple salad with arugula, cherry tomatoes, and a light dressing.
When I am already using the oven, roasted zucchini is another great option. There are plenty of possibilities, but below is a list of some of the best ones that come to mind.
- Mashed Potatoes
- Oven-Baked Steak Fries
- Roasted Potatoes
- Garlic-Thyme Mushrooms
- Parmesan-Roasted Asparagus
- Creamed Spinach
- Balsamic-Roasted Brussels Sprouts
- Arugula and Tomato Salad
Recipe Success Tips
When to Salt Strip Steak
A dry steak surface is the key to a great crust, and moisture is the biggest enemy of a good sear. After you salt the steak, the salt pulls moisture to the surface. Over the next 40-60 minutes, most of that salty liquid gets reabsorbed into the meat, and the exposed surface starts to dry.
Here’s the main point: salt your strip steak at least 1 hour before cooking, then place it on a wire rack set over a baking sheet. Don’t leave it flat on a plate or cutting board, because the bottom can sit in the moisture pulled out by the salt. A wire rack lets air circulate on all sides, which helps the surface dry more evenly before the steak hits the pan. That way, you don’t waste the first minutes of searing evaporating surface moisture instead of building a crust.
For even better results, place the strip steak uncovered on a rack in the fridge for 4-6 hours. This is the best option if you want a great sear while minimizing the gray band inside. Just keep in mind that the longer the steak sits salted, the larger the gray band forms under the crust (no matter how you cook the steak).
From my testing, 4-6 hours in the fridge is the sweet spot; it significantly boosts flavor, dries the surface nicely, and minimizes the gray band. That said, if you don’t care about a really thick gray band and want even more flavor, leave the salted strip steak in the fridge overnight. I often do this when I want a deeper, saltier flavor.
Avoid searing a strip steak between 2 and 30 minutes after salting. During that window, the surface is wet, and that will ruin your crust.
For more details on timing and technique, see my article: How to Salt a Steak.
Use the Right Pan and Oil
Do not sear the steak in butter. Butter burns too quickly over the kind of heat you need for a proper sear. For pan-searing, always start with a neutral, high-smoke-point oil.
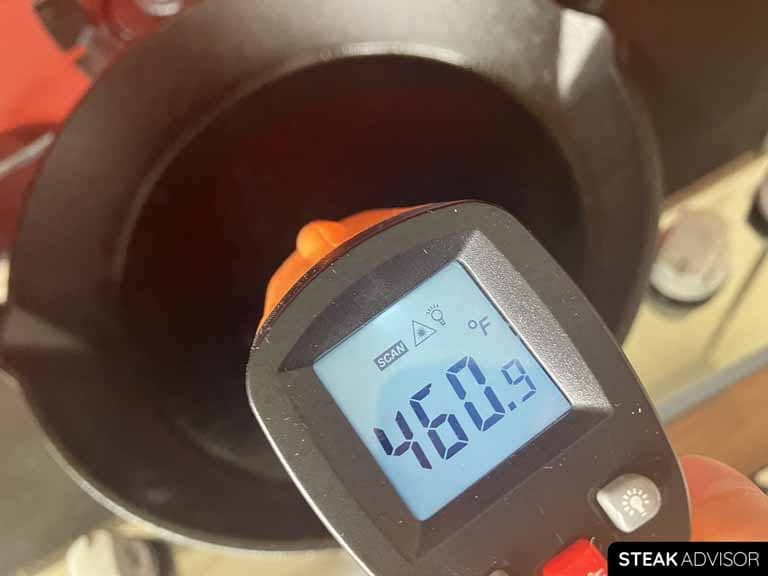
Your pan needs to reach at least 400°F (204°C) and ideally closer to 450°F (232°C), so you can’t use just any oil. You need a high-smoke-point oil. Refined avocado oil is one of my favorites and the one I use most often. It has a high smoke point and a neutral flavor. If you don’t have it, the table below lists other oils that work well for pan-searing.
| Type of Fat | Smoke Point ºF/ºC | Flavor profile |
|---|---|---|
| Refined Avocado Oil | 520ºF / 271°C | Neutral to very mild |
| Refined Pecan Oil | 470ºF / 243°C | Mildly nutty |
| Refined Canola Oil | 468°F / 242°C | Neutral |
| Refined Olive Oil | 465°F / 241°C | Mild to neutral |
| Refined Peanut Oil | 450ºF / 232°C | Neutral to mildly nutty |
| Refined Soybean Oil | 450°F / 232°C | Neutral |
| Clarified Butter / Ghee | 450°F / 232°C | Rich, buttery, mildly nutty |
| Refined Rice Bran Oil | 450°F / 232°C | Neutral to mildly nutty |
| Refined Corn Oil | 450°F / 232°C | Neutral to slightly sweet |
| Refined Sunflower Oil | 450°F / 232°C | Neutral |
Smoke points are approximate and may vary depending on the product, degree of refinement, freshness, and method of measurement.
For the pan, choose one with a thick bottom that holds heat well and can handle high temperatures. A cast-iron skillet is my go-to for a really hard sear, but a good, heavy-bottomed stainless steel or carbon steel pan works too. Avoid nonstick pans, as they aren’t designed for the high heat needed to cook a steak safely.
Cook to Temperature, Not Time
Treat recipe times as rough estimates, not exact guidelines. Cooking time varies based on several factors, including the thickness of your strip steak and the equipment used, such as the stove, burner power, and pan type. That’s why I always recommend using a meat thermometer.
If you don’t own one yet, get an instant-read thermometer. It’s one of the simplest and most affordable ways to quickly check the steak’s internal temperature and know when to remove it from the pan.
If you want even more control, use a leave-in probe thermometer or a wireless thermometer. These let you monitor the steak’s internal temperature from start to finish as it cooks, which makes it much easier to hit your target doneness. They cost more than a basic instant-read thermometer, but they’re worth it if you cook steak often.
A meat thermometer is the most reliable way to hit the doneness you want consistently.
How to Get a Great Crust on Strip Steak
For the best crust, focus on three things:
- A properly preheated pan
- A dry steak surface
- Frequent flipping
The pan is the most important one. Without enough heat, the steak won’t brown properly. For pan-searing, use a heavy pan and preheat it until the surface reaches about 400-450°F (204-232°C). That gives you enough heat to build a good crust before the inside overcooks.
The second key is a dry steak surface. Moisture is the enemy of browning. When you place a wet steak in the pan, that moisture has to evaporate first before the surface can start browning. That wastes valuable time and heat, especially with thinner cuts, where you don’t have much room for error.
That’s why, right before the steak goes into the pan, always pat it dry again with paper towels. Even if you dry-brined it earlier, moisture can still collect on the surface while the pan heats up. A dry surface browns much faster and gives you a much better crust.
Finally, flip the steak every 30 seconds. Frequent flipping helps the crust develop more evenly.

Why I Skip Butter Basting for This Recipe
I’m skipping butter basting in this recipe because it makes pan-searing harder, especially with thinner steaks. It looks simple, but in practice, it gives you more things to control at the worst possible moment. You have to add butter, lower the heat, tilt the pan, spoon hot fat over the meat, and keep an eye on the internal temperature. That leaves less room for error and makes it much easier to overshoot your target doneness.
Butter basting also keeps the top side of the steak hotter between flips. Normally, when you flip a steak every 30 seconds, the side facing up gets a short moment away from direct contact with the pan, so it cools slightly. But when you keep spooning hot butter over it, that cooling effect is much smaller. As a result, the steak cooks faster, the outer layers stay hotter, and the carryover rise is stronger once the steak comes off the heat.
In my opinion, it’s not worth the extra effort. I also don’t like how much butter it uses. You can get almost the same rich garlic-herb butter flavor much more easily by using compound butter or making a quick garlic-herb butter in the pan while the steak rests.

But if you still want to butter-baste your steak, here are a few tips. Use a thicker steak, ideally about 1 1/2 inches (3.8 cm) thick, so you have more room for error. Add the butter when the steak reaches about 90°F (32°C) if you’re aiming for medium-rare/medium, or about 100°F (38°C) if you’re aiming for medium/medium-well. Then lower the heat so the butter doesn’t burn.
Once the butter melts, baste the steak, or tilt the pan, place the steak in the pooled butter, and flip it every 30 seconds. Keep going until the steak is about 25°F (14°C) below your target doneness, then remove it from the pan and let it rest for 5 minutes.
Easy Ways to Finish the Strip Steak After Searing
Here are my favorite options:
1. Compound Butter
This is the easiest option. Place a small amount of compound butter on top of the steak right after it comes out of the pan. As the steak rests, the butter melts on the surface, adding rich garlic-herb butter flavor with almost no extra effort.
This works especially well if you make the compound butter ahead of time. I like to keep a batch in the fridge so it’s ready whenever I cook steak. What’s great is that you can make it in many different ways, so it’s easy to experiment with different herbs, spices, and other ingredients until you find the flavor you like most.
Bonus: you can use it for way more than just steak – I love using it for quick garlic bread or serving it with other kinds of meat.
2. Quick Garlic-Herb Butter
This is the second option and a simple alternative to compound butter. While the steak rests, use the same pan you seared it in. Lower the heat to medium and add a few peeled garlic cloves. Sear them until lightly browned, then add a couple of sprigs of rosemary or thyme and 2 tablespoons (30 g) of unsalted butter. Once the butter melts and turns lightly golden, turn off the heat and pour it over the sliced steak.
This option is best if you want more of that pan-finished flavor: lightly browned garlic, crispy herbs, and warm golden butter spooned over the steak right before serving.

3. Simple Resting Butter
If you don’t want to make compound butter or cook aromatics, just add a small piece of plain unsalted butter to the hot steak as it rests. It won’t give you the same garlic-herb flavor as the other two options, but it still makes the steak taste better with almost no effort.
For most home cooks, these finishing methods are a better choice than butter basting. You still get the rich buttery flavor, but with less effort, less stress, and a much lower risk of overcooking the steak.
Don’t Ignore Carryover Cooking
The steak doesn’t stop cooking the moment you take it out of the pan. As it rests, the internal temperature continues to rise because heat from the outer layers keeps moving toward the center. This is carryover cooking, and with fast, high-heat methods like pan-searing, the increase can be significant, from 15°F to even 30°F (8°C to 17°C), depending on the steak’s thickness, cooking temperature, and resting time.
That’s why removing the steak from the pan at the right moment and letting it rest matters. If you slice the whole steak right after cooking, you’ll release heat quickly and significantly reduce the effect of carryover cooking. So please don’t touch the steak while it rests unless your thermometer shows it’s already at your target doneness and you want to stop it from cooking any further.
Keep in mind that this kind of high carryover increase usually happens with fast, very hot cooking methods like pan-searing or grilling over direct heat. Don’t follow these exact guidelines for gentler cooking methods, such as sous vide or reverse searing.
For more details, check out my guide: Resting Steak After Cooking: Why You Should and for How Long.
FAQs
Can I use a bone-in New York strip steak for this recipe?
Yes, absolutely. The main thing to keep in mind is that the bone can sometimes prevent the steak from sitting completely flat against the pan, especially as the meat shrinks during cooking. This can make it harder to get an even crust. To help with that, gently press the steak down each time you flip it so it stays in good contact with the pan.
For an even better sear, salt the steak a few hours ahead of time and leave it uncovered in the refrigerator. This helps dry out the surface. Before cooking, pat it dry with paper towels to remove any remaining moisture. A dry surface will help you get a deeper, more even crust.

How long does it take to sear a strip steak on the stove?
With this recipe, a 1-inch (2.5 cm) thick strip steak usually takes me about 4-5 minutes to reach an internal temperature of around 115°F (46°C). After about 5 minutes of resting, it rises to medium-rare, around 135°F (57°C).
A 1 1/2-inch (3.8 cm) strip steak usually takes closer to 6-8 minutes to reach a similar pull temperature. But use these times only as a rough guide because the exact timing depends on the steak’s thickness, how long it rests, the pan you’re using, the pan temperature, and the power of your stove or burner.
For the best results, use a meat thermometer and remove the steak based on temperature, not time.
Can I use a thicker strip steak, for example, 2 inches (5 cm) thick?
This recipe works best for strip steaks between 1 and 1 1/2 inches (2.5-3.8 cm) thick. A 1 1/2-inch (3.8 cm) steak is ideal because it gives you enough time to build a good crust without overcooking the center.
A strip steak that’s closer to 2 inches (5 cm) thick, or even thicker, shouldn’t be cooked only over direct high heat. The problem is simple: with a steak that thick, the outside cooks much faster than the center. You’ll often end up with a very dark crust, a thicker overcooked gray band near the surface, and a center that’s still too red or undercooked. With steaks much thicker than 2 inches (5 cm), the crust can even start to burn before the inside reaches the right doneness.
The photo below is a good example of what happens when you cook a steak thicker than 2 inches (5 cm) using only a pan. This is a thick filet mignon, but the same problem applies to a thick strip steak. Notice the contrast between the red center and the more cooked meat closer to the surface.

For thick steaks like that, the most reliable option is a two-stage cooking method. You can cook the steak low and slow first, then sear it hard at the end for a crust, which is the reverse sear method. Or you can do the opposite: sear the steak first, then finish it gently in the oven at a lower temperature, which is the forward sear method. Sous vide also works, but it takes much longer with a thick cut like this.
Is a gray band normal on a pan-seared strip steak?
Yes, it’s completely normal. Compared with gentler methods like sous vide or reverse searing, hot-and-fast pan-searing creates a more noticeable gray band under the crust. That’s because the steak is cooked over very high direct heat, so the meat near the surface gets much hotter than the center.
During dry brining, the steak sits uncovered in the fridge, exposed to air. The surface dries out, and some oxidation happens. Salt also speeds up that color change. Add very high pan heat on top of that, and you have the perfect setup for a thicker gray band under the crust.
That said, you can minimize the gray band, and this recipe already includes the most effective ways to do that. The two most important ones are shorter dry-brining, around 4-6 hours instead of overnight, and flipping the steak every 30 seconds while searing. Both help you build a good crust while keeping the gray band as thin as possible.
Print
Pan-Seared Strip Steak Recipe
- Prep Time: 15 mins
- Dry-Brine Time: 1 to 6 hours
- Cook Time: 15 mins
- Total Time: 1 hour 30 minutes
- Yield: 1 steak
Description
Pan-seared strip steak with a crisp, deeply browned crust, a juicy center, and rich garlic-herb butter. An easy steakhouse-style dinner made at home.
Ingredients
For steak
- Aim for a well-marbled strip steak about 10-14 oz (285-400 g) and 1-1 1/2 in (2.5-3.8 cm) thick
- 2 tablespoons (30 ml) refined avocado oil (see Notes for alternatives)
- salt, about 1% of the steak’s weight (see instructions for a 14 oz / 400 g example)
- optional: about 1/3 teaspoon of finely ground black pepper
For garlic-herb compound butter (for serving)
- 1/2 stick (56g) of unsalted butter
- 2 garlic cloves, finely chopped or pressed
- 1/8 teaspoon salt (a generous pinch), or more to taste
- A generous pinch of finely ground black pepper (about 1/8 teaspoon), or to taste
- 1/2 tablespoon finely chopped fresh parsley or 1/2 teaspoon dried
- 1/2 tablespoon finely chopped fresh rosemary or 1/2 teaspoon dried rosemary
Tools
- Wire rack and baking sheet (for dry-brining the steak)
- Pan (cast-iron, carbon steel or heavy-bottomed stainless steel skillet)
- Tongs
- Meat thermometer (instant-read or leave-in probe thermometer)
Instructions
Prepare the Strip Steak
- Take the strip steak out of the fridge and pat it dry with paper towels.
- Season it evenly on all sides, including the edges, using kosher salt equal to about 1% of the steak’s weight. For a 14 oz (400 g) strip steak, use about 4 g, roughly 1 1/2 teaspoons of Diamond Crystal or 3/4 teaspoon of Morton kosher salt. If you don’t have kosher salt, use about 2/3 teaspoon of fine table salt.
- Place the steak uncovered on a wire rack set over a baking sheet, then choose the dry-brining time based on your schedule and desired results:
- If you’re short on time: Refrigerate the steak for at least 1 hour. That’s the bare minimum for dry-brining.
- If you have a few hours: Refrigerate it for 4 to 6 hours for deeper flavor and a better crust. This is how I prepare most of my steaks, and I highly recommend it.
- If you have less than 1 hour: Do not salt the steak in advance. Season it immediately before searing or after it comes out of the pan.
Make the Garlic-Herb Compound Butter
- While the strip steak is dry-brining, prepare the compound butter.
- Place the butter in a microwave-safe bowl. Microwave it in 5-second intervals, checking after each one, until soft but not melted. Alternatively, cut the butter into small cubes, place them in a bowl, and leave them at room temperature until softened.
- Add the garlic, parsley, rosemary, salt, and pepper, then mix with a fork until combined. Taste and adjust the seasoning if needed.
- Refrigerate until needed, then remove it about 15 minutes before cooking the steak.
- If you’re cooking more than two steaks, feel free to double the recipe (see notes).
Preheat the Pan
- Regardless of the salting method you choose, make sure the steak sits at room temperature for about 15 minutes before it goes into the pan.
- Place a heavy pan on medium-high heat, preferably a cast-iron skillet (or stainless steel or carbon steel). After about 3-4 minutes, add 2 tablespoons of high-smoke-point oil and let it heat for another minute.
- While the pan is heating, pat the strip steak dry again.
- (optional) if you want, season all sides with about 1/3 teaspoon of finely ground black pepper.
- Then move on to the next step.
Pan-Sear the Strip Steak
- High-heat searing creates a lot of smoke, so turn on the exhaust fan or open a window before the steak goes into the pan.
- Start by placing the strip steak fat side down in the pan to render some of the fat. Sear it for approximately 60-90 seconds, or until browned and lightly crisp. Then lay the steak flat and start searing the meat side, flipping it every 30 seconds.
- Keep searing until the strip steak reaches your internal pull temperature:
115°F (46°C) for medium-rare,
125°F (52°C) for medium,
135°F (57°C) for medium-well. - Then turn off the heat, remove the steak from the pan, and let it rest for 5 minutes. For rare, well-done, and final rested temperatures, use the chart below.
- Use this chart as a pull-temperature guide. The pull temperature is the internal temperature at which you remove the steak from the pan, not the final temperature after resting.
Compound Butter Finish
- Place a bit of garlic-herb compound butter on top of the steak right after you take it out of the pan.
- Store leftovers in the refrigerator for up to 4 days. Use them on bread, vegetables, or other meats.
Slice and Serve the Steak
- After cooking, don’t forget to let the steak rest for about 5 minutes.
- Once the steak has rested, slice it. For a well-marbled strip steak, slice it however you like. For a leaner cut, slice against the grain (see notes below). Serve with your favorite sides.
Notes
Oil/Fat Alternatives: Use refined high-oleic safflower, refined high-oleic canola, refined canola, refined olive, or refined peanut oil. Clarified butter (ghee) also works well. Don’t use regular butter for searing.
Slice against the grain: If you’re working with a lean strip steak, it’s a good idea to slice it against the grain. This shortens the muscle fibers, making each bite easier to chew. It’s one of the simplest and most effective ways to turn a slightly tough, chewy cut into something noticeably more tender, since your teeth don’t have to work as hard to break through the muscle fibers. If you’re not sure how to find the grain direction, check out my steak slicing guide.
Compound butter: If you want to make a larger batch of compound butter to keep on hand, it’s best to prepare it a day ahead. Roll the compound butter into a log and let it firm up in the fridge or freezer. It’s much easier to store this way, and you can slice off what you need whenever you want. For detailed step-by-step instructions, see my garlic-herb compound butter recipe.

Dry brining takes some time, and so does making the compound butter, but both are really easy. Totally worth it. I loved the result.
Thanks, Ethan.
This made strip steak feel really easy. I got a great crust in the pan, and the compound butter at the end made it taste even better.
Glad the crust came out great!
This was exactly what I needed for cooking a strip steak in a pan. The crust came out great, and using the temperature guidance made it much easier to avoid overcooking. The garlic-herb butter at the end was a really nice touch too.
Really glad it worked out so well!
Great recipe! The dry brine made a huge difference, and the garlic-herb butter finish gave the strip steak an amazing flavor. Will definitely make this again.
Thanks so much, Mike! Glad the steak turned out great and that the garlic butter finish worked well for you. Really appreciate the 5-star review!