This recipe starts with a ripping-hot pan sear and finishes in the oven, giving you a deeply browned, flavorful crust and a juicy, evenly cooked center with only a thin gray band under the crust. It’s a simple, reliable way to cook steaks that are about 2 inches (5 cm) thick.
For other methods, jump to Other Ways to Cook a 2-Inch (5 cm) Thick Steak.

You can’t cook a steak that’s about 2 inches (5 cm) thick over direct, high heat from start to finish and expect it to cook evenly. The problem is that with a steak this thick, very high heat cooks the outer layers much faster than heat can move toward the center. Instead of a juicy, evenly cooked interior with only a thin gray band, you get a strong doneness gradient: a thick gray layer under the crust, a pink layer closer to the middle, and a red center.
That’s why thick steaks need a different approach: a two-stage cooking method. In this recipe, I keep it simple with a hard pan sear to build the crust, then a gentle oven finish to cook the center more evenly.
Excluding dry-brining time, this recipe takes about 35–40 minutes from start to finish for a 2-inch (5 cm) thick steak, including a 5-minute rest. That’s usually enough to reach medium-rare to medium doneness, and it’s much quicker than sous vide or a standard reverse sear.
Optional Finish
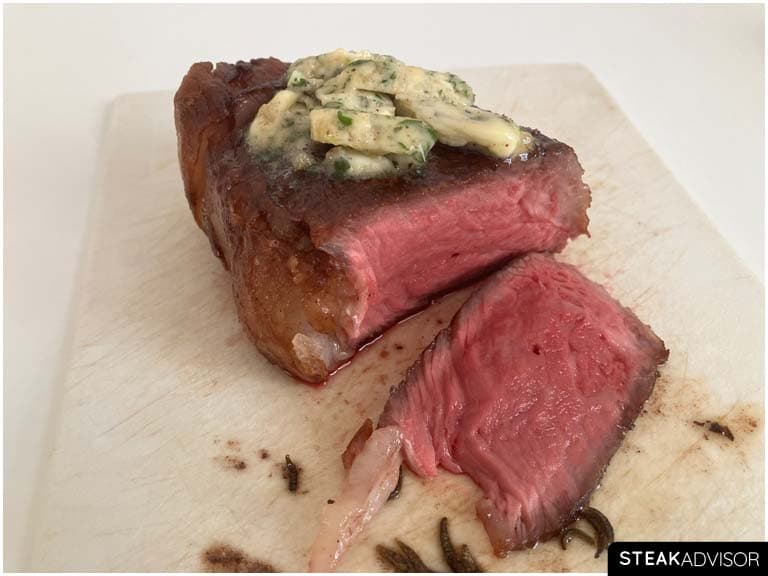
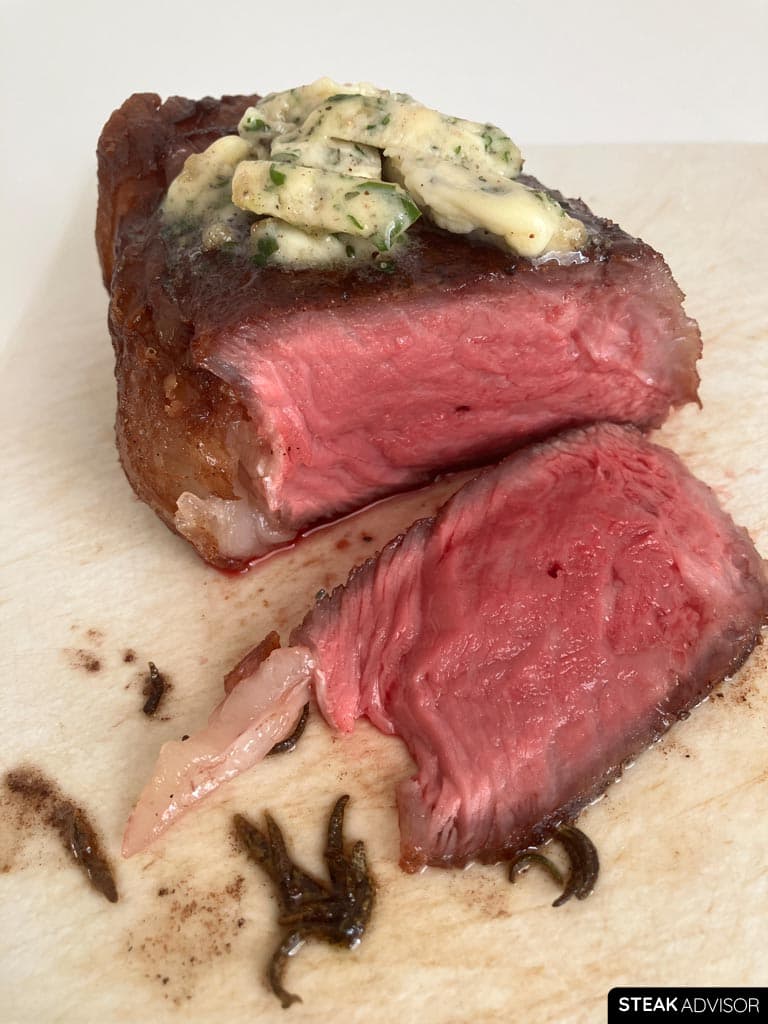
I like to finish the steak with a small amount of garlic-herb compound butter. As it melts, it adds richness, aroma, and that garlic-herb butter flavor without overcomplicating the cooking process.
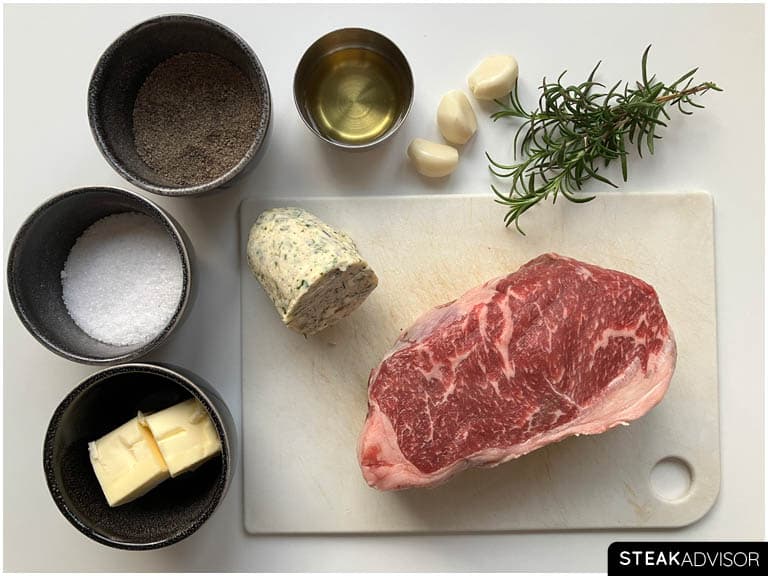
Ingredients You’ll Need
Here’s a quick visual overview of the key ingredients you’ll need for this recipe, along with important notes. For amounts, see the full recipe card below.
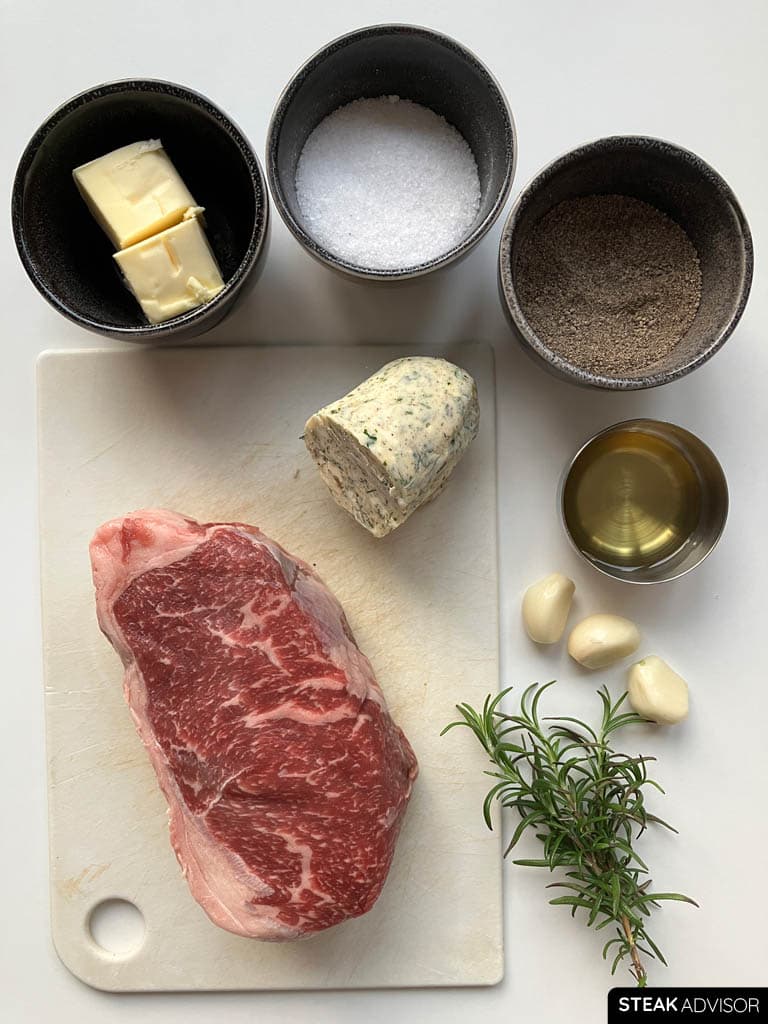
Ingredient Notes
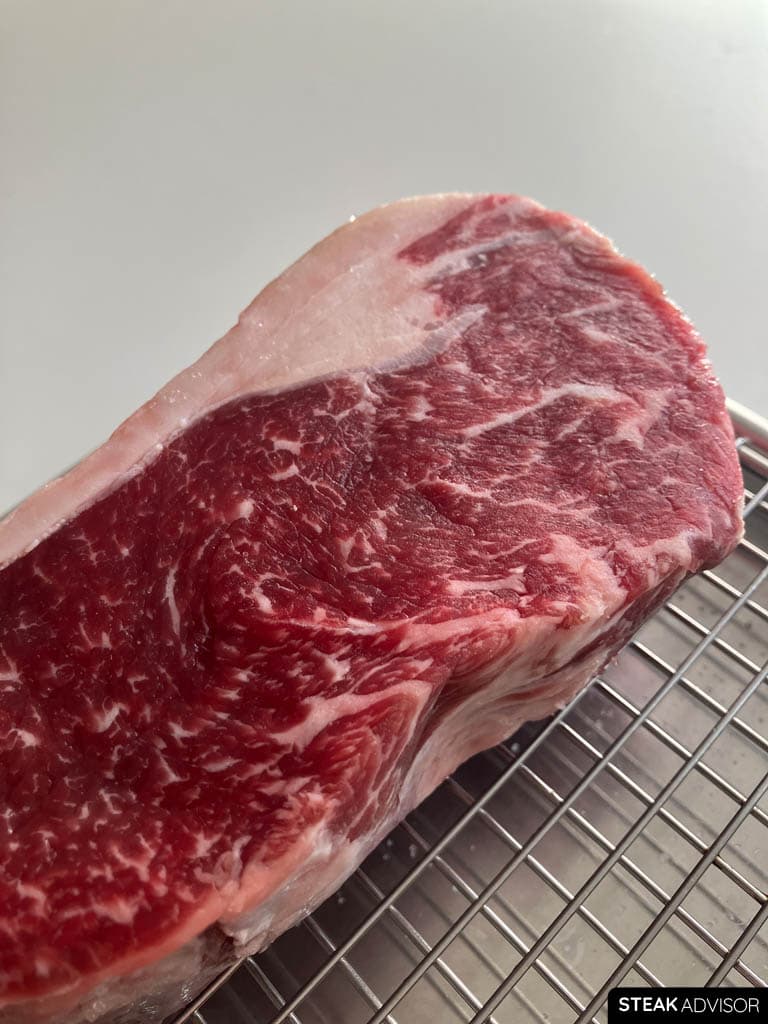
- Steak: This recipe is perfect for ribeye, strip steak, tomahawk, cowboy steak, filet mignon, or any other tender cut that’s about 2 inches (5 cm) thick.
- Oil: Use a neutral, high-smoke-point oil for searing. I like refined avocado oil because it has a neutral flavor and a high smoke point of about 500°F (260°C), which works well for hot pan searing.
- Salt: Use a coarse salt, such as kosher salt. Avoid fine table salt because it’s much easier to overseason the steak with it. A good starting point is about 1% of the steak’s weight in salt, or up to 1.5% if you prefer a stronger, more seasoned flavor.
- Black pepper (optional): Use finely ground black pepper. It stays close to the surface, helping the steak make better contact with the pan. Coarsely cracked pepper can create small gaps between the meat and the pan, making it harder to get an even sear.
- Steak butter (optional): A simple mix of butter, garlic, and herbs that adds a lot of flavor. I highly recommend making a larger batch of garlic-herb compound butter ahead of time. Use what you need, then store the extra butter in the fridge for up to 4 days or in the freezer for up to 3 months. You can also use a different type of compound butter if you prefer.
Note
If you don’t have compound butter on hand, you can add a small amount of unsalted butter on top of the hot steak. Another option is to make a quick garlic-herb butter in the pan while the steak rests.
Read more on the alternative aromatics finish options here.
Tools You’ll Need
- Oven-safe wire rack with baking sheet: Helps dry the steak evenly during dry-brining and prevents the hot skillet from overcooking the bottom of the steak during the oven finish.
- Pan: You can use a cast-iron skillet, a carbon-steel pan, or a heavy-bottomed stainless-steel skillet. However, I highly recommend cast iron because it retains heat extremely well, making it ideal for a hard sear and for building a deep, flavorful crust. It’s my go-to pan whenever I want an impressive crust on steak.
- Tongs: Use comfortable tongs that are long enough to keep your hands safely away from the hot pan and oil splatter.
- Meat thermometer: I highly recommend using a leave-in probe thermometer for this recipe. It lets you monitor the steak’s internal temperature from start to finish, especially during the oven stage. An instant-read thermometer also works, but you’ll need to check the steak more often to avoid overcooking.
- Oven: You can use regular bake or convection bake; both work well. Just keep in mind that convection can cook the steak slightly faster, so start checking the internal temperature a little earlier if you are using an instant-read meat thermometer.
How to Cook a 2-inch (5 cm) Thick Steak
Here’s a bird’s-eye view of the process, but to ensure success, I highly recommend following the step-by-step instructions, with photos and ingredient quantities, in the recipe card below. Also, be sure to read the “Recipe Success Tips” and FAQs section below.
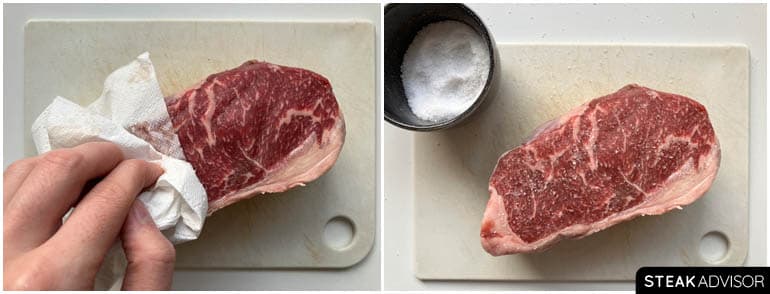
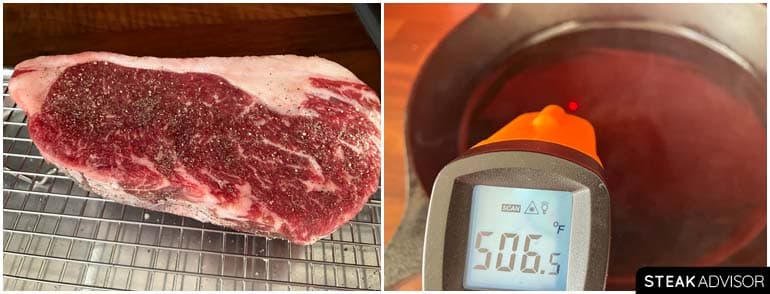
- Pat the steak completely dry with paper towels, then season it generously with kosher salt on all sides. Place it uncovered on an oven-safe wire rack set over a baking sheet and let it dry-brine in the fridge for 1 to 6 hours.
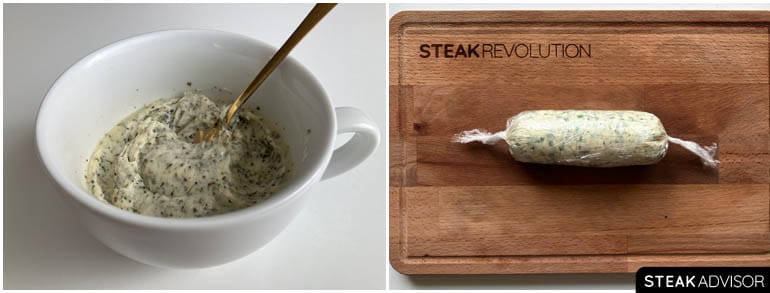
- Optional: While the steak is dry-brining, make the compound butter by mixing softened butter with salt, black pepper, garlic, and herbs. Cover and refrigerate until needed.
- You can shape it into a classic compound butter log or use the quicker bowl method. Here’s my step-by-step garlic-herb compound butter recipe with instructions for both versions.
- About 15 minutes before cooking, take the steak out of the fridge and let it sit at room temperature.
- Preheat the oven to 275°F (135°C). Heat a heavy pan, such as cast iron, carbon steel, or stainless steel, over medium-high heat for 3–4 minutes. Add the high-smoke-point oil and let it heat for another minute.
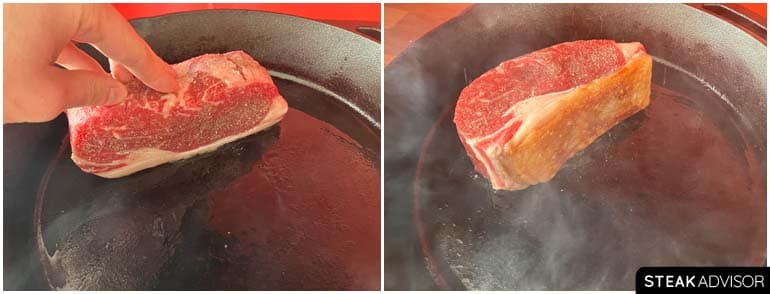
- Just before searing, pat the steak dry with paper towels again. If using black pepper, season both sides with finely ground black pepper.
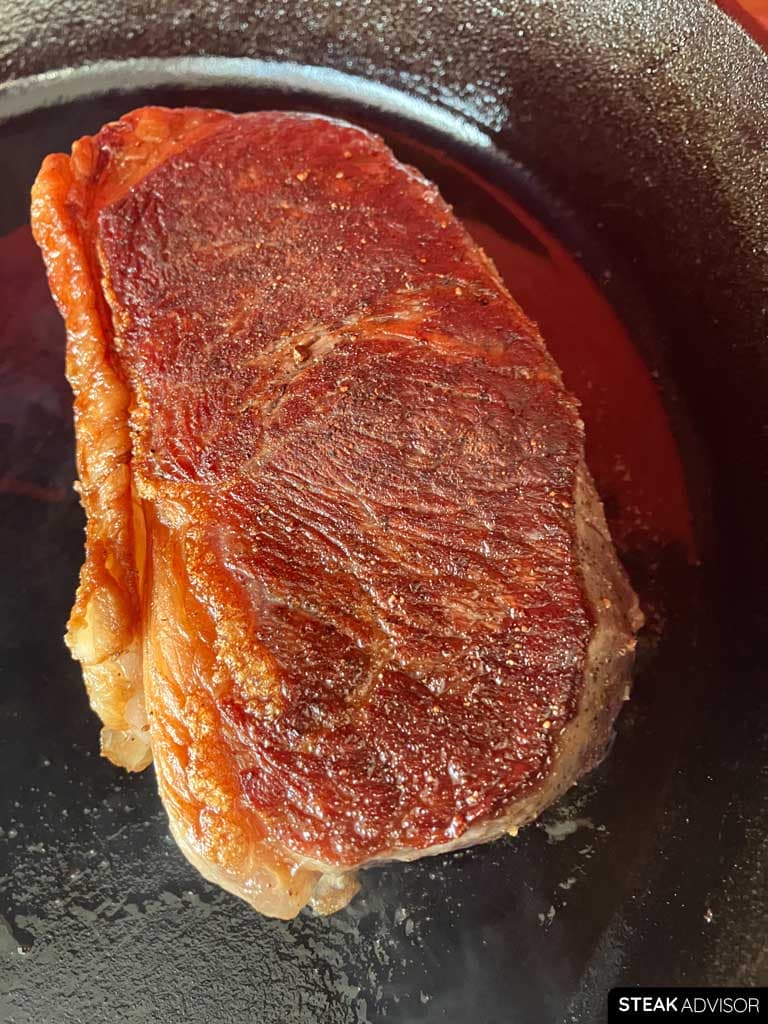
- If the steak has a fat cap, start by searing it fat-side down until it’s nicely browned. Then lay the steak flat in the pan, press it down gently for full contact, and sear, flipping every 30 seconds.
- Sear for up to 5 minutes for a well-marbled cut, or up to 4 minutes for a lean cut like filet mignon. Avoid searing much longer to keep the gray band smaller.
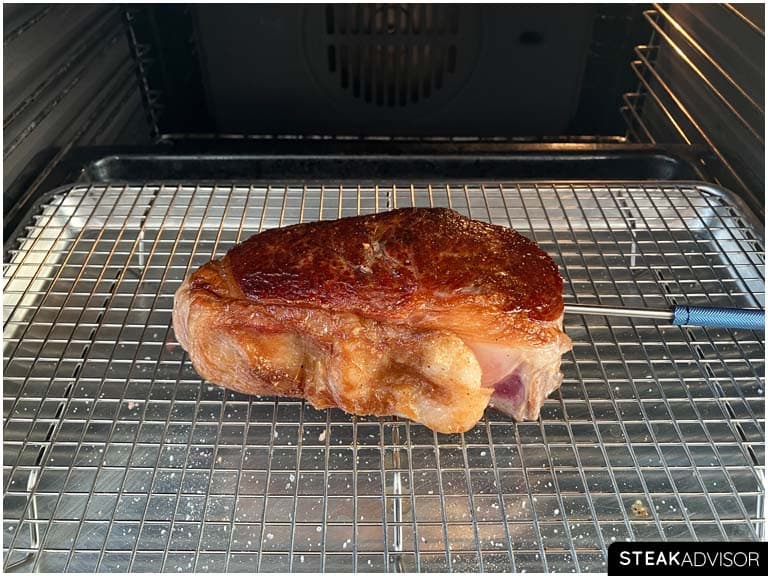
- Transfer the steak to an oven-safe wire rack set over a baking sheet and finish it in the center of the oven until it reaches about 10°F (6°C) below your final target temperature (see the temperature chart below).
- If finishing it in the same oven-safe pan, pull it about 15°F (8°C) below your target instead, since the hot pan will keep cooking the bottom more aggressively.
- Once the steak reaches your target pull temperature, carefully remove it from the oven and let it rest uncovered for 5 minutes before slicing.
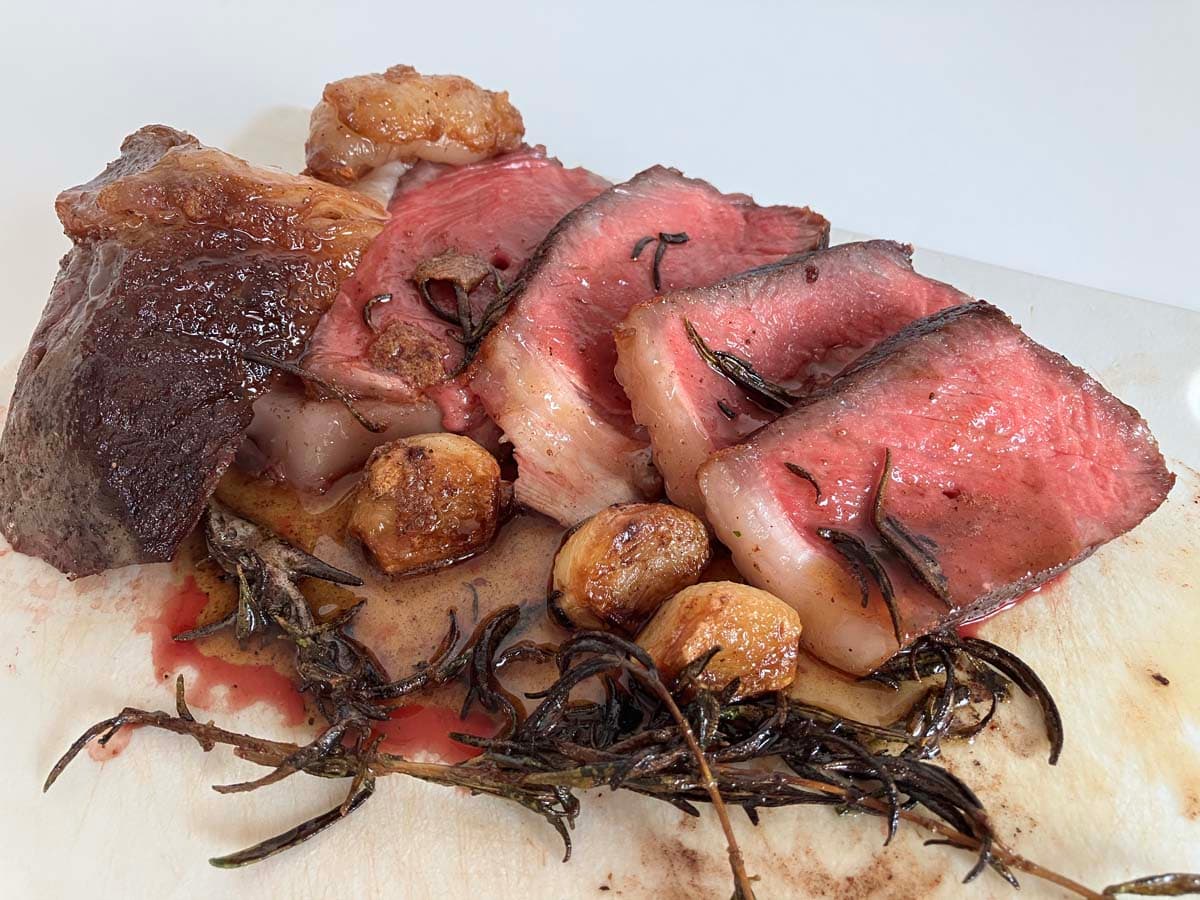
- Finish the steak: Top it with compound butter, plain butter, or pan butter with garlic and herbs. Slice thinly and serve.
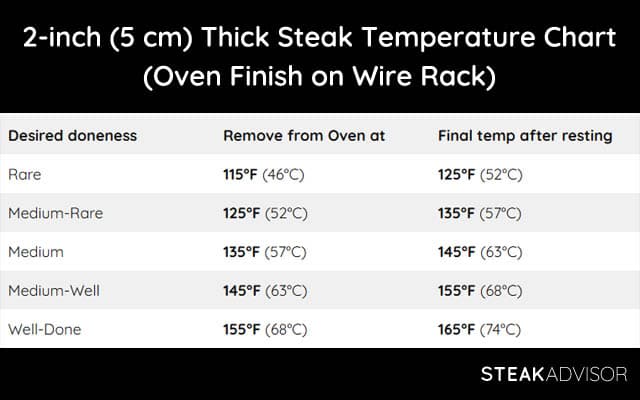
Steak Temperature Chart (Pan-Sear and Oven-Finish)
These guidelines apply only to steaks cooked with the two-stage method described in this recipe: a pan sear first, followed by an oven finish.
For steaks finished in the oven on a wire rack:
With this recipe, I expect about 10°F (6°C) of carryover cooking during a 5-minute rest after cooking the steak in the oven on a wire rack set over a baking sheet. That’s why I remove it from the oven before it reaches the final target temperature.
Use the pull-temperature column as your guide; the final-temp column shows the expected temperature after resting.
| Desired doneness | Remove from Oven at | Final temp after resting |
| Rare | 115°F (46°C) | 125°F (52°C) |
| Medium-Rare | 125°F (52°C) | 135°F (57°C) |
| Medium | 135°F (57°C) | 145°F (63°C) |
| Medium-Well | 145°F (63°C) | 155°F (68°C) |
| Well-Done | 155°F (68°C) | 165°F (74°C) |
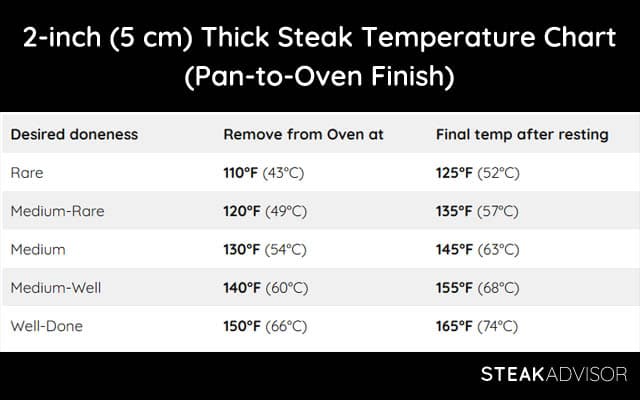
For steaks finished in the oven in the same pan:
When the steak stays in the hot, oven-safe pan during the oven stage, expect more carryover cooking than with the wire rack method because the pan continues to cook the bottom of the steak more aggressively. Remove the steak from the oven about 15°F (8°C) below your final target temperature.
| Desired doneness | Remove from Oven at | Final temp after resting |
| Rare | 110°F (43°C) | 125°F (52°C) |
| Medium-Rare | 120°F (49°C) | 135°F (57°C) |
| Medium | 130°F (54°C) | 145°F (63°C) |
| Medium-Well | 140°F (60°C) | 155°F (68°C) |
| Well-Done | 150°F (66°C) | 165°F (74°C) |
Recipe Success Tips
- Dry-brine the steak for 4–6 hours for much better flavor and better browning, but avoid going much longer if you want to keep the gray band from getting thicker.
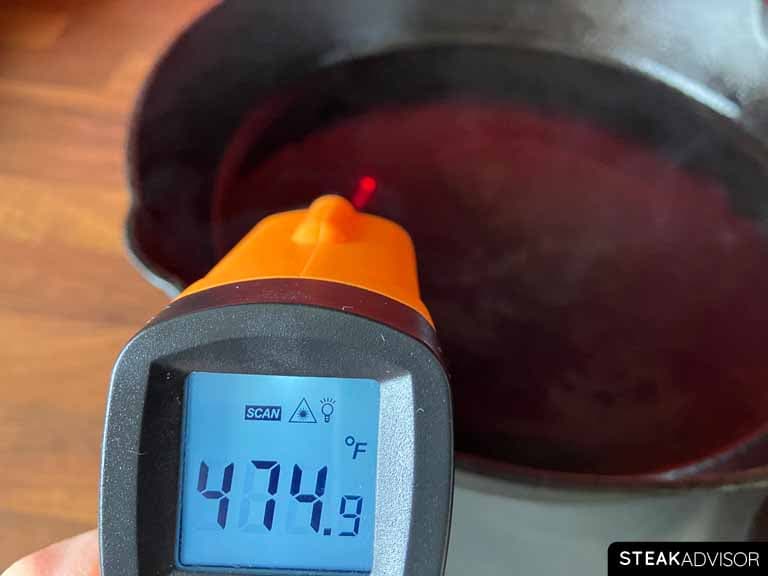
- Preheat the pan until it’s very hot, around 500°F (260°C).
- Use a high-smoke-point oil for searing, not butter.
- Do not sear the steak in regular butter.
- Pat the steak dry right before searing to remove surface moisture and help build a better crust.
- Flip the steak every 30 seconds for more even cooking.
- Transfer the steak to a wire rack set over a baking sheet before placing it in the oven.
- Use a meat thermometer instead of relying on cooking times.
- Remove the steak from the oven about 10°F (6°C) below your final target temperature if using a wire rack, or about 15°F (8°C) below if finishing it in the same pan.
- Add butter at the end, while the steak rests.
Below, I explain each tip in more detail and show you why it matters.
Dry Brine for Better Flavor, Not Just a Better Sear
Dry brining does more than help you get a better sear. It also gives the salt enough time to season the meat more deeply, which makes a big difference in flavor. And honestly, getting a good crust on a steak this thick isn’t that hard. That’s why, for this recipe, I care more about flavor than just surface browning.
Salt needs time to do its job. One hour is just the bare minimum. For the best results, I highly recommend dry-brining the steak for 4–6 hours. You can go longer if you want, but the longer the steak sits salted, the thicker the gray band under the crust gets. After about 8 hours, it becomes noticeably thicker, and after 12–24 hours, the difference is very significant.
That said, I still sometimes dry-brine steaks overnight when I want maximum flavor. The flavor is excellent, but you have to be okay with a more noticeable gray band and a slightly saltier taste. That gray band isn’t a sign of overcooking. The steak will still be juicy and tender, but it won’t have that clean, even pink doneness from edge to edge. I’m personally fine with that when I want maximum flavor, but it’s totally up to you.
For more details, check out my comprehensive salting steak guide, where I compare different salting times side by side, from quick salting to overnight dry brining, and show how each one affects flavor, texture, crust, and the gray band after cooking.
Preheat the Pan Properly
Heat is the key to a good sear. You can dry-brine the steak perfectly and pat it completely dry, but if the pan isn’t hot enough, you still won’t get a good crust.
The Maillard reaction, responsible for browning, starts around 285–340°F (140–170°C). The problem is that the pan cools down the moment the steak touches it. That’s why I like to preheat the skillet hotter than that range, ideally to about 450–500°F (232–260°C). This gives the pan enough heat reserve to keep searing hard after the steak goes in instead of wasting time evaporating moisture and slowly warming back up.
In my experience, a 12-inch (30 cm) cast-iron skillet set over medium-high heat on a large gas burner usually takes about 4–5 minutes to reach about 450–500°F (232–260°C). That’s the range where you can build a deep, flavorful crust without keeping the steak in the pan longer than necessary.
Use a High-Smoke-Point Oil
For this recipe, always use a high-smoke-point oil for searing. The pan gets very hot, usually around 450–500°F (232–260°C), and lower-smoke-point oils start smoking and breaking down quickly at those temperatures, which can affect the flavor of the steak.
My go-to is refined avocado oil because it has a neutral flavor and a very high smoke point, around 500°F (260°C). If you don’t have it, use one of the oils below. They all handle high heat well and work great for pan-searing.
| Type of Fat | Smoke Point ºF | Smoke Point ºC |
|---|---|---|
| Refined Avocado Oil | 520ºF | 270ºC |
| Refined Safflower Oil | 510ºF | 266ºC |
| Beef Tallow | 480ºF | 250ºC |
| Pecan Oil | 470ºF | 243ºC |
| Refined Peanut Oil | 450ºF | 232°C |
Do Not Sear the Steak in Regular Butter
Regular butter has a low smoke point, about 300°F (150°C). Since in this recipe we sear the steak in a pan that’s closer to 500°F (260°C), butter would burn quickly, which is why I don’t cook the steak in butter from the start.
Instead, I sear the steak in a high-smoke-point oil, finish it in the oven, and add the compound butter at the end while the steak rests. The residual heat gently melts the butter over the steak, giving you rich flavor without the risk of a burnt, bitter taste.
Pat the Steak Dry Right Before Searing
It’s a small step, but it makes a huge difference.
Moisture is one of the biggest enemies of a good sear. If the steak goes into the pan wet, the surface moisture has to evaporate before the meat can start browning properly.
In this recipe, you’ll sear the steak for about 4–5 minutes total, then transfer it to the oven. That’s enough time to build a decent crust, but if you want a much deeper, better-browned crust, I highly recommend patting the steak dry one more time right before placing it in the pan.
A drier surface starts browning almost immediately instead of wasting the first minute evaporating moisture. That gives the steak more time to build a deeper crust before it finishes in the oven.
Flip the Steak Every 30 Seconds
I know there’s a lot of advice out there saying you should flip a steak only once, but that rule is mostly a myth. Based on my experience, flipping the steak every 30 seconds is a better option. It helps the steak cook more evenly, gives you better control over the crust, and can even speed up the cooking slightly.
When the steak sits too long on one side, that side stays in direct contact with intense heat for too long. This can create a thicker, gray band under the crust and cause the inside to cook unevenly. Flipping every 30 seconds helps prevent that. Each side gets a short break from direct contact with the hot pan, so the outer layers don’t overheat as much before the center catches up. The result is a more even doneness inside and a better crust on the outside.
Use an Oven-Safe Wire Rack Instead of Finishing the Steak in the Pan
In many pan-to-oven steak recipes, the steak is transferred straight from the stovetop to the oven in the same pan. That method works, but it has one problem: the pan is still extremely hot after searing, and it won’t cool down quickly in a preheated oven.
Even if the oven temperature is low, the bottom of the steak is still sitting on a hot pan. The side in contact with the pan continues to receive direct heat, while the top and edges cook more gently from the surrounding oven heat. As a result, the steak cooks less evenly, especially if the oven step takes more than a few minutes.
That’s why I recommend transferring the steak to a wire rack set over a baking sheet before placing it in the oven. The steak finishes with gentler, more even heat around it, instead of getting extra direct heat from the skillet. It’s a simple change, but it gives you better control over doneness, especially with thicker steaks that need more than a few minutes in the oven.
Use a Meat Thermometer
I don’t include exact oven cooking times because there are too many factors that affect how long a steak takes to finish. The cut, thickness, oven temperature, and how hot or how long you seared it earlier all make a big difference.
The best option is to use a meat thermometer, ideally a leave-in probe thermometer. Set it to alert you when the steak is about 10–15°F (6–8°C) below your final target doneness, then relax or focus on the rest of the meal. That way, you don’t have to keep opening the oven or guess based on time. The thermometer will let you know exactly when the steak is ready to come out of the oven.
This takes the guesswork out of cooking and makes it much easier to hit the doneness you want without overcooking the steak.
Remember That the Steak Keeps Cooking as It Rests
When the steak comes out of the oven, its outer layers are still hotter than the center. As the steak rests, heat from the hotter outer layers continues to move toward the cooler center, raising the internal temperature by a few more degrees. This is called carryover cooking.
The exact carryover rise can vary depending on the oven temperature, searing time, and steak thickness. Just keep that in mind and follow the recipe as closely as possible for the most consistent results.
In my case, with a 2-inch (5 cm) strip steak cooked using this method, the internal temperature increased by about 10°F (6°C) during the first 5 minutes of resting. When I kept tracking it longer, it reached a total rise of about 15°F (8°C) after 9 minutes. So the steak went from 115°F (46°C) to 130°F (54°C) as it rested. Your results may vary, but with a thick steak cooked this way, you can usually expect a 10–15°F (6–8°C) carryover rise during the first 5–10 minutes of resting.
FAQs
Should I bake or broil the steak in the oven?
For this recipe, stick with baking. The steak already gets its crust from the hot pan, so there’s no need to broil it afterward. The oven’s role here is to cook the steak gently and evenly until it reaches your target temperature – without burning the outside.
Is it possible to cook a 2-inch (5 cm) thick steak only in the oven?
Yes, it’s possible, but it’s not the method I recommend. You’ll need a broiler and a meat thermometer, and even then, getting a decent crust in the oven is really hard – especially if you like your steak medium-rare or medium. Broiling also leaves a thicker gray band under the crust.
If you want better results and still plan to use the oven, go with a reverse sear (cook the steak low and slow in the oven, then finish it in a hot pan for the crust) or a classic forward sear (sear the steak over high heat in a pan to build a beautiful crust, then finish it gently in the oven).
That said, if all you have is an oven with a broiler, you can still cook the steak entirely in the oven. For the full details, check out my guide on How to Broil Steak in the Oven.
How can I finish the steak without compound butter?
You don’t have to use compound butter to finish the steak. A simple garlic-herb butter made in the same pan works just as well.
After the steak comes out of the oven and starts resting, place the pan over medium heat. Add a few peeled or lightly crushed garlic cloves and let them cook until lightly browned. Then reduce the heat to medium-low and add a couple sprigs of thyme or rosemary, along with 2 tablespoons (28 g) of unsalted butter. Let the butter melt gently, then turn off the heat.
Once the steak has rested, slice it and spoon the warm garlic-herb butter over the top. You’ll still get that rich butter, garlic, and herb flavor without making compound butter ahead of time.
You can also keep it simple and place a bit of unsalted butter on top of the steak as it rests. Another option is to use the same pan while the steak rests: lightly brown a few garlic cloves with a couple of sprigs of rosemary or thyme, then add the butter and let it melt. Spoon that garlic-herb butter over the sliced steak before serving.
Print
2-inch (5 cm) Thick Steak Recipe
- Prep Time: 15 mins
- Chill Time (optional): 1 to 6 hours
- Cook Time: 30 minutes
- Total Time: 45 minutes
- Yield: 1 Steak
Description
A reliable way to cook a thick 2-inch (5 cm) steak at home using the pan-sear and oven-finish method. You’ll get a juicy, edge-to-edge pink center and a beautifully browned crust. Top it with garlic-herb compound butter for a rich, restaurant-quality finish.
Ingredients
For steak:
- Any tender steak that’s 2-inch (5 cm) thick (ribeye, strip steak, tomahawk, cowboy steak, filet mignon)
- 2 tablespoons (30 ml) high-smoke-point oil (I recommend refined avocado oil)
- 1–2 teaspoons (5–10 g) kosher salt per steak (1-1.5% of the steak’s weight in salt)
- 1/2 teaspoon finely ground black pepper per pound (454 g) of steak (optional)
For compound butter: (optional)
- 1/4 pound (113 grams) unsalted butter
- 1–2 garlic cloves, finely chopped or pressed
- 1/4 teaspoon salt
- 1/2 teaspoon black pepper, finely ground
- 1 tablespoon parsley, finely chopped (fresh or dried)
- 1 tablespoon rosemary, finely chopped (fresh or dried)
Tools:
- Oven-Safe Wire Rack
- Baking Sheet
- Pan (a cast-iron, carbon steel, or heavy-bottomed stainless steel skillet)
- Tongs
- Oven
- Meat Thermometer (I highly recommend using a leave-in probe thermometer for this recipe)
Instructions
- Before you start, decide how you want to finish the steak. I highly recommend compound butter because it’s the easiest option and adds great flavor to the steak. If you don’t have time to prepare it, you can make a quick butter-garlic-herb mixture in the same pan while the steak rests.
- After that, gather your ingredients and tools, then follow the steps below.
Prepare the Steak
- Pat the steak dry on all sides with paper towels, then season it evenly all over with kosher salt. A good rule is to use about 1–1.5% of the steak’s weight in salt. For a thick 20 oz (567 g) steak, that usually comes out to roughly 1–2 teaspoons.
- Place it uncovered on a wire rack set over a baking sheet. Then choose the next step based on how much time you have and the result you want:
- If you plan to cook it soon, let it sit at room temperature for about 1 hour. That’s the bare minimum.
- For even better flavor and a superior crust, leave it uncovered in the fridge for 4–6 hours (that’s my go-to method for thick, 2-inch/5 cm steaks).
- Want to dry-brine it longer? See the notes below.
- If you don’t have at least 1 hour to let the steak rest after salting, don’t salt it in advance. Either season it right before it goes into the pan, or salt it after searing.
Make the Compound Butter (Optional)
- While the steak is dry-brining, make the compound butter and refrigerate it until needed. You can shape it into a classic log or use the quicker bowl method. Here’s my step-by-step garlic-herb compound butter recipe for both versions.
Preheat the Pan & Oven
- If you refrigerate the steak, take it out about 15 minutes before cooking.
- Set your oven to 275°F (135°C). While it warms up, get your pan ready for the sear.
- Place a heavy pan over medium-high heat and let it heat for 3–4 minutes. Add 2 tablespoons (30 ml) of high-smoke point oil and let it heat for another minute. Once the pan and oil are hot, you’re ready to sear.
Pan-Sear the Steak
- Just before searing, pat the steak dry with paper towels again.
- (Optional) If using black pepper, season the steak with 1/2 teaspoon of finely ground black pepper per pound (454 g) of steak.
- If the steak has a fat cap, start by searing it fat-side down until it’s nicely browned. Then lay the steak flat in the pan, press it down gently for full contact, and sear, flipping every 30 seconds.
- Sear for up to 5 minutes for a well-marbled cut, or up to 4 minutes for a lean cut like filet mignon (excluding the optional fat-side sear).
- Don’t go longer unless you’re okay with a thicker gray band under the crust. Once you’re happy with the crust, turn off the heat and move on to the next step.
Finish the Steak in the Oven (Wire Rack Method)
- Transfer the steak to a wire rack set over a baking sheet and finish it in the center of the oven until the internal temperature reaches about 10°F (6°C) below your final target temperature.
- For medium-rare, remove it from the oven at 125°F (52°C); for medium, 135°F (57°C); and for medium-well, 145°F (63°C).
- Let the steak rest for 5 minutes before slicing. For rare, well-done, and final rested temperatures, use the chart below.
Optional Pan-to-Oven Finish
- If you don’t have a wire rack but you do have an oven-safe pan, you can place the pan with the steak directly in the oven. With this method, cook the steak until the internal temperature reaches about 15°F (8°C) below your final target temperature.
- For medium-rare, remove it from the oven at 120°F (49°C); for medium, 130°F (54°C); and for medium-well, 140°F (60°C).
- Let the steak rest for 5 minutes before slicing. For rare, well-done, and final rested temperatures, use the chart below.
- See notes for how the wire rack method differs from the pan-to-oven finish.
Add Aromatics
- As the steak rests, place two thin slices of compound butter on top. If you don’t have compound butter, place a bit of unsalted butter.
- Another option is to sear a few garlic cloves and a couple of sprigs of rosemary or thyme in a pan over medium-high heat while the steak rests. Then, melt some butter in the same pan and spoon that mixture over the steak right before serving.
Serve the Steak
- Once the steak has rested, slice it thinly and serve it with your favorite sides.
- If you skipped the compound butter and used the pan juices instead, pour them over the sliced steak right before serving.
Notes
Dry brining for 12-24 hours: You can dry-brine the steak for 12–24 hours, but expect a thicker gray band under the crust. The flavor and crust will be excellent, but not everyone likes the deeper, saltier flavor that develops after a long dry brine, especially when the steak sits closer to 24 hours. If you want to try a longer dry brine, I recommend starting with 12 hours first. Then, next time, you can go longer and see if you like the difference. Just keep in mind that the closer you get to 24 hours, the more noticeable the gray band under the crust becomes.
Difference between the wire rack method and pan-to-oven finish
You can finish the steak in the oven two different ways. The method you choose affects how evenly it cooks inside and how much of a gray band forms under the crust.
Option 1: Wire Rack Method (my preferred method): With air circulating all around, the steak cooks more evenly on both sides, and you get a much smaller gray band under the crust.
Option 2: Pan-to-Oven Method (if you don’t have a wire rack): With this method, the steak cooks less evenly because the bottom sits on a very hot pan while the top is exposed to the gentler oven heat. A larger temperature difference creates a stronger temperature gradient inside the steak, leading to a thicker gray band just under the crust, and may also lead to a slightly bigger carryover rise as the steak rests.
Other Ways to Cook a 2-Inch (5 cm) Thick Steak
For this recipe, I’m sticking with one of the most practical ways to cook a 2-inch (5 cm) thick steak at home without any fancy tools: the pan-sear-and-oven-finish method. But if you prefer a different technique, here are a few great options to consider:
- Sous Vide: The most foolproof method for steaks about 2 inches (5 cm) thick. It’s perfect if you’re working with a well-marbled or expensive cut and want to avoid any risk of overcooking. No thermometer required, just a sous vide machine and a pan or grill to sear for the crust at the end. For a cut this thick, expect a cook time of about 3.5 to 4 hours. The payoff? Perfect, edge-to-edge doneness every time.
- Reverse Sear: Takes about half the time of sous vide and still gives you great control. It’s not quite as foolproof, but as long as you follow the steps, it’s still very beginner-friendly. Reverse searing gives you a beautiful golden-brown crust on the outside and perfect edge-to-edge doneness inside. You can do it oven-to-pan or entirely on the grill.
- Broiling: Broiled steak cooks quickly and fairly evenly, but the crust won’t be as good, and the gray band will be a bit thicker than with reverse searing. It’s also less consistent than other methods, since results depend on the oven, how hot the broiler actually gets, and a few other variables. Still, it’s a good option if all you have is an oven with a broiler. I just wouldn’t use it for really nice, expensive cuts, where better control and a stronger crust matter more.
More Steak Recipes
This recipe works best with steaks 2 inches (5 cm) thick or more. If your steak is thinner, you’ll get better results by following one of my other recipes:
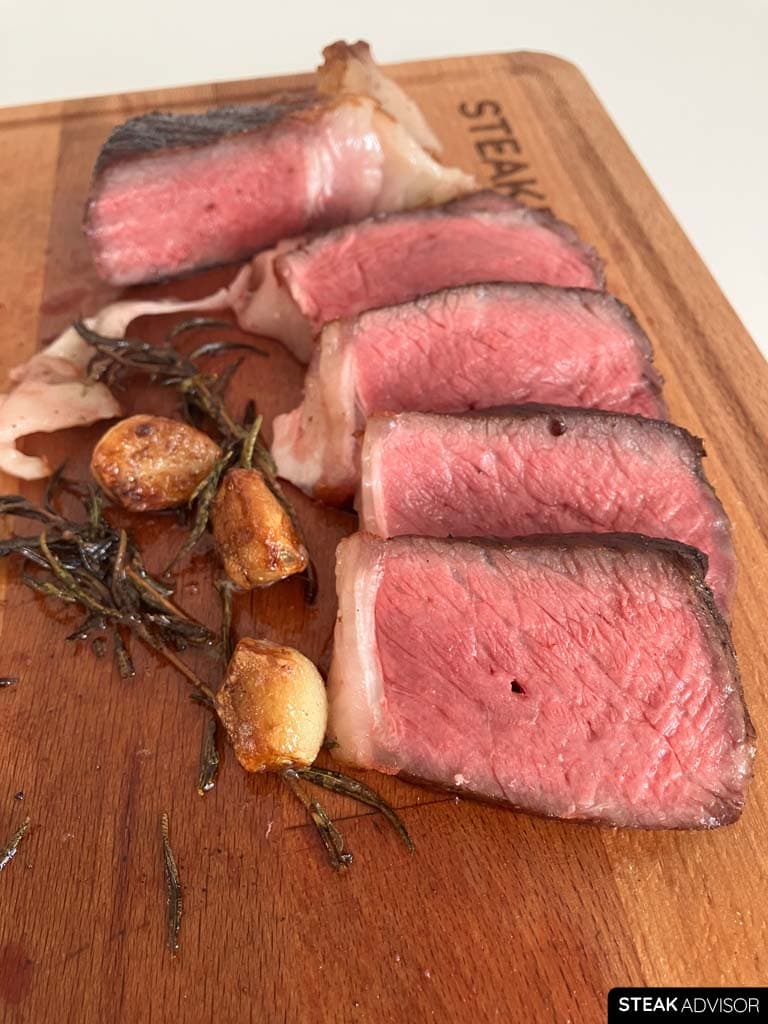
This method worked great for my 2-inch ribeye. I liked that I could get a strong sear first, then let the oven finish the center more gently. The crust was excellent and the inside came out evenly cooked.
Love to hear that. Glad it cooked evenly!
I’ve actually started to prefer this method over reverse searing. It feels quicker and more foolproof for me, and my 2-inch steak turned out amazing. Thanks for the recipe!
Thanks, Chris!