A good pan-seared steak should have a well-browned crust, a juicy center, and rich flavor from simple seasoning, butter, garlic, and herbs. In this guide, I’ll show you the method I use to cook steak entirely on the stove, with clear steps, practical tips, and the key details that make the biggest difference.
Important
I developed this recipe for steaks that are about 1 to 1 1/2 inches (2.5–3.8 cm) thick. If your steak is thinner or thicker, you’ll get better results by following one of my other guides instead:
- 1/2-inch (1.3 cm) Steak in a Pan
- How to Cook a Thick Steak

Pan-searing is one of the best ways to cook most steaks. It doesn’t take long, but there are a few key rules you need to follow to get it right: the pan needs to be hot, the steak surface needs to be dry, the oil has to handle high heat, and the steak should be cooked to temperature, not strictly by time. Once you understand the technique, you can use it for almost any steak without relying strictly on a recipe.
Ingredients You’ll Need
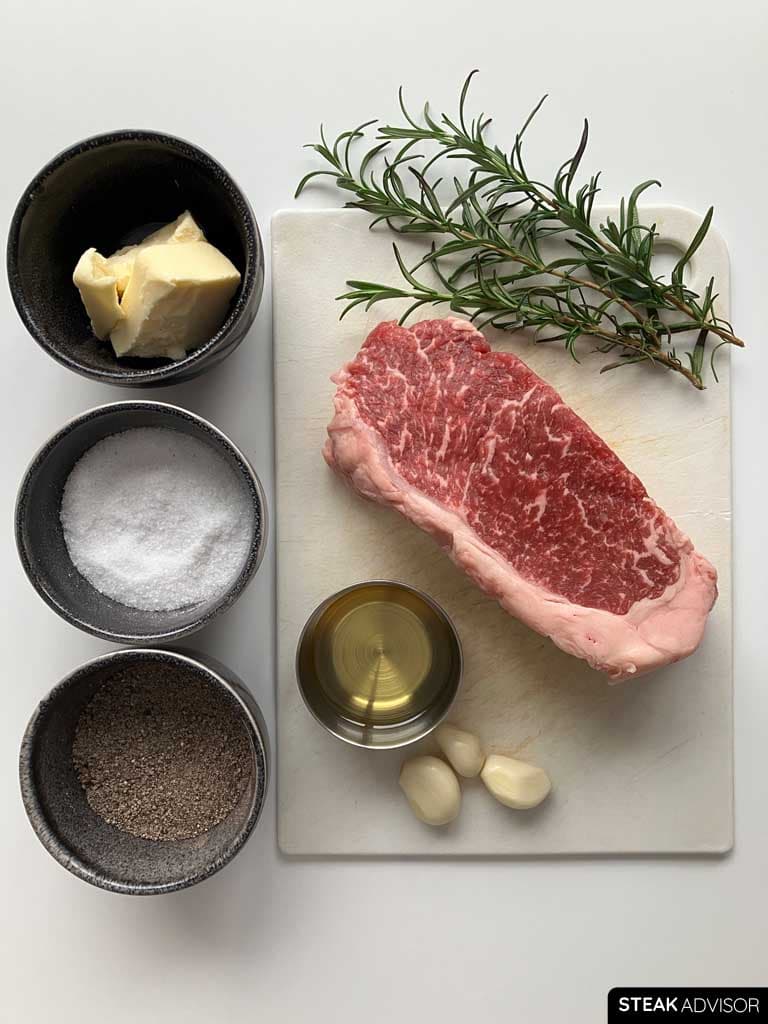
Here’s a quick visual overview of the key ingredients you’ll need for this recipe, along with important notes. For amounts, see the full recipe card below.
Ingredient Notes
Main Ingredients for Pan-Seared Steak
- Steak: Use a naturally tender cut, ideally 1 to 1 1/2 inches (2.5–3.8 cm) thick. I’m using a strip steak for this recipe, but ribeye, filet mignon, picanha, or another tender, thicker cut will work well too. For more options, see the FAQ section below.
- High-smoke-point oil: I recommend refined avocado oil, as it has a very high smoke point and a neutral flavor. If you don’t have it, see the Recipe Success Tips section below for suitable alternatives.
- Kosher salt: A good starting point is about 1% of the steak’s weight in salt, or up to 1.5% if you prefer a stronger, more seasoned flavor. For example, for a 500 g steak, use about 5 g of salt, or up to 7.5 g for a more seasoned flavor. Kosher salt or another coarse salt works best because it’s larger grains are easier to distribute evenly over the meat surface. Avoid fine table salt because it dissolves quickly and makes it much easier to overseason the steak. For the most consistent results, measure the salt by weight, not volume, because different salts can vary a lot in density.
- Black pepper (optional): Use finely ground black pepper. It stays close to the surface, helping the steak make better contact with the pan. Coarsely cracked pepper can create small gaps between the meat and the pan, making it harder to get an even sear.
Optional Finishing Options
You don’t need much to make a great steak, but these extras take the flavor to another level. My favorite option is compound butter because it adds rich, buttery flavor while the steak rests, without complicating the cooking process.
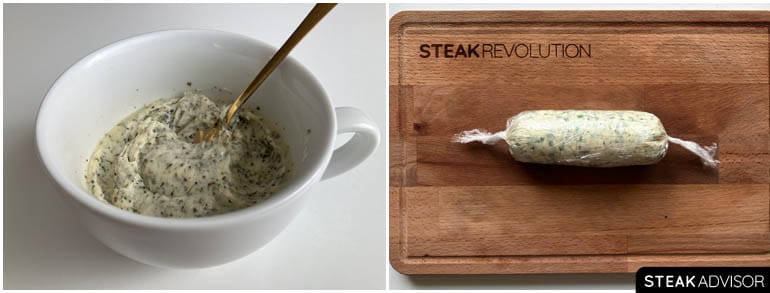
- Compound butter: Place a small amount on top of the steak while it rests, or right before serving, so it melts over the hot surface. For this recipe, I recommend garlic-herb compound butter, but you can use another type if you prefer. For more ideas, check out my full list of steak butter recipes. The quickest and easiest option is to mix the compound butter in a bowl. If you want to make a larger batch and store it more conveniently, roll it into a log so you can slice off what you need later.
- Quick garlic-herb butter, alternative: If you don’t have compound butter, make a quick garlic-herb butter in the same pan while the steak rests. Lightly brown a few smashed garlic cloves, add a few sprigs of rosemary or thyme, then add the butter and let it melt. Spoon the warm garlic-herb butter over the sliced steak before serving.
The Tools You’ll Need
- Wire rack with baking sheet: Useful for dry-brining. It keeps the steak lifted rather than sitting flat on a tray, allowing air to circulate around it and helping the surface dry more evenly.
- Pan: Whatever you do, don’t use a nonstick pan for searing steak. A proper sear requires very high heat, which can damage the coating and may release fumes. Instead, use a pan that can handle and retain high heat, such as a cast-iron skillet, a carbon-steel pan, or a heavy-bottomed stainless-steel skillet. I highly recommend a cast-iron skillet because it retains heat extremely well, making it easier to build a deep, flavorful crust.
- Tongs: Use any sturdy tongs that are long enough to flip the steak comfortably and keep your hands away from the intense heat and oil splatter.
- Meat thermometer: The most reliable way to hit your target doneness. Use whichever type you prefer: an instant-read thermometer is perfect for quickly checking the steak’s internal temperature. A leave-in probe thermometer works great if you want to monitor the temperature as the steak cooks (from start to finish).
How to Pan-Sear Steak on the Stove
Here’s a bird’s-eye view of the process, but to ensure success, I highly recommend following the step-by-step instructions, with photos and ingredient quantities, in the recipe card below. Also, be sure to read the “Recipe Success Tips” and FAQs section below.
- Prepare the steak: Pat the steak dry with paper towels. If needed, trim any excess fat and cut the steak into similarly sized pieces so they cook more evenly. This is especially useful for long or uneven cuts, such as skirt steak or hanger steak.
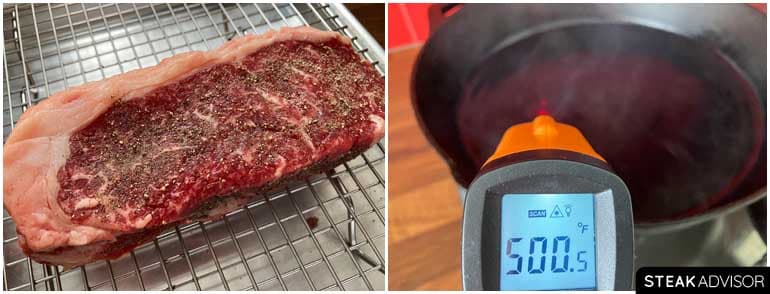
- Season all sides with kosher salt, then place the steak uncovered on a wire rack set over a baking sheet. Refrigerate for at least 1 hour, or ideally 4–6 hours, for the best balance of flavor, crust, and a thinner gray band.
- If you don’t have at least 1 hour, don’t salt the steak in advance. Season it right before searing, or salt it after cooking. This isn’t my preferred option, but it’s better than salting the steak 10–20 minutes before it hits the pan, when the surface is wet and much harder to sear properly.

- Optional: Make the compound butter. While the steak is dry-brining, make the compound butter. For this recipe, I recommend garlic-herb compound butter. You can use the quick bowl method, or roll it into a log if you want to store it and slice off portions more easily later. For both versions, see my step-by-step garlic-herb compound butter recipe.
- Take the steak out of the fridge 15 minutes before cooking.
- Heat the pan: Place a heavy pan over the largest burner set to medium-high heat and let it preheat for 3–4 minutes, until the surface is very hot, ideally around 450–500°F (232–260°C). Add oil and let it heat for about 1 more minute. While the oil heats, pat the steak dry one more time.
- If using black pepper, season the steak with finely ground black pepper right before searing.
- Sear the steak: Before searing, turn on your exhaust fan or open a window, because high-heat searing will create some smoke.
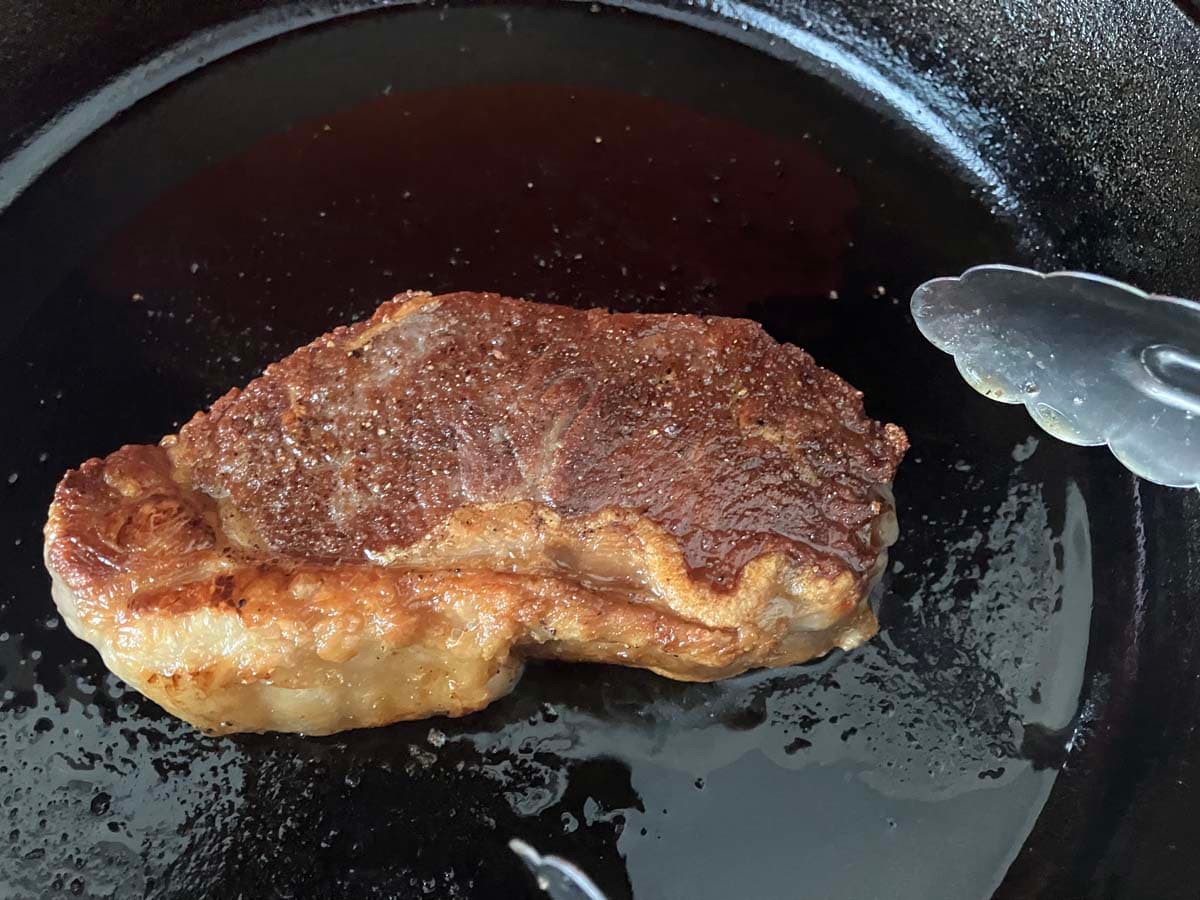
- If the steak has a fat cap, such as a strip steak or picanha, start by rendering it for 60–90 seconds, or until nicely browned. Then lay the steak flat in the pan and sear it, flipping every 30 seconds, until the internal temperature is about 15–20°F (8–11°C) below your target doneness. Use the temperature chart below as your guide.
- Once the steak reaches your target pull temperature, remove it from the pan and let it rest uncovered for 5 minutes before slicing.
- Finish the steak: While the steak rests, you can leave it as is, top it with compound butter, or make a quick garlic-herb butter in the same pan. If using compound butter, place it on top of the hot steak so it melts as the steak rests. If making garlic-herb butter in the pan, spoon it over the sliced steak right before serving.

Pan-Seared Steak Temperature Chart
These guidelines apply only to steaks seared in a pan from start to finish as described in this recipe. Use the charts below as a pull-temperature guide, not a final-temperature chart.
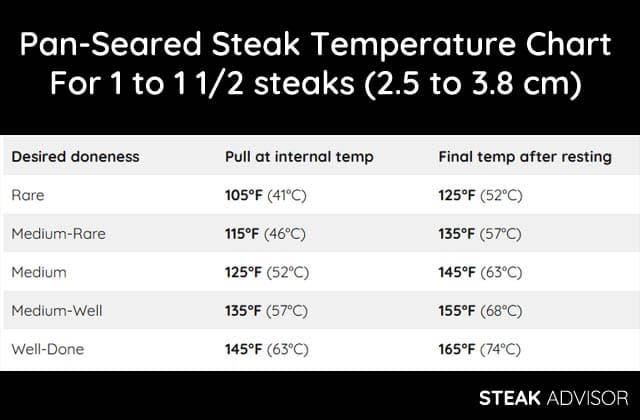
For steaks 1 to 1 1/2 inches (2.5 to 3.8 cm) thick
With this recipe, I expect about 20°F (11°C) of carryover cooking during a 5-minute rest for steaks 1 to 1 1/2 inches (2.5–3.8 cm) thick. That’s why I pull the steak from the pan before it reaches the final target temperature.
| Desired doneness | Pull at internal temp | Final temp after resting |
| Rare | 105°F (41°C) | 125°F (52°C) |
| Medium-Rare | 115°F (46°C) | 135°F (57°C) |
| Medium | 125°F (52°C) | 145°F (63°C) |
| Medium-Well | 135°F (57°C) | 155°F (68°C) |
| Well-Done | 145°F (63°C) | 165°F (74°C) |
For Steaks Thinner Than 1 Inch (2.5 cm)
For steaks thinner than 1 inch (2.5 cm), expect less carryover cooking during the same 5-minute rest. Pull them from the skillet about 15°F (8°C) below your target final temperature.
| Desired doneness | Pull at internal temp | Final temp after resting |
| Rare | 110°F (43°C) | 125°F (52°C) |
| Medium-Rare | 120°F (49°C) | 135°F (57°C) |
| Medium | 130°F (54°C) | 145°F (63°C) |
| Medium-Well | 140°F (60°C) | 155°F (68°C) |
| Well-Done | 150°F (66°C) | 165°F (74°C) |
Tips for the Best Pan-Seared Steak
Go for a Thicker Steak, Not a Thin One
This recipe works best with steaks at least 1 inch (2.5 cm) thick, ideally closer to 1 1/2 inches (3.8 cm).
That thickness gives you enough time to build a good crust on the outside while keeping the center medium-rare to medium. It also gives you more room for error, which is especially helpful if you’re still learning how to pan-sear steak.
Keep this in mind:
- With steaks thinner than 1 inch (2.5 cm), it’s hard to get both a good crust and a medium-rare or medium center.
- With very thick steaks, about 2 inches (5 cm) or more, the outside can get too dark or even start to burn before the center reaches medium-rare or medium. For steaks that thick, a two-stage method like reverse sear or pan-sear-and-oven-finish works better.

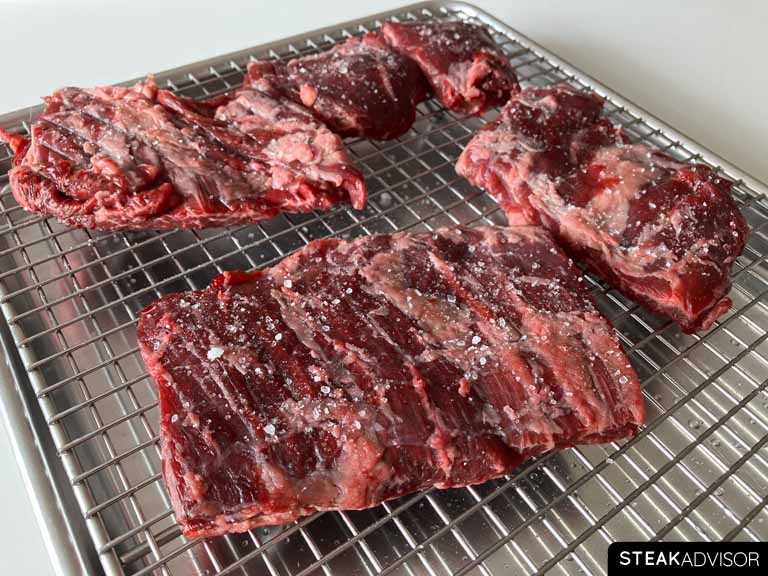
Cut Uneven Steaks Into Similar-Sized Pieces
Some steaks have an uneven shape, unlike a simple ribeye, filet mignon, or strip steak. Good examples are skirt steak, hanger steak, and flap steak. These cuts can vary significantly in thickness across the same piece of meat.
Skirt steak is a perfect example. One part can be only about 1/4 inch (0.6 cm) thick, while another part can be closer to 1 inch (2.5 cm). That’s a huge difference when you’re cooking over high heat in a pan.
If you sear the whole steak as one uneven piece, the thinner sections will cook much faster than the thicker ones. By the time the thick part reaches your target doneness, the thin part may already be overcooked. Or, if you remove the steak when the thin part is ready, the thicker section may still be undercooked.
That’s why, while trimming and preparing the steak, I recommend cutting it into more similar-sized pieces. They don’t have to be perfectly identical, but try to separate the thinner and thicker sections so each piece cooks at a similar rate.
This is helpful for any steak cooked over high heat in a pan, but it matters even more for cuts that vary a lot in shape and thickness, such as skirt steak, flap steak, and hanger steak.
Pat the Steak Dry Before Seasoning and Again Before Searing
Moisture is one of the biggest enemies of a good sear. Before the Maillard reaction (browning) can occur and create that deep, golden-brown crust, surface moisture must first evaporate.
If the steak is wet when it hits the pan, the surface moisture has to evaporate before the steak can start browning properly. That wastes valuable time, especially with thinner steaks, where the inside can overcook before the outside has a chance to develop a nice crust.
That’s why you should pat the steak dry thoroughly with paper towels on all sides before seasoning, then pat it dry one more time right before it goes into the pan. This second drying step matters more because moisture can still collect on the surface while the steak sits or while the pan heats up.
The drier the steak’s surface is when it hits the pan, the faster it starts browning, and the better the crust will be.
Salt the Steak at Least 1 Hour Before Cooking
Salting the steak at the right time makes a big difference.
A steak salted and rested uncovered for at least 1 hour will brown better and taste more evenly seasoned than one salted right before cooking. For even better results, let the salted steak rest uncovered in the refrigerator for 4–6 hours. That’s my preferred window for the best balance of flavor, crust, and a thinner gray band.
This method is called dry-brining: salting the steak and leaving it uncovered in the refrigerator so the salt has time to penetrate the meat while the surface dries out.
Let me explain why.
After you salt a steak, the salt draws moisture to the surface. It then dissolves in that moisture, creating a salty liquid on the steak’s surface. Within 2–3 minutes, the steak starts to look wet, and this usually peaks around 15–20 minutes after salting. Over the next 20–30 minutes, much of that salty liquid gets reabsorbed into the meat, and the surface starts to dry again. In total, this process usually takes about 45–60 minutes. Once it’s done, the steak has a noticeably drier surface, which helps it brown much better in the pan.
If you leave the steak uncovered in the refrigerator for a few more hours, the surface will dry even more due to air exposure. At the same time, the salt has more time to penetrate the meat, giving the steak a deeper, more evenly seasoned flavor that pairs perfectly with its natural beefy taste.
That’s why I recommend waiting at least 1 hour after salting before cooking. This is the bare minimum. For the best overall result, salt the steak and leave it uncovered in the fridge for 4–6 hours.

On the other hand, salting the steak and letting it sit for only a few minutes is one of the worst things you can do for the crust. During the 2–30-minute window after salting, the surface is wet, so the steak spends too much time evaporating moisture rather than forming a crust. If you have at least 1 hour, salt in advance. If you don’t, salt immediately before cooking – not 5–30 minutes before.
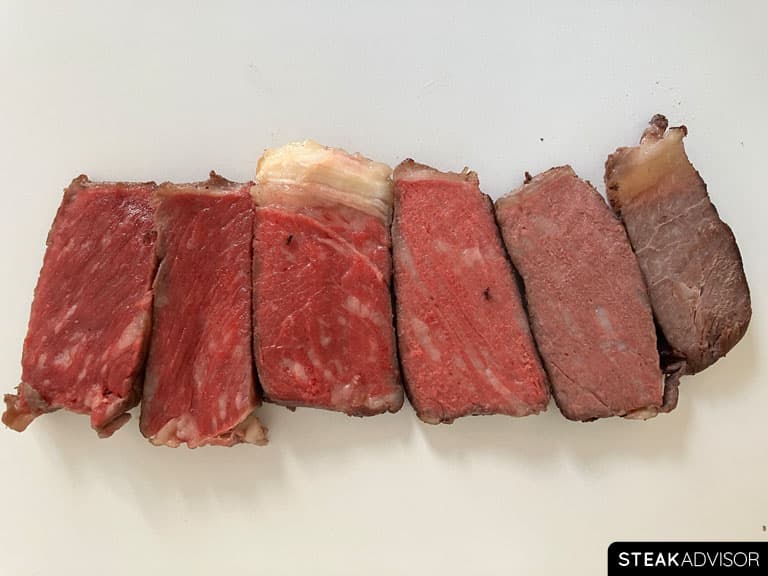
Also, don’t dry-brine the steak too long unless you know what to expect. The longer the steak sits salted, the more likely you’ll notice a gray band forming just under the crust. It doesn’t mean the steak is overcooked (it’s still tender and flavorful), but it doesn’t look as nice if you like a wall-to-wall pink interior.
A very long dry brine, especially around 24 hours, also gives the steak a deeper, saltier flavor. Some people like that, but not everyone does. That’s why, for the best overall balance, I usually stick to 4–6 hours.
I tested different salting times side by side, with photos of the crust, gray band, and surface moisture. You can see the full results here: How to Salt a Steak.
Preheat the Skillet Properly
Heat is the key to a good sear. You can dry-brine the steak perfectly and pat it completely dry, but if the skillet isn’t hot enough, you still won’t get a good crust.
The Maillard reaction, responsible for browning, occurs rapidly at 285–340°F (140–170°C). But as soon as the steak touches the pan, it draws heat from the surface, causing the pan temperature to drop immediately. That’s why you need to preheat the pan hotter than that, ideally to about 450–500°F (232–260°C).
This gives the pan enough heat reserve to keep searing hard after the steak goes in, instead of dropping too low and slowing down the browning process. In that range, the steak can start building a deep, flavorful crust almost immediately, without spending too much time in the pan and risking overcooking the inside.
In my experience, a 12-inch (30 cm) cast-iron skillet over medium-high heat on a large gas burner usually takes about 4–5 minutes to reach that range. At that point, the pan is hot enough to sear the steak properly without keeping it in the pan longer than necessary.

Use an Oil With a High Smoke Point
The pan needs to reach at least 400°F (204°C), and ideally closer to 500°F (260°C), so you can’t use just any oil. At these temperatures, you need the high-smoke-point oil.
Many common cooking oils start to smoke and break down at those temperatures, which can leave the steak with a burnt or bitter flavor. That’s why regular butter and extra-virgin olive oil aren’t good choices for searing steak. Their smoke points are too low, and they can burn before the steak has enough time to build a proper crust and reach the target pull temperature.
Instead, use a neutral oil with a smoke point around 500°F (260°C) or higher. My top choice is refined avocado oil because it has a high smoke point and a neutral flavor, but there are other good options too. See the table below.
| Type of Fat | Smoke Point ºF/ºC | Flavor profile |
|---|---|---|
| Refined Avocado Oil | 520ºF / 271°C | Neutral to very mild |
| Refined High-Oleic Safflower Oil | 510ºF / 266°C | Neutral |
| Refined High-Oleic Canola Oil | 475°F / 246°C | Neutral |
| Refined Pecan Oil | 470ºF / 243°C | Mildly nutty |
| Refined Canola Oil | 468°F / 242°C | Neutral |
| Refined Olive Oil | 465°F / 241°C | Mild to neutral |
| Refined Peanut Oil | 450ºF / 232°C | Neutral to mildly nutty |
| Refined Soybean Oil | 450°F / 232°C | Neutral |
| Clarified Butter / Ghee | 450°F / 232°C | Rich, buttery, mildly nutty |
| Refined Rice Bran Oil | 450°F / 232°C | Neutral to mildly nutty |
| Refined Corn Oil | 450°F / 232°C | Neutral to slightly sweet |
| Refined High-Oleic Sunflower Oil | 450°F / 232°C | Neutral |
| Refined Sunflower Oil | 450°F / 232°C | Neutral |
Smoke points are approximate and may vary depending on the product, degree of refinement, freshness, and method of measurement.
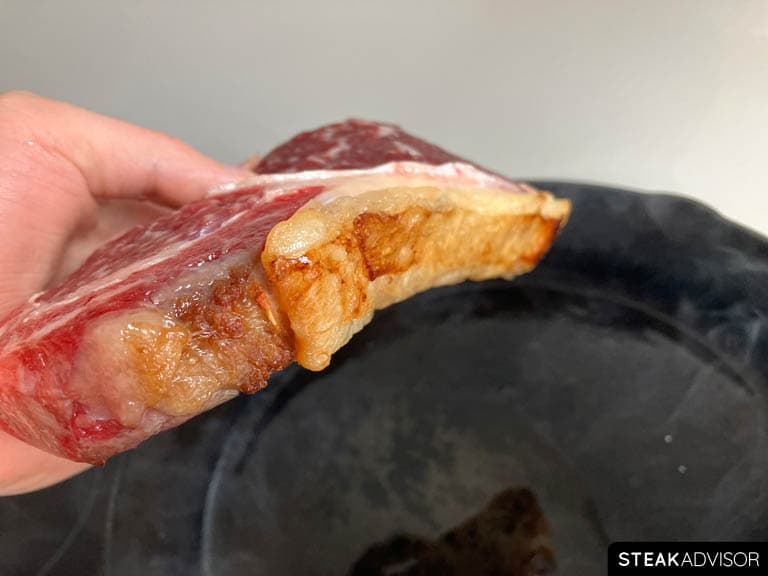
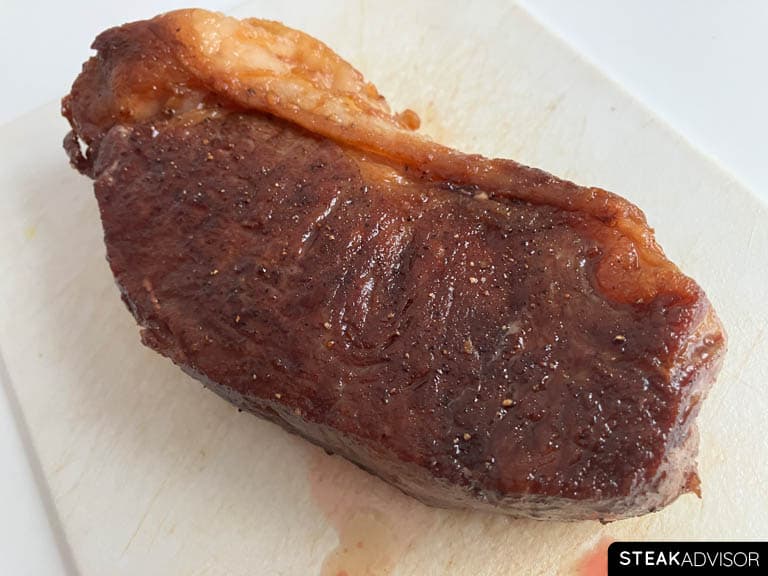
Render the Fat Cap First
If your steak has a thick strip of fat on one side, like a strip steak or picanha, start by rendering that fat before searing the flat meat sides of the steak.
The goal is to brown the fat until it’s lightly crisp and no longer pale or chewy. Over high heat, this usually takes about 1–2 minutes, depending on the thickness of the fat cap and the temperature of your pan.
You can render the fat cap near the end of cooking, but I prefer doing it at the beginning. This way, the fat has time to brown properly before the steak gets close to your target pull temperature. Rendering the fat cap first also gives you a little extra beef fat in the pan, which adds flavor.
It also gives you better control. Near the end of cooking, the steak is already close to its final temperature. If the fat cap still needs more time, you have to keep the steak in the hot pan longer to finish rendering the fat. That extra time at high heat can push the internal temperature higher than planned, making it easier to overshoot your doneness, especially with thinner steaks.
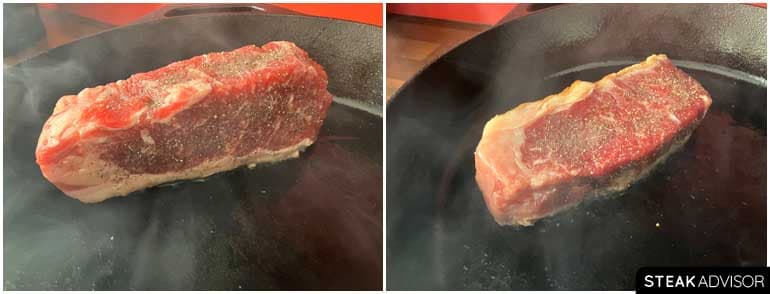
Flip the Steak Every 30 Seconds
Forget the old rule about flipping steak only once. When I sear steak in a hot pan, I get better browning, better control, and more even doneness by flipping it every 30 seconds.
If a steak sits too long on one side, the side touching the pan cooks much faster than the side facing up. This makes the steak cook less evenly, especially with thicker cuts about 1 1/2 inches (3.8 cm) thick, which need more time in the pan to cook through.
Flipping the steak every 30 seconds helps both sides cook more evenly and gives you better control over the crust. Each side gets enough direct contact with the hot pan to brown properly, but not so much that the layer under the crust overcooks too quickly. The result is a smaller gray band under the crust and more even doneness from edge to center.
Interestingly, this technique also makes the steak cook slightly faster. Since you keep turning the steak, heat moves into the meat more evenly from both sides, rather than building up mostly on one side at a time.
Skip the Butter Basting
Popular chefs often present butter basting as one of the best ways to cook a flavorful steak. It looks impressive, and yes, it adds that rich garlic-herb butter finish many people love while helping the crust brown a little better. But in practice, it also makes the cooking process much harder to control, especially for beginners.
Once you start butter basting, the cooking process gets more complicated. You have to lower the heat, add the butter, keep it from burning, tilt the pan, spoon the hot butter over the steak, keep flipping, and still watch the internal temperature. That’s a lot to manage, especially when the steak is already cooking quickly.
Butter basting also changes how the steak cooks. When you flip the steak every 30 seconds, the side facing up gets a short break from the hot pan, which helps it cool down slightly before it touches the surface again. But when you keep spooning hot butter over that side, it never really gets that break. As a result, the steak cooks faster, the outer layers stay hotter, and carryover cooking becomes more aggressive once the steak comes off the heat. That makes it much easier to overshoot your target doneness.
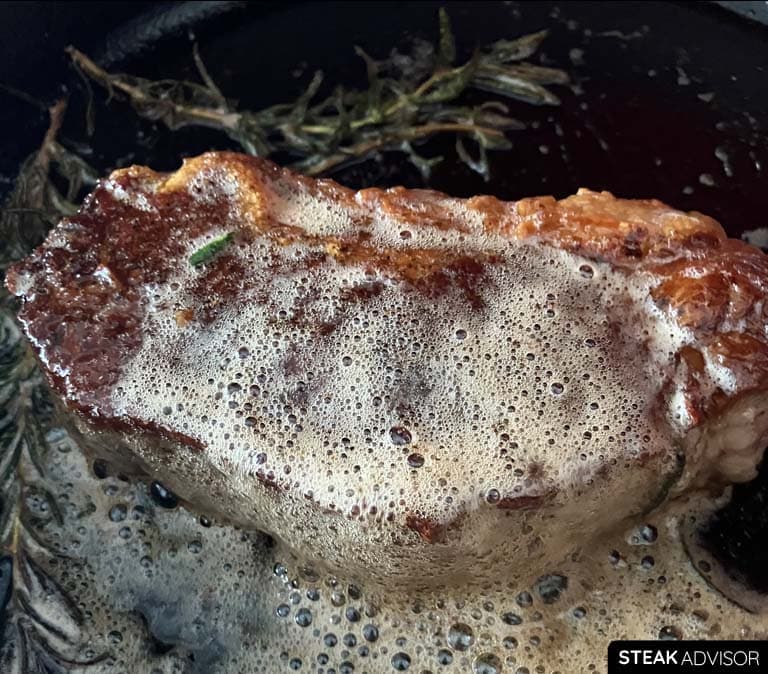
In my opinion, it’s not worth the extra effort. I also don’t like how much butter it uses. That’s why I recommend skipping it unless you’re very comfortable cooking steak in a pan, or you’re okay with a little less control over the final doneness.
Instead, I recommend searing the steak first in a high-smoke-point oil, focusing on building a good crust, and controlling the internal temperature. Then add butter after the sear.
You can place a slice of compound butter on top while the steak rests, or make a quick garlic-herb butter in the same pan and spoon it over the sliced steak before serving. You still get that rich garlic-herb butter flavor, but with much better control over the final doneness.
Cook to Temperature, Not Time
I don’t give strict cooking times in this recipe because they wouldn’t be reliable. Steak thickness, cut, pan temperature, stove power, starting temperature, and target doneness all change how fast the steak cooks.
Even steaks of the same thickness can cook very differently. For example, a 1-inch (2.5 cm) thick filet mignon cooks faster than a 1-inch (2.5 cm) thick ribeye because filet mignon is much leaner and has very little marbling, while ribeye is a well-marbled cut with much more intramuscular fat.
That’s why I always recommend using a meat thermometer. Track the steak’s internal temperature and remove it from the pan early enough to account for carryover cooking. It’s the only reliable way to know exactly where the steak is and to hit your target pull temperature consistently.

I also don’t recommend using the finger test to check doneness. Pressing the steak and judging doneness by firmness is too unreliable, especially because different cuts feel completely different. A filet mignon feels much softer than a strip steak, and a well-marbled ribeye won’t feel the same as a leaner cut. If you want consistent results, use a thermometer.
You don’t need anything expensive. Even a basic instant-read thermometer will do the job. But if you cook steak often and have around $50 to spend, I highly recommend getting a leave-in probe thermometer or a wireless meat thermometer. It lets you monitor the steak’s internal temperature from start to finish, giving you better control without having to check it repeatedly with an instant-read thermometer.
For the most accurate reading, insert the thermometer probe from the side into the center of the thickest part, away from bone or large pockets of fat.
Pull the Steak Early and Let It Rest
Resting a steak isn’t about “sealing in juices.” That’s a common myth. For pan-seared steaks, the main reason to pull the steak early is carryover cooking.
After you remove the steak from the pan, it keeps cooking for a few more minutes. The outer layers are still much hotter than the center, so as the steak rests, that heat continues moving inward. As a result, the internal temperature continues to rise even after the steak is off the heat.
With fast, high-heat methods like pan-searing, this rise is much bigger than most people expect. For steaks about 1 to 1 1/2 inches (2.5–3.8 cm) thick, I usually see about 15–20°F (8–11°C) of carryover cooking during a 5-minute rest.
For this recipe, I recommend pulling the steak from the pan when it’s about 20°F (11°C) below your final target temperature.
Here’s an example. The graph below shows what happened after I removed a 1 1/4-inch (3.2 cm) thick steak from the pan. I pulled it at 110°F (43°C), then tracked how much the internal temperature increased as it rested.
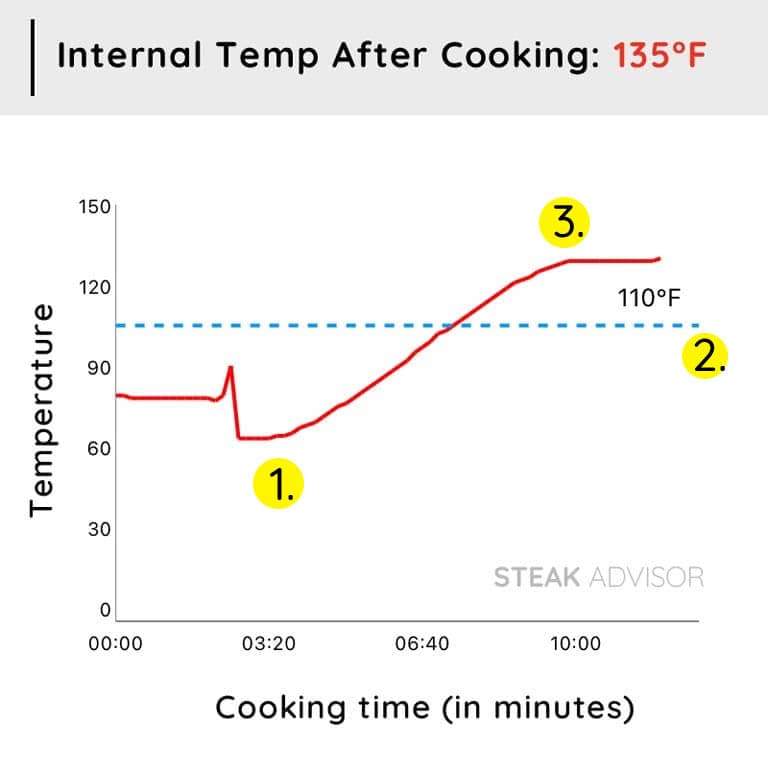
- In the graph, the sharp drop at the beginning marks the moment the probe entered the steak and began measuring its internal temperature.
- The blue line marks 110°F (43°C), the temperature at which I removed the steak from the pan.
- After that, you can see the temperature continue to rise for the next few minutes due to carryover cooking, until it finally stabilizes.
For this recipe, let the steak rest uncovered for about 5 minutes. Set it on a wire rack, cutting board, or plate, and don’t touch it during that time. Avoid covering it with foil, because it traps steam and softens the crust.
This advice applies to steaks cooked quickly over direct high heat, such as pan-seared steaks. It does not apply the same way to sous-vide or reverse-seared steaks, where carryover cooking is much lower.
For more details, see my guide: Resting Steak After Cooking: Why You Should and for How Long. I also recommend testing this yourself with a meat thermometer. Track the steak’s internal temperature after it comes out of the pan and see how much it rises with your own setup, pan, stove, and cooking style.
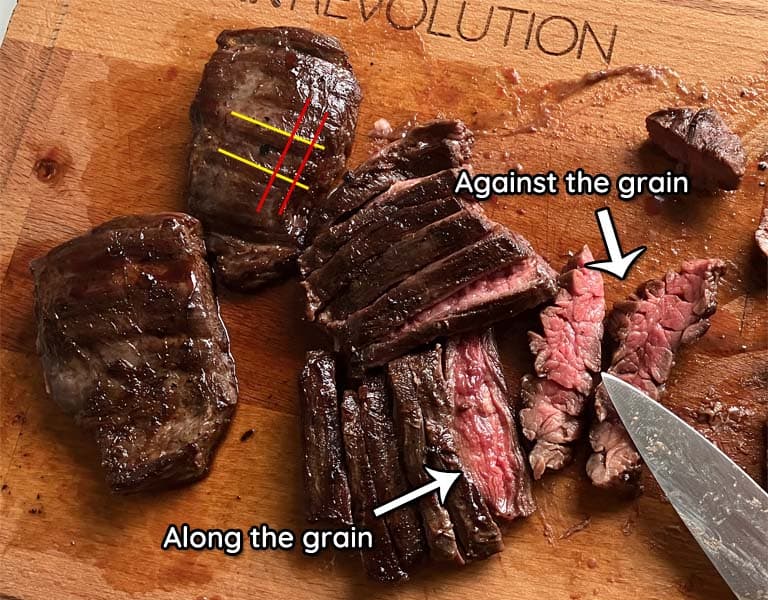
Slice Against the Grain When It Matters
Naturally tender cuts, such as ribeye, strip steak, or filet mignon, are already tender enough that slicing them one way or another doesn’t make a huge difference. But with cuts that have longer, coarser muscle fibers, such as skirt steak, flank steak, hanger steak, or flap steak, slicing against the grain matters a lot.
The reason is simple: slicing against the grain shortens the muscle fibers. Instead of chewing through long strands of meat, each bite has shorter fibers that are easier to break apart. This is one of the simplest ways to make tougher, chewier cuts noticeably more tender.
I explain this in more detail, with photos, in my full guide: How to Slice Steak.
Pan Seared Steak FAQs
What are the advantages of pan-searing steak?
- Speed: Pan-searing is one of the fastest ways to cook a steak.
- Great crust: Pan-searing creates an excellent golden-brown crust, especially on thicker steaks.
- Simplicity: Once you learn the basics, it’s so straightforward you won’t even need a recipe.
- No special gear needed: You only need a pan, a stove, tongs, a rack, a tray, and a meat thermometer. Nothing fancy or expensive.
- Perfect for quick sauces: The browned bits in the pan (fond) make an excellent base for simple sauces, which is great for leaner steaks like filet mignon.
- Works anytime: Since it’s an indoor method, you can pan-sear steak year-round, no matter the weather.
What are the disadvantages of pan-searing steak?
- Not ideal for thin steaks: Very thin cuts cook too fast in a hot pan. You’ll usually end up with little to no crust or a steak that’s cooked past medium-rare.
- Not for wet-marinated steaks: Pan-searing works best when the steak is dry. A wet marinade makes it hard to build a good crust. For marinated steaks, grilling is usually the better option.
- Oil splatter: Pan searing means hot oil popping around the pan. It can get messy.
- Lots of Smoke: Pan-searing produces a lot of smoke, so it’s not a good method if your kitchen doesn’t have proper ventilation.
- More cleanup: Oil splatters on the stove, pans, and nearby surfaces, making cleanup more time-consuming.
- Easier to overcook: Since the steak cooks from start to finish in a very hot pan, its internal temperature continues to rise significantly as it rests. If you don’t factor in carryover cooking, the steak can easily end up overdone.
What type of pan is best for searing steak?
The best pan for searing steak is one that handles very high heat and retains it well. A proper sear requires a very hot pan, around 450–500°F (232–260°C), and the pan needs to stay hot after the steak hits the surface.
The best options are cast iron, heavy-bottomed stainless steel, and carbon steel. They all work well for high-heat searing, but the best choice depends on what matters most to you: price, heat retention, a deep crust, easy cleanup, or how comfortable the pan is to use.
- Cast-iron skillet (Best for Searing): My top choice for pan-searing steak. It holds heat extremely well and stays hot after the steak hits the surface. It takes a little longer to heat up, but once it’s hot, it stays hot, which is exactly what you need to build a really deep crust. It’s also affordable. You can get a solid medium-sized cast-iron skillet for around $20–30, and with proper care, it can last for decades. The main downsides are that it’s not the best option for making fond-based pan sauces, and it requires more care than stainless steel. You need to clean it properly, dry it well, and keep the seasoning in good shape. So while cast iron is excellent for searing, it’s not the most convenient pan for everyday cooking.
- Heavy-bottomed stainless-steel skillet: A great, versatile choice for high-heat searing. It doesn’t hold heat quite as well as cast iron, but it is easier to clean, more versatile overall, and a better option when you want to build a sauce from the browned bits left in the pan. The downsides are that it is more expensive and not quite as effective as cast iron at building a deep crust.
- Carbon-steel pan: A strong middle-ground option. It’s lighter and more comfortable to handle than cast iron, heats up faster, and still holds enough heat to build an excellent crust. The main downside is the price. A good carbon-steel pan costs a few times as much as a basic cast-iron skillet, so it’s not the cheapest option if you only need a pan for occasional steak searing.
Whatever you do, don’t use a nonstick pan to sear a steak. Most nonstick coatings aren’t designed for that kind of heat, and many start to break down around 450°F (232°C).
Personally, I use cast iron when I want the deepest, most flavorful crust with the simplest setup. But if I know I’m going to deglaze the pan or make a sauce after searing, I use stainless steel instead.

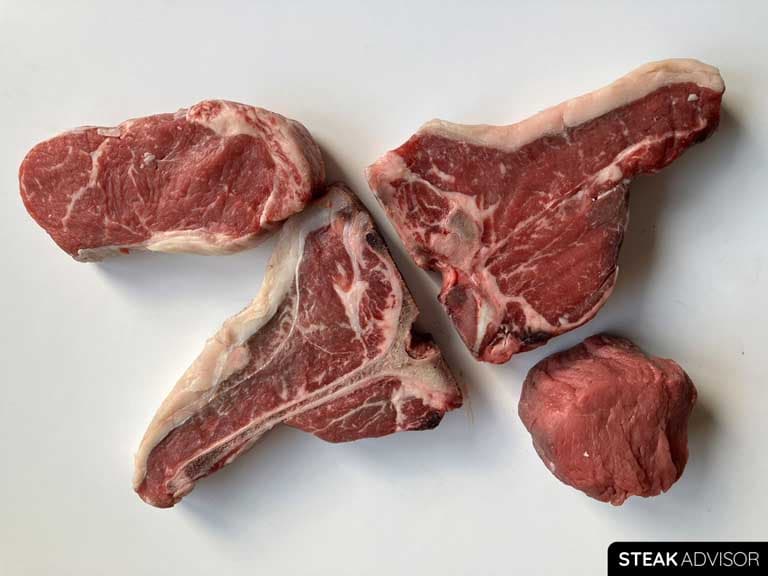
What steaks are best for pan-searing?
You can technically sear any steak in a pan, but if you want a great crust while keeping the center medium-rare, thicker cuts work best. At least 1 inch (2.5 cm) thick, ideally closer to 1 1/2 inches (3.8 cm).
Thicker cuts give you more time to build that crust without overcooking the inside. Additionally, I recommend choosing naturally tender steaks with good marbling (for a richer flavor and better texture).
Here are the cuts I find work best for pan-searing:
- Ribeye Steak
- Strip Steak (New York Strip)
- Tenderloin Steak (Filet Mignon)
- Picanha Steak (Coulotte Steak)
- Hanger Steak
- Flat Iron Steak
- Denver Steak
- Chuck Eye Steak
- Teres Major Steak
Of course, you can pan-sear thinner steaks too, but there’s a catch. With cuts under 1 inch (2.5 cm) thick, it’s much more difficult to get a deep crust and keep the center medium-rare at the same time. If you’re okay with a lighter crust or you prefer steak cooked past medium-rare, these thinner cuts can still turn out great in a pan:
- Outside Skirt Steak
- Ribeye Cap Steak
- Flank Steak
- Flap Steak (Bavette Steak)
- Spider Steak (Oyster Steak)
- Tri-Tip Steak (Newport Steak)
What’s the best doneness for steak?
It depends on the cut and your personal preference.
For most steaks, I like the final internal temperature around 135–145°F (57–63°C), which is the upper side of medium-rare to the lower side of medium.
Leaner cuts, such as filet mignon, are usually best cooked to rare or medium-rare, around 130–135°F (54–57°C), definitely no more than 140°F (60°C). They don’t have much intramuscular fat (marbling), so once you push them past medium-rare, they quickly lose moisture and become noticeably less juicy and tender.
Well-marbled cuts, such as ribeye, are different. I prefer them closer to 140°F (60°C) because at that temperature, the marbling melts more noticeably, making the steak juicier and more flavorful. If you cook a well-marbled steak too rare, the fat doesn’t have enough time to melt properly and can feel firm, cold, or waxy.
For more details, see my steak doneness and temperatures guide.
Food safety note
According to the USDA, whole cuts of beef should reach at least 145°F (63°C) and rest for at least 3 minutes to be considered safe to eat.
What if the steak reaches the final temperature in the pan?
If the steak reaches your final target temperature while it’s still in the pan, remove it immediately and slice it right away. Don’t let it rest. At that point, the steak is already past the ideal pull temperature. Resting would only let carryover cooking push the temperature higher, making the steak more done than intended. Slicing it right away helps release heat faster and reduces further carryover cooking.
Print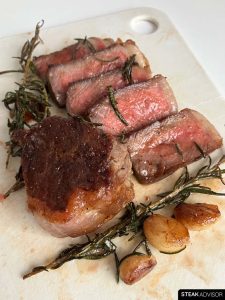
Pan-Seared Steak Recipe
- Prep Time: 10 minutes
- Dry-Brine Time: 1 to 6 hours
- Cook Time: 15 minutes
- Total Time: 1 hour 25 minutes
- Yield: 1 steak
Description
This pan-seared steak recipe shows you how to cook steak in a pan for a golden-brown crust, juicy center, and a rich garlic-herb butter finish.
Ingredients
For steak
- Any naturally tender steak about 1 to 1 1/2 inches (2.5–3.8 cm) thick, such as ribeye, strip steak, or filet mignon.
- 2 tablespoons (30 ml) high-smoke-point oil (I recommend refined avocado oil)
- 1–2 teaspoons (5–10 g) kosher salt per steak (1-1.5% of the steak’s weight in salt)
- 1/2 teaspoon of finely ground black pepper per pound (454 g) of steak (optional)
- Garlic-herb compound butter (optional)
For the garlic-herb butter finish (alternative to compound butter)
- 2 tablespoons (30 g) unsalted butter
- 2–3 garlic cloves, peeled and lightly crushed
- 2 sprigs fresh rosemary or thyme
Tools
- Wire rack and baking sheet (optional)
- Pan (a cast-iron, carbon steel, or heavy-bottomed stainless steel skillet)
- Tongs
- Meat thermometer (instant-read or leave-in probe thermometer)
Instructions
-
Decide how you want to finish the steak before you start. To keep the process simple and reduce the risk of overcooking, skip the butter basting. I highly recommend using compound butter instead. It gives you rich garlic-herb butter flavor without making the searing process harder.
- As an alternative to compound butter, you can make a quick garlic-herb butter in the same pan while the steak rests, then spoon it over the sliced steak.
-
Before you start cooking, gather all the ingredients and tools. If it’s your first time pan-searing a steak, read through the steps at least once before you start.

Prepare the Steak
- Pat the steak dry with paper towels to remove excess surface moisture. If needed, trim off any excess fat and cut the steak into similarly sized pieces so they cook more evenly (this is especially useful for long or uneven cuts, such as skirt steak or hanger steak).
-
Season all sides generously with kosher salt, using about 1–2 teaspoons (roughly 1–1.5% of the steak’s weight). Place the steak uncovered on a wire rack set over a baking sheet, then choose the next step based on how much time you have and the result you want:
- If you’re short on time, leave it at room temperature for 1 hour. That’s the bare minimum for dry-brining.
- If you have more time, refrigerate it uncovered for 4–6 hours for even better flavor and a drier surface (which means a better sear). I highly recommend this option.
- Want to dry-brine it longer? See notes. If you don’t have at least 1 hour to let the steak rest after salting, don’t salt it in advance. Either season it right before it goes into the pan, or salt it after searing.
Make the Compound Butter (Optional)
- While the steak is dry-brining, make the compound butter, then cover and refrigerate until needed. I highly recommend garlic-herb compound butter for this recipe.
- Use the quick bowl method if you plan to use it soon, or roll it into a log for easier slicing and longer storage. Cover and refrigerate until needed.
- See my step-by-step garlic-herb compound butter recipe for both versions.
Preheat the Pan
-
Regardless of the salting method you choose, let the steak sit at room temperature for about 15 minutes before it goes into the pan.
- Place a heavy, thick-bottomed pan (ideally cast iron) over medium-high heat. Let it heat for 3-4 minutes. Then add 2 tablespoons of high-smoke-point oil and let it heat for about 1 minute.
- While the pan is heating, pat the steak dry again.
- Optional: If using black pepper, season all sides with about 1/2 teaspoon of finely ground black pepper per pound (454 g) of steak.
- Then move straight to the next step.
Pan-Sear the Steak
- Searing produces a lot of smoke, so turn on your exhaust fan or open a window before you start.
- If your steak has a fat cap, such as a strip steak or picanha, start by placing it fat-side down in the hot pan. Sear for 1–2 minutes, or until the fat is browned and crisp. Then lay the steak flat in the pan.
- If your steak doesn’t have a thick fat cap, place it flat in the hot pan right away. Gently press it down with a spoon or tongs to ensure it makes good contact with the pan surface.
- Once the steak is flat in the pan, sear it over medium-high heat, flipping every 30 seconds. For steak 1 to 1 1/2 inches (2.5 to 3.8 cm) thick, cook until a meat thermometer probe inserted into the center reads 20°F (11°C) below your final target temperature.
-
For medium-rare, remove it from the pan at 115°F (46°C); for medium, 125°F (52°C); and for medium-well, 135°F (57°C).
- Let the steak rest for 5 minutes before slicing. For rare, well-done, and final rested temperatures, use the chart below.
- For steaks thinner than 1 inch (2.5 cm), use the same final temperatures but pull the steak about 15°F (8°C) below the target instead of 20°F (11°C). See the notes for the thinner-steak chart.
Compound Butter Finish
- Place a small piece of compound butter on top of the steak right after you take it out of the pan. Let it melt over the steak as it rests.
-
Alternative garlic-herb butter finish (If you don’t have compound butter): While the steak rests, use the same pan you seared it in. Lightly brown a few peeled garlic cloves over medium heat, then add a couple sprigs of rosemary or thyme and 2 tablespoons (30 g) of unsalted butter. Let the butter melt, turn off the heat, then spoon the garlic-herb butter over the sliced steak before serving.
Slice and Serve the Pan Seared Steak:
- After the steak has rested for 5 minutes, slice it thinly.
- For well-marbled, naturally tender cuts, slice it however you like. For cuts with longer, coarser muscle fibers, such as outside skirt steak, hanger steak, or flank steak, slice against the grain for a more tender bite (see notes).
- If you made the quick garlic-herb butter in the pan instead of using compound butter, spoon it over the sliced steak right before serving.
- Serve with your favorite sides.
Notes
Dry brining for 12-24 hours
You can dry-brine the steak for 12–24 hours, but expect a thicker gray band under the crust. The flavor and crust will be excellent, but not everyone likes the deeper, saltier flavor that develops after a long dry brine, especially when the steak sits closer to 24 hours. If you want to try a longer dry brine, I recommend starting with 12 hours first. Then, next time, you can go longer and see if you like the difference. Just keep in mind that the closer you get to 24 hours, the more noticeable the gray band under the crust becomes.
For steaks thinner than 1 inch (2.5 cm), expect less carryover cooking during the same 5-minute rest. Pull them from the skillet about 15°F (8°C) below your target final temperature.

How to Slice the Steak After Cooking
Naturally tender cuts, such as ribeye, a good-quality strip steak, or filet mignon, can be sliced however you prefer. However, cuts with long, coarse muscle fibers (such as skirt, hanger, flank, or flap steak) should always be sliced against the grain. Slicing against the grain shortens the muscle fibers, making the steak much easier to chew. If you’re unsure how to slice a specific cut, check out my slicing steak guide for clear, step-by-step examples.
Compound butter
Use any type of compound butter you like. Garlic-herb compound butter is just the classic option, and it never disappoints. For more ideas and flavor combinations, check out my full list of steak butter recipes.
Food safety note
According to the USDA, whole cuts of beef should reach at least 145°F (63°C) and rest for at least 3 minutes to be considered safe to eat.
Flipping the steak more often than I usually do actually made a big difference. The crust built up nicely, and the steak cooked more evenly. I also dry-brined it for about 5 hours, and the flavor was noticeably better. I finished it with compound butter mixed in a bowl, which was a great tip – much easier than rolling it into a log, and perfect for making a quick small batch.
I used to be a big fan of butter basting, but honestly, I now prefer compound butter. I still got that rich garlic-herb butter flavor, but the whole cooking process is much easier to control. It’s also much easier to hit the target temperature without basting. Great guide, especially for beginners. Thanks!
Thanks for the detailed feedback.
This guide made pan-searing feel a lot more predictable. Dry-brining first and patting the steak dry again before it hit the pan gave me a much better crust than usual. The temperature chart helped too.
Thanks for sharing your feedback.
Straightforward and really helpful. My steak got a great crust, and the inside came out just how I wanted.
Glad it turned out the way you wanted.