

No grill? No pan? No problem. You can still cook a flavorful steak under your oven’s broiler, though the method takes some practice to figure out how your broiler works. This method works best for cuts that are at least 1 inch (2.5 cm) thick.
Important
I developed this recipe specifically for electric ovens with a top-mounted broiler.

Broiling won’t give you the same crust as searing a steak in a pan from start to finish or using a forward sear (pan to oven), unless you’re working with a very thick steak (about 2 inches / 5 cm). With thinner cuts, you’ll get some browning, but not a deep crust without cooking the center past pink. You’ll also end up with a thicker gray band under the crust.
Another issue with broiling is carryover cooking. After you take the steak out of the oven, the internal temperature keeps rising significantly (even by as much as 30°F / 17°C), so it’s very easy to overshoot your target doneness. And it’s not a good choice for heavily marbled steaks, since dripping fat can cause flare-ups that are hard to control inside an oven.
Ingredients You’ll Need

For the steak:
- Steak: Choose any tender, not heavily marbled steak that’s at least 1 inch (2.5 cm) thick; around 2 inches (5 cm) is ideal. Go for a naturally tender cut like ribeye, strip steak, picanha, porterhouse, or filet mignon. With thinner steak, it’s much harder (often impossible) to get good browning while still keeping the inside medium-rare or medium. Thicker steaks give you more time to build a nice crust on the surface without overcooking the center.
- Kosher salt: Use about 1% of the steak’s weight in salt. That’s enough to get the benefits of dry brining without making the steak too salty. For example, a 16 oz (454 g) steak needs about 0.16 oz (4.5 g) of salt. Weigh the salt if you can, since different types of salt can vary a lot in density. Kosher salt is much lighter by volume than table salt, so measuring by the teaspoon isn’t very accurate. Once you know what the right amount looks like with the salt you normally use, you can just season by eye. See the recipe instructions below for approximate teaspoon measurements.
For the garlic-herb compound butter:
Makes enough for 2 thick-cut steaks.
- Butter: 4 tablespoons (1/2 stick; 56 g) unsalted butter. Stick with real butter, not margarine.
- Garlic: 2 fresh garlic cloves, minced or pressed.
- Rosemary: 1/2 tablespoon finely chopped fresh rosemary or 1/2 teaspoon dried rosemary. If you’re using fresh rosemary, chop it very fine so you don’t get any tough, woody pieces in the butter.
- Parsley: 1/2 tablespoon finely chopped fresh parsley or 1/2 teaspoon dried parsley.
- Salt and black pepper: Add a generous pinch of each (about 1/8 teaspoon to start), then taste and adjust to your liking.
Want to switch things up? Take a look at my other compound butter recipes.
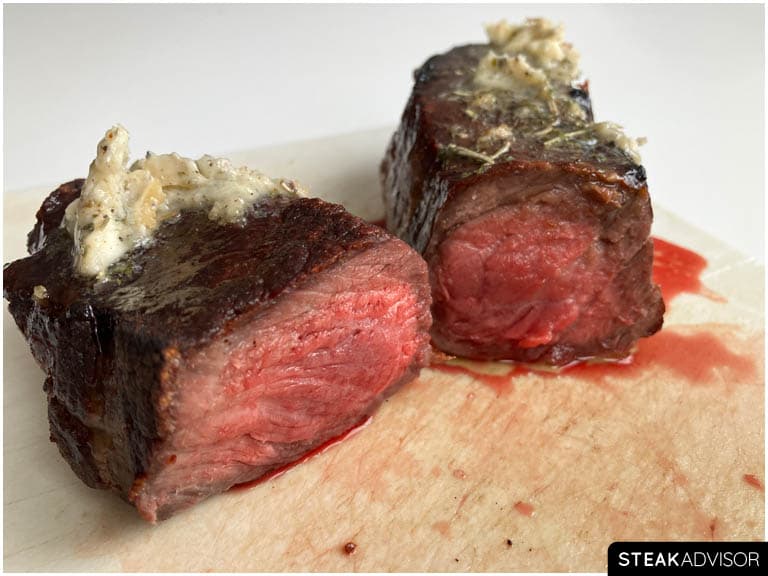
This is one of my favorite ways to add extra flavor to steak. I top it with compound butter as soon as it comes out of the oven. The heat melts the butter, coating the steak with garlic, herbs, and all that buttery flavor.
Tools You’ll Need
- Oven with broiler: You’ll need an oven with a top-mounted broiler. The broiler is what browns the surface of the steak. Without it, the outside will stay gray because a regular oven can’t get hot enough to build a proper crust. Even if your broiler isn’t very powerful, you should still get some nice browning, especially with steaks about 2 inches (5 cm) thick.
- Broiler-safe metal wire rack and broiler-safe rimmed baking sheet: A wire rack set over a baking sheet is essential for both dry brining and broiling. The rack keeps the steak from sitting in its own juices, which helps the meat surface dry out during dry brining. It also reduces flare-ups under the broiler. The baking sheet catches the drippings and helps keep the oven clean.
- Aluminum foil: for lining the baking sheet.
- Meat thermometer: Use an instant-read thermometer for quick temperature checks. Alternatively, if your probe is broiler-safe, use a leave-in thermometer to monitor the steak’s temperature as it cooks.
- Tongs: Use a sturdy pair of tongs to handle the steak safely, whether you’re flipping it, moving it on the rack, or taking it out of the oven.
- Heat-resistant oven mitts
How to Broil Steak in The Oven
Prepare the Steak
Pat the steak dry on all sides with paper towels, then trim off any excess fat around the edges, since it can burn easily under the broiler. If there isn’t much fat around the edges, you can skip this step.
Season the steak with salt equal to about 1% of its weight. For a 16 oz (454 g) steak, that’s about 0.16 oz (4.5 g) of salt, or roughly:
- 1 1/2 teaspoons Diamond Crystal kosher salt,
- 1 teaspoon Morton kosher salt,
- or 3/4 teaspoon table salt.

Dry-Brine the Steak
Place the salted steak on a wire rack set over a baking sheet and refrigerate uncovered for 1 to 6 hours. One hour is the minimum, but for the best flavor, dry-brine the steak for 4 to 6 hours. This gives the salt more time to season the meat. If you don’t have at least an hour, season the steak right before putting it in the oven.
Make the Garlic-Herb Compound Butter
Cut the butter into small cubes and add the cubes to a bowl. Let it soften at room temperature until it’s easy to work with but still holds its shape. If you’re short on time, microwave it in 5-second intervals, checking after each one to make sure it doesn’t melt.
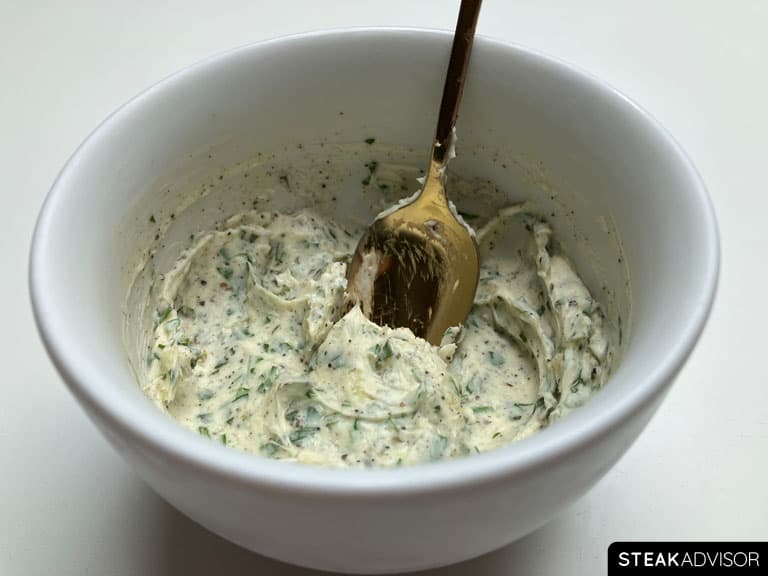
Add the garlic, rosemary, parsley, salt, and black pepper to the bowl. Mash everything together with a fork until the butter is smooth and the herbs and seasonings are evenly combined. Taste and add more seasoning if needed.
Cover the bowl and refrigerate until ready to use.
Note
You can store the compound butter in the fridge for a few days or in the freezer for up to 3 months – it’s one of those little make-ahead tricks that pays off every time.
Preheat the Broiler
Take the steak and compound butter out of the refrigerator.
Turn the broiler to high and let it heat up for about 10 minutes. Since broilers vary quite a bit from oven to oven, use the highest setting your oven has. You want the heating element as hot as possible. Most home broilers get to around 500–550°F (260–288°C).
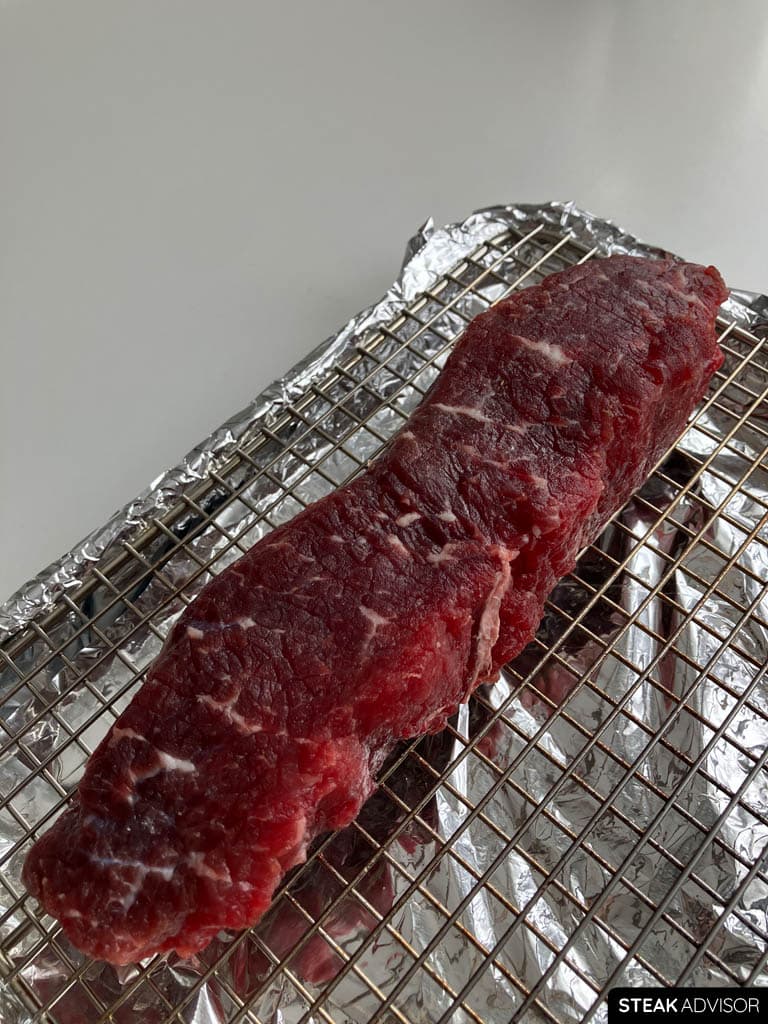
While the broiler preheats, line the baking sheet with aluminum foil for easier cleanup and set a wire rack on top. The rack keeps the steak from sitting in the drippings as it cooks.
Once the broiler is fully preheated, pat the steak dry again, then set it on a wire rack over a foil-lined baking sheet. It’s now ready to go under the broiler.
Broil the Steak
Place the baking sheet on the upper oven rack so the steak sits about 2 1/2 to 3 inches (6-8 cm) below the broiler (Measure the distance from the top surface of the steak to the broiler element, not from the oven rack or baking sheet). Position the steak so it runs parallel to the broiler element and sits directly underneath it rather than at an angle. This helps it cook evenly without any cooler spots (see the photo below).
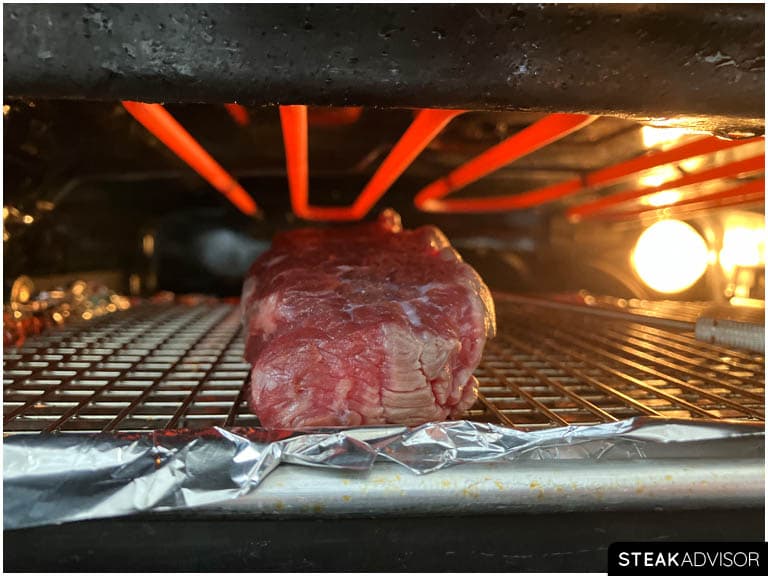
Broil until the thermometer reads 30°F (17°C) below your target doneness (see the temperature chart below). After 3 minutes, start checking the internal temperature. Insert your thermometer horizontally into the thickest part of the meat.
Remove the steak from the oven, top it with 1 to 2 tablespoons of compound butter, and let it rest uncovered for 5 minutes. If you don’t have compound butter, use regular butter; it’ll still add great flavor and richness.
Oven-Broiled Steak Temperature Chart
| Doneness | Remove at temp: | Expected final temp: |
| Rare | 95°F (35°C) | 125°F (52°C) |
| Medium Rare | 105°F (41°C) | 135°F (57°C) |
| Medium | 115°F (46°C) | 145˚F (63°C) |
| Medium-Well | 125°F (52°C) | 155˚F (68°C) |
| Well Done | 135°F (57°C) | 165°F+ (74°C+) |
Note
Broiling happens fast, so don’t walk away. Watch the steak closely as it browns and keep an eye on the internal temperature. If needed, crack a window for ventilation. There’s usually no need to flip it unless the crust already looks good on one side. I typically flip only thicker steaks, about 2 inches (5 cm) or more, and only once.
For a 1 1/2-inch (3.8 cm)-thick steak, broiling typically takes about 7-8 minutes to reach an internal temperature of around 110°F (43°C). After resting for at least 5 minutes, the temperature usually rises to about 140°F (60°C) due to carryover cooking. However, don’t cook by time; always use a meat thermometer.

Slice and Serve
After the steak has rested, slice it thin and serve with your favorite sides.
What to Serve with Oven-Broiled Steak
Oven-broiled steak pairs especially well with classic potato sides, simple vegetables, and fresh salads. Here are some of my favorite options:
- Mashed Potatoes: Creamy, buttery, and perfect with the steak juices and melted compound butter.
- French Fries: Crispy fries are a classic choice and turn the meal into an easy steak frites-style dinner.
- Roasted Potatoes: Golden and crisp on the outside with soft, fluffy centers.
- Potato Wedges: Thick, crispy wedges make a hearty side for steak.
- Baked Potato: Serve it simply with butter, sour cream, chives, or your favorite toppings.
- Scalloped Potatoes: Thinly sliced potatoes baked until creamy and tender.
- Roasted Asparagus: A quick, simple vegetable side that pairs naturally with steak.
- Green Beans: Roasted or sautéed green beans are an easy addition to the plate.
- Arugula Salad: Peppery greens with a simple vinaigrette add a fresh contrast to the steak.
Key Tips for the Best Broiled Steak
Use a Wire Rack Set Over a Foil-Lined Baking Sheet
For dry-brining, set the steak on a wire rack over a baking sheet. The rack lets air circulate around the meat, helping dry the surface for better browning. The baking sheet catches any moisture that drips off as the steak sits in the refrigerator.
Before broiling, line the baking sheet with aluminum foil and place the wire rack back on top. As the steak cooks, the fat drips through the rack instead of pooling around the meat. That helps with browning, reduces flare-ups, and keeps the steak from sitting in rendered fat.
The foil is there mainly to make cleanup easier. Any fat or juices that drip onto a bare baking sheet can quickly burn onto the surface under the broiler and be a pain to scrub off. Lining the baking sheet with foil catches the drippings, so once everything has cooled, you can simply remove the foil and throw it away.
Dry-Brine the Steak
For the best results, dry-brine the steak for 4 to 6 hours. This gives the salt time to season the meat more deeply while drying the surface, which helps the steak brown better under the broiler.
Avoid salting the steak just a few minutes before cooking. Salt initially draws moisture to the surface, and it takes about 45 to 60 minutes for most of that moisture to be reabsorbed. An hour is the minimum, but 4 to 6 hours gives you better results.
Pat the Steak Dry
A dry surface is essential for good browning. Any moisture left on the steak has to evaporate before browning can begin, which matters even more under a home broiler because the steak cooks so quickly. Pat the steak thoroughly dry with paper towels before placing it under the broiler. This helps the surface brown faster and gives you a better crust without overcooking the inside. For this recipe, don’t skip this step – it makes a noticeable difference.
Trim Excess Exterior Fat Before Broiling a Steak
Fat burns very quickly under the broiler and is the main cause of flare-ups and a lot of smoke. That’s why I recommend trimming off the outer fat before broiling a steak. It makes the whole process easier, cleaner, and a lot less smoky. For the same reason, I don’t recommend broiling highly marbled steaks. If you do want to broil one, don’t place it too close to the broiler. Cooking it very close to the broiler makes flare-ups much more likely.

Position the Steak Parallel to the Broiler Element
Since the steak sits so close to the broiler, its position makes a difference. The heating element doesn’t heat every spot evenly, so some areas run hotter than others. Position the steak parallel to the broiler element. This keeps more of the steak under the same level of heat and helps it brown and cook more evenly. If you place it perpendicular to the element, part of the steak may sit under a cooler spot and cook unevenly.
Below, I’ve included two photos to show how to position the steak under the broiler. The first shows the correct position, and the second shows the incorrect one.

Don’t Flip the Steak Too Often
If you’re broiling a thin steak, don’t flip it. There’s no real benefit. If the steak is at least 1 1/2 inches (3.8 cm) thick, you can flip it once, but only after the first side has developed the crust you want.
Under the broiler, flipping too often makes it much harder to build a good crust. Take a look at the first photo: it shows a 1 3/4-inch (4.5 cm) thick steak flipped every 30-45 seconds under the broiler. There’s barely any crust.
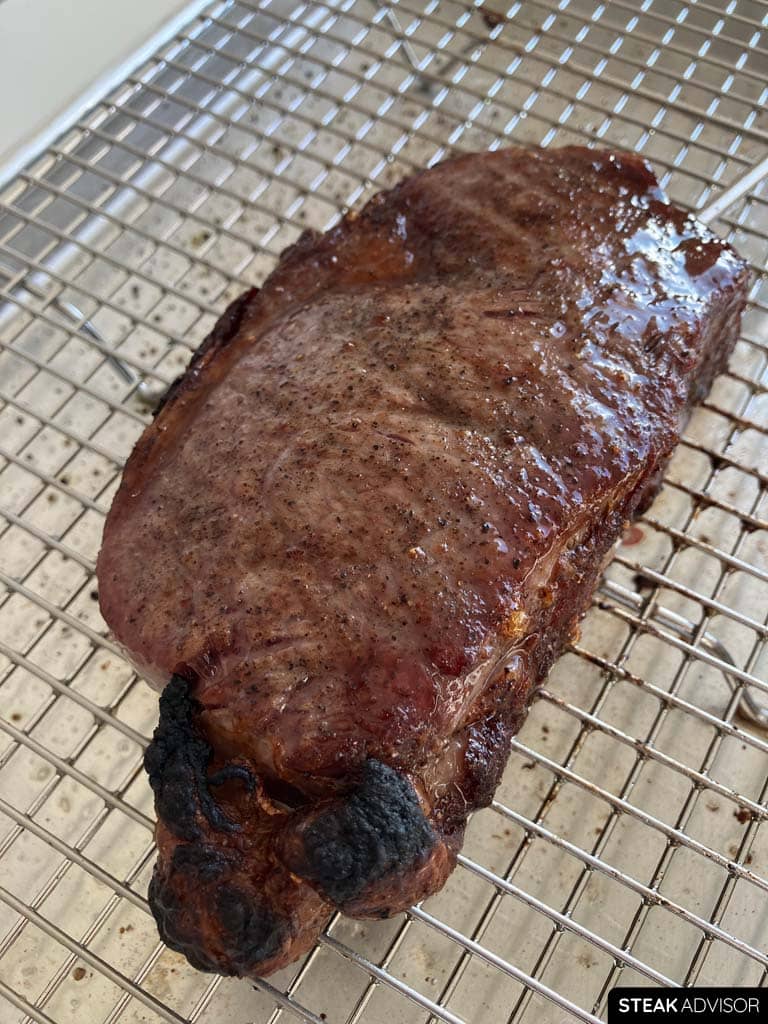
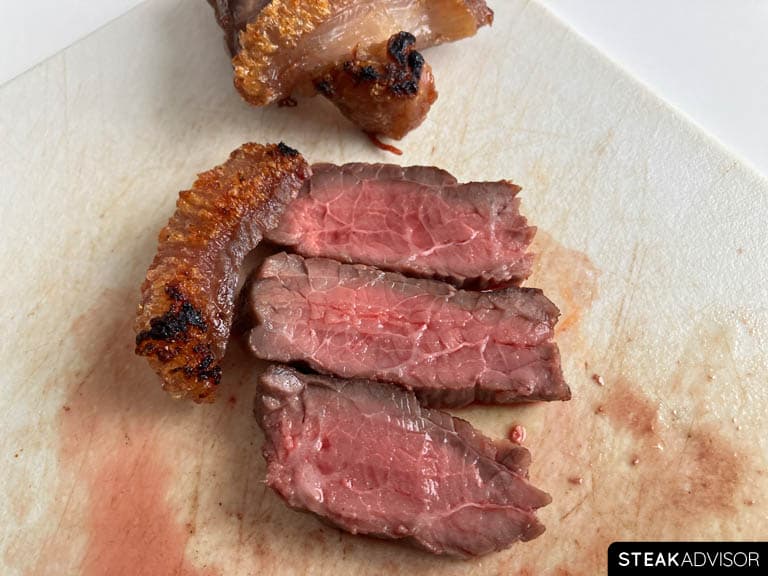
Now compare that to the next photo. This steak is the same thickness and cooked to the same target temperature, but it was flipped only once. The difference in the crust is easy to see.

The only small downside for some people is the thicker gray band that forms under the side of the steak that’s flipped only once. You can see what I mean in the photo below.
Broiling Steak FAQs
What Is Broiling?
Broiling is a high-heat cooking method that uses intense, direct heat from the oven’s broiler element or flame. Since the food sits close to the heat source, it cooks quickly and browns well on the surface. That makes broiling great for building a crust, but food can also burn fast, so you need to keep an eye on it. It’s especially useful for searing, browning, and giving meats, vegetables, and casseroles a crisp finish.
Broilers aren’t all the same. The biggest differences are where the broiler is located and whether it uses electricity or gas:
- Electric broiler (most common): Usually located at the top of the oven and heated by an electric element.
- Gas broiler: Uses a gas flame and may be located at the top of the oven or in a separate drawer below.
Broiler location: Depending on the oven, the broiler may be inside the main oven cavity or in a separate drawer below.
What are the advantages of broiling steak?
- It’s fast. Broiling uses intense direct heat, so most steaks cook in about 5 to 10 minutes, depending on their thickness and how powerful your broiler is. Just keep in mind that the broiler usually needs about 10 minutes to preheat.
- It works year-round. Since broiling happens indoors, the weather does not matter.
- You do not need a grill or skillet. All you need is a wire rack, a baking sheet lined with aluminum foil, and a meat thermometer to check the steak’s internal temperature.
- The steak cooks fairly evenly. It won’t cook quite as evenly as a reverse-seared steak, but it still gives you relatively even results when done properly.
- You can cook several steaks at once. Once you know how your broiler heats and where the hot spots are, broiling multiple steaks is pretty straightforward.
- Cleanup is easy. Everything cooks in the oven, and lining the baking sheet with foil makes cleanup simple.
- The results are consistent once you dial in the technique. After you figure out the right rack position and cooking time for your oven, broiling becomes very repeatable. I recommend practicing with a less expensive steak, such as a Choice-grade strip steak or sirloin.
What are the disadvantages of broiling steak?
- Not all broilers are made the same. Every oven is different, so you need to learn how hot your broiler runs and where the hot spots are. A meat thermometer helps avoid overcooking the steak, but testing is still necessary.
- It’s not very forgiving. Steak prep, rack height position, placement under the broiler, and timing all matter. A small mistake can be enough to overcook the steak.
- You don’t have much control once cooking starts. Broiling is fast and intense, so there’s not much time to make adjustments once cooking starts.
- Proper steak prep is important. For good browning, the steak should be dry-brined and patted completely dry before it goes under the broiler. You’ll also want to trim any thick outer fat, since it can burn quickly under such intense heat.
- It doesn’t work well with every steak. Thin steaks and cuts that vary a lot in thickness tend to cook unevenly under the broiler. Broiling works best with steaks that are at least 1 inch (2.5 cm) thick and fairly even in thickness.
- Significant carryover cooking: Broiling heats the outside of the steak extremely quickly, which creates a large temperature difference between the surface and the center. As a result, carryover cooking can raise the internal temperature by another 20 to 30°F (11 to 17°C) after the steak comes out of the oven.
- Getting a good crust on both sides is difficult. Even with a thick steak, it can be hard to brown both sides well without overcooking the center. In most cases, you’re better off focusing on building a nice crust on one side without flipping the steak.
- You have to watch it closely. Broiling is not a set-it-and-forget-it method. The steak can go from perfectly cooked to overdone very quickly, so you need to keep an eye on it the entire time.
- Smoke: Broiling steak produces a lot of smoke (often comparable to high-heat pan-searing) and may trigger alarms.
- Flare-ups: High heat combined with rendered fat increases the risk of flare-ups, especially if you haven’t trimmed the steak properly. That’s one reason I avoid putting heavily marbled steaks too close to the broiler.
Can I broil a steak straight from the freezer?
For best results, I don’t recommend broiling a steak straight from the freezer, especially thicker cuts. Broiling is a very hot, fast-cooking method, and starting with a frozen steak creates a large temperature gap between the surface and the cold center. The outside cooks quickly while the inside lags behind, so the steak cooks unevenly from edge to center.
Why should I remove the steak from the broiler so early?
Broiling exposes the steak to extremely high heat, creating a large temperature difference between the steak’s surface and its center. The greater the difference, the more significant the carryover cooking. That’s why I always recommend removing the steak much earlier when cooking under very high heat. Waiting until it’s close to your final doneness guarantees an overcooked steak.
I’ve tested this recipe with steaks of different thicknesses, and one thing stays consistent: broiling causes aggressive carryover cooking, especially when the steak sits close to the heating element. When I broil a steak about 2 1/2 to 3 inches (6–8 cm) from the heating element, I usually remove it at around 110°F (43°C). After it comes out of the oven, the internal temperature rises by about 30°F (17°C) during the first 5 minutes of resting.
How does the distance from the broiler affect carryover cooking?
The closer the steak is to the broiler, the hotter its surface gets, and the larger the carryover cooking once it comes out of the oven. Based on my tests, when a steak is placed about 2 1/2 to 3 inches (6–8 cm) from the broiler, the internal temperature rises by roughly 30°F (17°C) during resting. Move the steak farther from the heat, around 5 to 6 inches (13–15 cm), which is usually the center rack, and the carryover drops to about 20°F (11°C). That’s a big difference, and it directly affects when you should remove the steak from the oven.
This recipe is developed specifically for broiling steaks very close to the broiler. If you cook the steak farther away, carryover cooking will be smaller, and you’ll need to adjust your removal temperature accordingly. That’s why it’s so important to follow the recipe instructions closely. With high-heat methods like broiling, small changes in distance can have a big impact on the final results.
How to deal with a flare-up when broiling a steak?
If a flare-up happens while broiling, the most important thing is to stay calm.
- If flames start inside the oven, keep the door closed and turn off the broiler. Closing the door cuts off oxygen, and the flames will die out on their own.
- Never use water on a grease fire. Spraying water will only make the flare-up worse and can cause hot grease to splatter.
To minimize flare-ups in the first place, make sure the steak is well trimmed and not heavily marbled. Always place it on a wire rack set over a baking sheet or broiler pan, so the fat drips away instead of pooling around the steak. Avoid marinades or oil on the steak surface, and always pat the steak dry before it goes into the oven. If flare-ups keep happening, move the steak farther from the broiler and continue cooking at slightly lower heat.
And again, never use water if a flare-up occurs.
Print
Oven-Broiled Steak Recipe
- Prep Time: 20 minutes
- Dry-Brine Time: 1 to 6 hours
- Cook Time: 10 minutes
- Total Time: 1 hour 30 minutes
- Yield: 1 steak
Description
In this recipe, I’ll show you how to broil a steak using only an oven with a top-mounted broiler. You’ll end up with a steak that’s cooked relatively evenly on the inside, with a bit of browning on the surface.
Ingredients
For Steak:
- Any tender, not heavily marbled steak that’s at least 1 inch (2.5 cm) thick (ribeye, strip steak, picanha, porterhouse, or filet mignon)
- salt, about 1% of the steak’s weight (see instructions for a 16 oz / 454 g example)
For the Garlic-Herb Compound Butter (makes enough for 2 steaks):
- 1/2 stick (56 g) of unsalted butter
- 2 garlic cloves, finely chopped or pressed
- 1/2 tablespoon finely chopped fresh rosemary or 1/2 teaspoon dried rosemary
- 1/2 tablespoon finely chopped fresh parsley or 1/2 teaspoon dried
- A generous pinch of salt and black pepper (about 1/8 teaspoon each)
Tools:
- Oven with a top-mounted broiler
- Broiler-safe metal wire rack
- Broiler-safe rimmed baking sheet
- Aluminum foil (for lining the baking sheet)
- Meat thermometer (instant-read or broiler-safe leave-in probe)
- Tongs
- Heat-resistant oven mitts
Instructions
Prepare the Steak
- Pat the steak dry on all sides with paper towels to remove any surface moisture.
- Trim off any excess outer fat. This helps prevent the fat from burning. If there isn’t much outer fat on the steak, feel free to skip this step.
- Season the steak with salt equal to about 1% of its weight. For a 16 oz (454 g) steak, that’s about 0.16 oz (4.5 g) of salt, or roughly:
1 1/2 teaspoons Diamond Crystal kosher salt,
1 teaspoon Morton kosher salt,
or 3/4 teaspoon table salt.
Dry-Brine the Steak
- Place the salted steak on a wire rack set over a baking sheet and refrigerate it uncovered for 1 to 6 hours (see notes). One hour is the minimum, but for the best flavor, dry-brine the steak for 4 to 6 hours
Make the Garlic-Herb Compound Butter
- Cut the butter into small cubes and place it in a small bowl. Let it soften at room temperature until easy to mix but not melted. If you’re short on time, microwave it in 5-second intervals, checking after each one so it doesn’t melt.
- Add the garlic, rosemary, parsley, salt, and black pepper.
- Mash with a fork until well combined. Taste and adjust the seasoning, then cover and refrigerate until ready to use.
Preheat the Broiler
- Take the steak and compound butter out of the refrigerator.
- Set your broiler to high and let it preheat for about 10 minutes. Every oven is a little different, so make sure you choose the highest broiler setting to get the heating element as hot as possible.
- While the broiler heats up, line the baking sheet with aluminum foil to make cleanup easier, then place a wire rack on top so the drippings fall away from the steak.
- Once the broiler is fully preheated, pat the steak dry again then set it on a wire rack over a foil-lined baking sheet. Now the steak is ready to go into the oven.
Broil the Steak
- Place the baking sheet on the upper oven rack so the steak sits about 2 1/2 to 3 inches (6-8 cm) below the broiler (measure the distance from the top surface of the steak to the broiler element, not from the oven rack or baking sheet).
- Make sure the steak runs parallel to the broiler element and sits fully under it, not turned sideways, so it cooks evenly without cold spots (see the photo below).
- Broil until it reaches the pull temperature for your desired doneness:
95°F (35°C) for rare,
105°F (41°C) for medium-rare,
115°F (46°C) for medium,
125°F (52°C) for medium-well,
135°F (57°C) for well-done.
See notes for the complete steak temperature chart. - Check the temperature with a thermometer inserted horizontally into the thickest part of the steak, starting after about 3 minutes.
- Once the steak reaches your target pull temperature, transfer it to a board or plate, top with 1-2 tablespoons of compound butter, and let it rest for 5 minutes.
- Don’t walk away, broiling happens fast. Watch the steak closely as it browns to avoid burning, and monitor the internal temperature (crack a window for ventilation if needed). There’s usually no need to flip it unless the crust already looks good on one side. I typically flip only thicker steaks, about 2 inches (5 cm) or more, and only once.
- Cooking time depends on your steak’s thickness, oven accuracy, and your preferred doneness. That’s why I always recommend using a leave-in probe thermometer with an alarm. It eliminates the guesswork, saving you from constantly opening the oven to check with an instant-read thermometer.
Serve the Broiled Steak
- Once the steak has rested, slice it thinly and serve it with your favorite sides.
- Optional: if you don’t have compound butter, use regular butter; it’ll still add great flavor and richness.
Notes
Dry-brining
You can dry-brine the steak even longer than 4-6 hours for deeper flavor, but keep in mind: the longer it sits salted, the more noticeable the gray band just under the crust becomes. If you’re short on time, you can let the salted steak rest uncovered at room temperature for 1 hour, but for this recipe, I don’t recommend it. The steak needs more time to dry properly if you want good browning under the broiler.

The carryover cooking tip was huge. Pulling the steak early made all the difference.
Thanks, Jason.