
Dry-brining is one of the easiest and most effective ways to make any type of steak much more flavorful. A proper dry brine not only seasons the meat but also dries the steak’s surface, which is exactly what you need for a hard sear and a rich, golden-brown crust. The only time I skip dry brining is when I’m using a wet marinade.
In this guide, I’ll explain what dry brining is, why it works so well, and (based on my own tests) how long to dry brine steak and how much salt to use for the best results.
What is Dry-Brining?
Dry-brining is a simple technique of salting food ahead of time and letting it rest before cooking. It’s a process where you apply salt to the food surface ahead of time and let it rest for hours or even days uncovered so the salt has a chance to work its way into the food.
Here’s how it works: 2-3 minutes after salting, the steak’s surface starts to look wet as the salt starts to draw liquids to the surface through the process called osmosis. After a few more minutes, the liquids begin to dissolve the salt, forming a small amount of brine. That brine is then reabsorbed by the meat through a process called diffusion, carrying the salt along with it. The result is a steak that’s seasoned more evenly throughout (not just on the outside), noticeably more flavorful, and even slightly more tender. It also leaves the surface drier, which is exactly what you want for a rich, golden-brown crust.
Dry brining takes patience. For steak, the sweet spot is usually about 6 hours, although you can go shorter if you’re in a hurry. I’ll get into the timing details later in this article.

What Are the Benefits of Dry-Brining Steak?
Dry brining has three main benefits that make a big difference in how your steak turns out:
- Deeper Flavor: Even a short dry brine makes a noticeable difference. After just one hour, the steak will taste far better than if you had salted it right before cooking. Give it a few hours, and the flavor goes deeper, seasoning the meat more evenly throughout. Salt naturally boosts the beef’s flavor, and that deeper taste pairs beautifully with butter and aromatics like garlic and fresh herbs.
- More Tender Steak: Salt gently modifies the meat’s protein structure, allowing it to hold its juices better as it cooks. The result is a steak that stays juicy and becomes slightly more tender and easier to chew.
- Better Browning: A dry-brined steak builds a superior crust because the surface has time to dry out before cooking. Once the salt has pulled out moisture and the meat reabsorbs it, the exterior is left drier (perfect for the Maillard reaction/browning). In fact, dry brining is the number one technique for getting a much better crust.
How to Dry Brine Steak – Step by Step
Step 1: Set Up for Dry Brining
Set up a wire rack over a baking sheet. This setup is ideal because it lets air circulate freely around the steak as it rests, which helps dry out the surface for a better crust later. If you don’t have a rack, prepare a plate and set a few chopsticks, skewers, or forks on top. Later, you’ll place the steak on them so it doesn’t lie flat against the plate.

Step 2: Season Steak with Kosher Salt
Pat the steak dry with paper towels, then sprinkle kosher salt over both sides of the steak. Hold your hand about 5–8 inches (13–20 cm) above the steak as you season, covering it with a generous and even coating. A good rule of thumb is 1/2 tablespoon of salt per side for a steak that’s roughly 1.5 inches (3.8 cm) thick. From there, you can adjust up or down depending on the cut and your taste.


Note
Salt density varies a lot. For example, Diamond Crystal kosher salt is about 9-10 g per tablespoon, while table salt is closer to 16 g per tablespoon, which makes it almost twice as salty. Most other kosher salts are 10-14g per tbsp. If you’re using a different brand, adjust the amount to avoid oversalting your steak.
While you can dry-brine thinner cuts, it’s most effective on steaks that are at least 1 inch (2.5 cm) thick.
Step 3: Refrigerate 1 Hour Up to 24 Hours
Place the salted steak uncovered on a wire rack set over a rimmed baking sheet. For the best balance of flavor, crust, and a minimal gray band, refrigerate 4–6 hours. In a rush, 1 hour at room temperature works, and for maximum flavor, you can go up to 24 hours, but expect a thicker gray band under the crust.


Note
The bare minimum time for dry-brining is about 1 hour. That’s enough time for the steak to reabsorb most of the liquid that the salt draws out, but honestly, it’s not where the magic happens. The real magic starts after a few hours. That’s when you get a deeper flavor, a drier surface perfect for a proper sear, and an overall better steak.
There is a small downside, though. The longer the steak sits salted, the thicker the gray band becomes just under the crust. From my tests, it becomes noticeable after about 8 hours and becomes significantly thicker after 12–24 hours.
Through my tests, I’ve found that 4–6 hours works best if you want significant improvements in flavor and crust while keeping the gray band inside to a minimum. That’s usually what I recommend. That said, I often dry-brine for 12–24 hours myself. I don’t mind the way the gray band looks, and the steak is still tender and juicy. Just don’t go beyond 24 hours. The taste turns a little off, the texture gets firmer, and the gray band takes over too much.
Step 4: Cook the Steak
Important: Do not rinse the salt off the steak!
If you’re pan-searing or grilling the steak over high, direct heat, remove it from the refrigerator and let it rest at room temperature for about 30 minutes before cooking (this helps it cook more evenly). For slower methods, such as sous vide, reverse searing, or indirect grilling or smoking, you can skip the resting step and move straight to cooking. And one more important note: don’t season the steak with salt again after dry-brining.

FAQs
What is the best salt for dry-brining a steak?
The best salt for dry-brining is kosher salt, and it’s the only one I use when seasoning a steak before cooking. It has large, flake-shaped grains that are easy to pinch and spread evenly over the steak. Avoid coarse sea salt (too large grains, won’t dissolve well) and table salt (too fine grains, easy to oversalt).
If table salt is all you have, you’ll need to be extra careful with measurements. Here’s why this matters: when recipes list salt by volume (such as teaspoons), the type of salt makes a big difference. A teaspoon of table salt contains far more sodium than a teaspoon of kosher salt, simply because the grains are smaller and denser. Even between kosher salts, the difference is huge: Morton kosher salt is almost twice as salty as Diamond Crystal.
Eight ounces (226 g) of salt contains the same amount of sodium, whether it’s table, kosher, or sea salt – the volume just looks different. Always check which type of salt a recipe uses when the measurement is given in teaspoons or tablespoons. If you skip this step
How much salt is needed to dry-brine the steak?
A good rule of thumb is to use 1–1.5% salt by weight of the steak when dry brining. That range works well for most people, but it really comes down to personal taste. I prefer my steaks a little saltier, so I usually go with 1.5–2% salt by weight.
For example, if I’m cooking a steak that’s about 1.5 inches (3.8 cm) thick and weighs 20 oz (567 g), I’ll use roughly 0.35 oz (11 g) of kosher salt. That usually works out to about ½ tablespoon per side, depending on the brand of salt.
If it’s your first time dry brining, I’d suggest starting with less. See how you like it, then adjust next time. In general, you don’t need much more salt for dry brining than you’d normally sprinkle at the table.
How long to dry-brine a steak?
The timing depends on the results you’re after and the amount of time you have. Based on my tests, here are the three best options:
- 1 hour (minimum): Enough time for the steak to reabsorb most of the liquid the salt pulls out, but you won’t notice big improvements in flavor or crust.
- 4–6 hours (I highly recommend): Better flavor, a dry surface for a proper sear, and only a thin gray band inside.
- 12–24 hours (Optional): Even stronger flavor and crust. The gray band becomes more noticeable, but the steak still stays juicy and tender.
Don’t go beyond 24 hours – the flavor starts to turn off, the texture gets firmer, and the gray band becomes too thick.
Why do I need a rack to dry-brine?
Salt pulls liquids out of the steak, then the meat slowly reabsorbs them. For that process to work properly (and to get a perfectly dry surface for searing), the air must surround the meat. If you leave the steak flat on a plate, the bottom stays wet. Instead, place it on a wire rack set over a baking sheet so air can circulate underneath.
No rack? Use a plate with a few forks, chopsticks, or any other utensil that lifts the steak slightly so it isn’t sitting flat on the plate. It’s not a perfect method, but it works. If you cook steaks often, I recommend investing in a small baking sheet with a rack. It’s inexpensive and makes the dry-brining process much more effective.
Is it required to rinse the salt off the steak before cooking?
Absolutely not! During dry-brining, almost all of the salt gets absorbed into the meat. You might see a few thicker grains left on the surface, but that’s normal and nothing to worry about.
Rinsing the steak only ruins the dry surface you worked for, and that dry surface is exactly what gives you a proper sear. There’s no advantage to rinsing, so don’t do it.
Print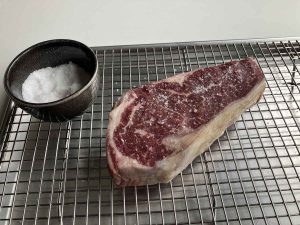
How to Dry-Brine a Steak
- Prep Time: 5 minutes
- Rest Time: 1 to 24 hours
- Total Time: 1 hour
Description
Dry-brining is the simplest way to take your steak to the next level. With just salt, a rack, and a little time, you’ll get deeper flavor, a juicier interior, and a perfectly dry surface that sears beautifully every time.
Ingredients
For Steak:
- Steak (Ideally at least 1 inch/2.5 cm thick)
- Kosher Salt (1/2 tablespoon of salt per side for a 1.5 inches / 3.8 cm thick steak)
Tools:
- Wire Rack
- Baking Sheet
Instructions
- Set Up for Dry Brining: Set up a wire rack over a baking sheet. If you don’t have a rack, prepare a plate and set a few chopsticks, skewers, or forks on top. Later, you’ll place the steak on them so it doesn’t lie flat against the plate.
- Season Steak with Kosher Salt: Pat the steak dry with paper towels, then sprinkle kosher salt over both sides of the steak. Hold your hand about 5–8 inches (13–20 cm) above the steak as you season, covering it with a generous and even coating. A good rule of thumb is 1/2 tablespoon of salt per side for a steak that’s roughly 1.5 inches (3.8 cm) thick. From there, you can adjust up or down depending on the cut and your taste.
- Refrigerate for 1 Hour to 24 Hours: Place the salted steak, uncovered, on a wire rack set over a rimmed baking sheet. For the best balance of flavor, crust, and a minimal gray band, refrigerate 4–6 hours. In a rush, 1 hour at room temperature works, and for maximum flavor, you can go up to 24 hours, but expect a thicker gray band under the crust.
- Cook the Steak: Do not rinse the salt off the steak! If you’re pan-searing or grilling the steak over high, direct heat, remove it from the refrigerator and let it rest at room temperature for about 30 minutes before cooking. For slower methods, such as sous vide, reverse searing, or indirect grilling or smoking, you can skip the resting step and move straight to cooking. And one more important note: don’t season the steak with salt again after dry-brining.
I’ve become a big fan of the 4–6 hour dry brine. It’s enough time to get better flavor and a nicer crust, but still easy to fit into the day.
Thanks for the comment.
I usually just salt my steak right before cooking, but I tried this with a strip steak and I get the hype now. It had more flavor all the way through and a much better crust.
Thanks for giving it a shot.
I always thought dry brining was more effort than it was worth, but this changed my mind. I left a ribeye on the rack for about 5 hours and the flavor and crust were noticeably better. The salt guide was really helpful too.
Thanks for the feedback. Five hours make a real difference.