
There are many ways to tenderize a steak: pounding it, properly slicing it, salting it in advance, using enzyme-based marinades, or simply letting time do the work through aging. Some methods make a noticeable difference, while others aren’t worth the extra effort.
In this guide, I tested some of the most popular steak tenderizing methods side by side to see which ones actually work. You’ll see what made the biggest difference, which methods were disappointing, and which one turned out to be the clear winner.
Quick Overview
What’s the Best Way to Tenderize a Steak?
Using a pineapple marinade for about 45 minutes is the clear winner; it gives the biggest improvement in tenderness. For the best overall result, combine it with overnight salting, but if you need a single method, pineapple works best on its own.
Here’s how all the methods performed in my tests.
| Tenderizing method | Overall rating* (0-10) | Tenderizing time |
| Salt overnight in the fridge | 6 | 12-24 hours |
| Slicing against the grain | 8 | Immediate |
| Pounding with a meat mallet | 7 | Immediate |
| Baking soda | 8 | 30 minutes |
| Pineapple | 9 | 45 minutes |
| Papaya | 8 | 45 minutes |
| Pineapple and salt | 10 | 12-24 hours |
How I Tested These Steak Tenderizing Methods
My goal was to keep the testing process as consistent and controlled as possible, so the results would be fair and easy to compare.
Here’s how I ran those tests:
- For most of the tests, I used eye of round steak, one of the toughest cuts of beef. I cut the steaks myself from a whole eye of round roast and made each one about 1 inch (2.5 cm) thick to keep the tests as consistent as possible. In a few cases, I used a different cut when it made more sense for that specific test.
- For each test, I cooked two steaks cut from the same section. One steak was tenderized using the method I was testing, while the other was left untreated and used as the control.
- I kept the seasoning simple, using only finely ground black pepper on both steaks.
- I cooked both steaks at the same time in a cast-iron skillet on the stove, aiming for a medium-rare finish of about 130–135°F (54–57°C). After cooking, I let both steaks rest before comparing the results.
Below, I’ll walk you through all the steak tenderizing methods I tested, explain how effective each one was in my experience, and show you roughly how long it took to tenderize a 1-inch (2.5 cm) eye of round steak with each method.
Detailed Results by Method
Method 1: Salt Overnight in the Fridge
Tenderizing time: 12-24 hours
Overall rating compared to the control steak: 6/10
Best for: moderately tender cuts
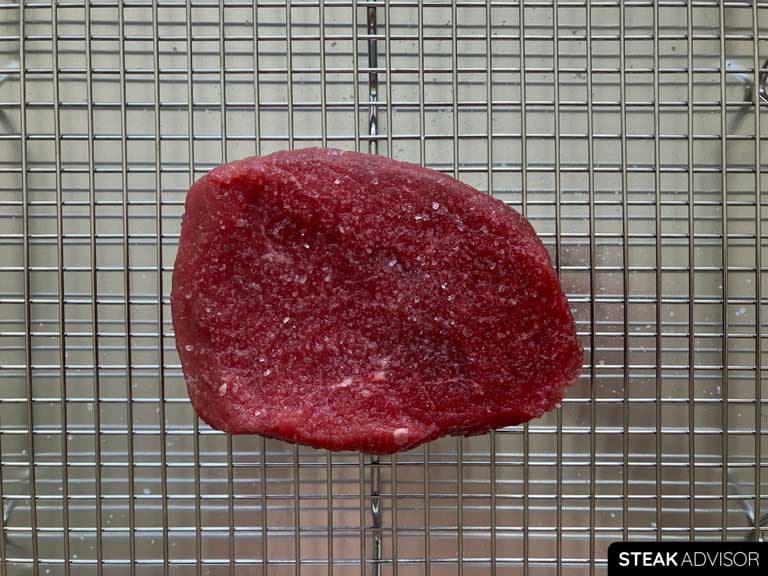
About this method: I seasoned both sides of the steak generously with kosher salt, placed it on a wire rack set over a baking sheet, and left it uncovered in the fridge overnight. I took the steak out of the fridge 30 minutes before cooking.
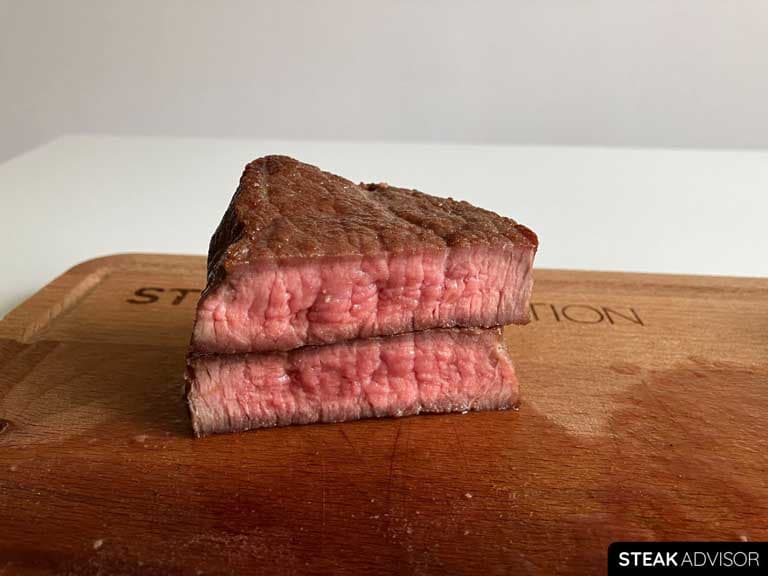
Results: Overnight salting made the eye of round steak more tender than the control, but the improvement wasn’t dramatic. Even after salting, the steak was still relatively tough and chewy, as I expected from a cut like eye of round.
Where this method worked better was in the overall result. The steak tasted better, and the surface dried out nicely, making it easier to achieve a better crust when cooking. For moderately tender cuts, I think overnight salting works well on its own. For very tough cuts like eye of round, I see it more as a supporting method than the main tenderizing technique.
One downside is that a longer dry brine results in a thicker gray band under the crust. I explain why that happens in my guide on salting steak.

Method 2: Slicing Against the Grain
Tenderizing time: Immediate
Overall rating compared to the control steak: 8/10
Best for: steaks with a clear, visible grain, such as flank or skirt steak
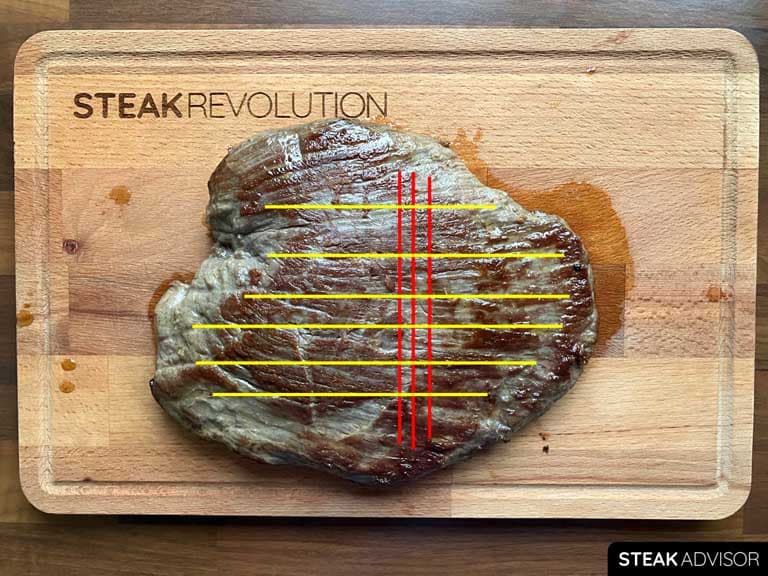
About this method: For this test, I used flank steak instead of eye of round because flank steak has a much clearer grain. After cooking, I sliced the steak against the grain and compared it with a version sliced with the grain.
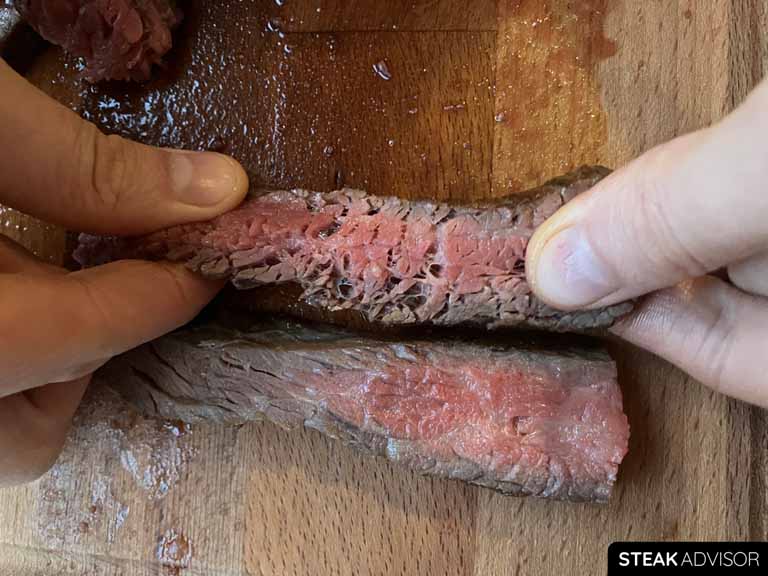
Results: Slicing against the grain made a very noticeable difference in tenderness compared to the control steak. The version sliced with the grain was much tougher and chewier because the long muscle fibers stayed intact, making each bite harder to chew.
This method doesn’t change the meat’s structure the way salt or enzyme-based tenderizers do. It works by shortening the muscle fibers, which makes each bite feel more tender right away.
The biggest advantage is that it works immediately after cooking and only requires a knife. It also combines easily with other tenderizing techniques, such as salting or enzyme-based marinades. The downside is that it only works well on cuts with a clearly visible grain, such as skirt steak, flank steak, hanger steak, or flap steak.
If you want to learn more about how to slice steak against the grain, how to identify the grain in different cuts, and see more examples, check out my guide on How to Slice Steak.
Method 3: Pounding With a Meat Mallet
Tenderizing time: Immediate
Overall rating compared to the control steak: 7/10
Best for: tough, thin, and lean cuts, especially cuts from the round

About this method: I placed the steak on a stable surface, covered it with plastic wrap, and pounded it with the coarse side of a meat mallet. The goal was to hit it hard enough to tenderize the meat without completely flattening it.
Results: Pounding the eye of round steak with a meat mallet made a noticeable difference in tenderness compared to the control steak. The texture still wasn’t anywhere close to a naturally tender cut, but it was much easier to chew. The result was definitely better than salting overnight alone, and honestly, for such a tough cut, I really like the improvement.
This method doesn’t change the meat’s flavor. Instead, it changes the texture by physically breaking down the tough muscle fibers and connective tissue.
For a cut like eye of round, this method makes a lot of sense. It’s lean, tough, and has very little marbling, so it benefits from some mechanical tenderizing. I found it especially useful if the steak is going to be heavily seasoned, breaded, or cooked in a dish like chicken-fried steak or Swiss steak.
Next time, though, I’d either start with a thinner cut than 1 inch (2.5 cm) or flatten the steak much more. That’s especially true if you want to use it for something like chicken-fried steak, where a thinner, evenly pounded piece works much better.

Method 4: Baking Soda
Tenderizing time: 30 minutes
Overall rating compared to the control steak: 8/10
Best for: steak served with sauce
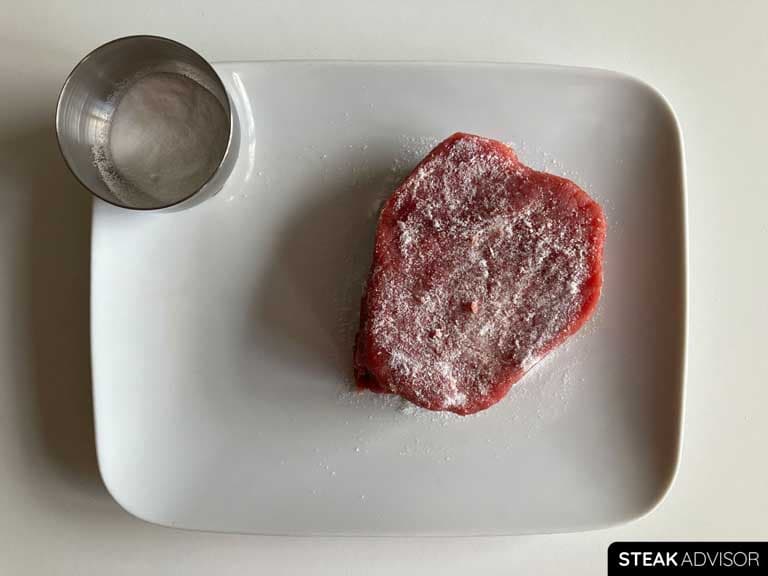
About this method: I evenly sprinkled about 1 teaspoon of baking soda per pound (454 g) of meat over both sides of the steak, placed it on a rack set over a baking sheet, and refrigerated it for 30 minutes. After that, I rinsed off the baking soda under cold running water, gently patted the steak dry with paper towels, and then seasoned and cooked it.
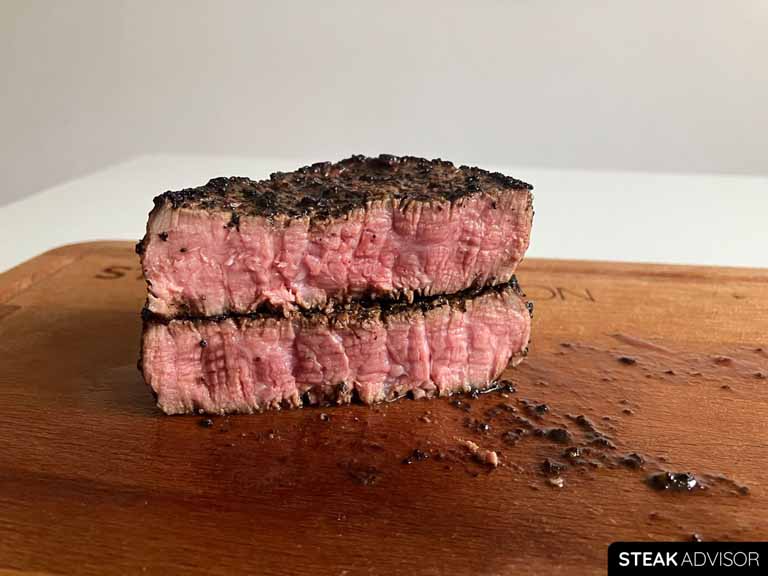
Results: Baking soda is a fast and very effective way to tenderize steak. In my test, it made the eye of round steak significantly more tender in just 30 minutes, which makes it one of the quickest methods I tried.
The steak was easier to slice and had a much more pleasant texture compared to the control steak. It still wasn’t anywhere close to a naturally tender cut like ribeye, but for eye of round, the difference was very noticeable.
The biggest downside is the flavor. Personally, I’m not a fan of how steak tastes after using baking soda, and if you use too much or leave it on for too long, that off-flavor becomes even more noticeable. That said, the tenderizing effect is hard to ignore.
Another problem is the wet surface after rinsing off the baking soda. Even after patting the steak dry, I couldn’t get a proper crust in the pan.
In my opinion, this method works best when the steak is served with a sauce, since the sauce can help cover that flavor change. It’s quick, simple, and effective, but you need to get both the amount and the timing right.
Method 5: Pineapple
Tenderizing time: 45 minutes
Overall rating compared to the control steak: 9/10
Best for: really tough cuts when tenderness matters more than crust
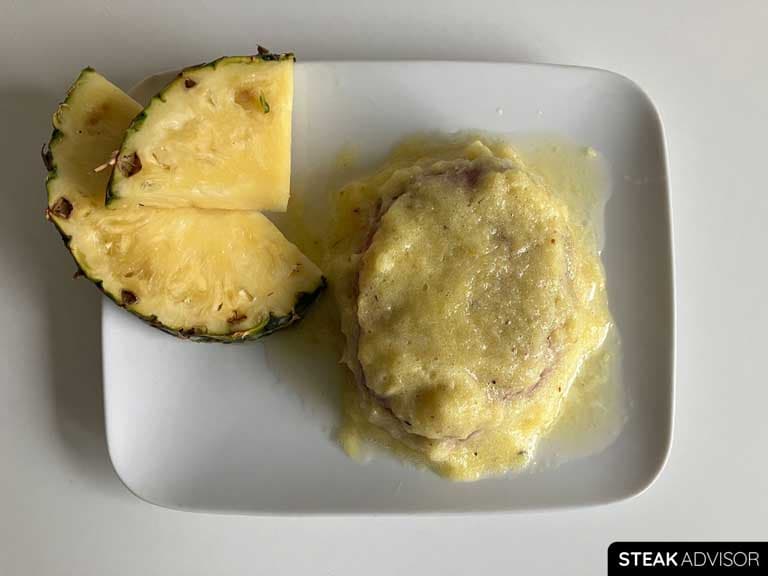
About this method: I blended a few pineapple chunks into a smooth puree, then coated the steak evenly with it. I placed the steak in a bowl and let it marinate in the fridge for 45 minutes. After marinating, I washed off the pineapple under cold water, dried the steak with paper towels, and then seasoned and cooked it.
Results: Pineapple worked incredibly well in my test. It turned a very tough eye of round steak into something surprisingly tender in just 45 minutes. Honestly, this method impressed me a lot. I didn’t expect such a tough cut to change that much so quickly. The texture became much softer and easier to chew, almost like a decent, naturally tender cut.
The reason it works so well is simple: fresh pineapple contains bromelain, an enzyme that breaks down proteins in the steak. Fresh pineapple matters because canning and cooking destroy bromelain. As a result, canned or cooked pineapple won’t tenderize the steak.
Timing is critical with pineapple. I find that 45 minutes is just right. Leave the steak in it for too long, especially more than an hour, and the texture starts to turn mushy.
The only issues I noticed were the flavor and the crust. Pineapple adds a slight sweetness to the steak, which not everyone likes, though I personally enjoy it. It also makes the steak so juicy inside and wet on the surface that achieving a decent crust with this method is basically impossible.
Method 6: Papaya
Tenderizing time: 45 minutes
Overall rating compared to the control steak: 8/10
Best for: tough cuts when you want tenderness without changing the steak’s flavor
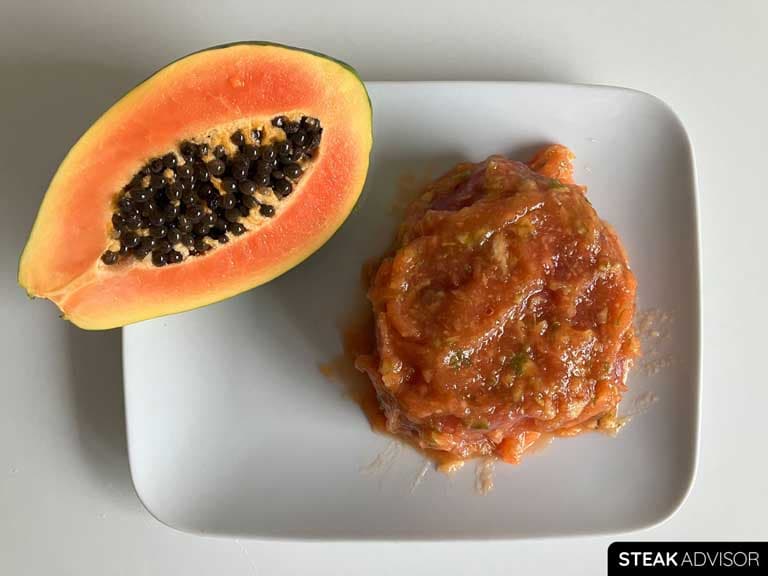
About this method: I blended a few chunks of papaya until smooth, placed the steak in a bowl, and generously covered it with the papaya puree. I let it marinate in the fridge for 45 minutes. After marinating, I rinsed off the papaya under cold water, dried the steak with paper towels, and then seasoned and cooked it.
Results: Similar to pineapple, papaya impressed me a lot. In my test, it turned a very tough eye of round steak into something surprisingly tender in about 45 minutes. The meat texture was no longer tough or chewy. It was soft, juicy, and much easier to chew. For such a tough cut, that’s an impressive result. Papaya does this thanks to papain, an enzyme that breaks down proteins in the steak.
What I also noticed is that using fresh green, unripe papaya doesn’t affect the steak’s flavor, which is a big advantage over pineapple. That’s why green papaya is the best choice for this method. It has more enzymes than ripe papaya, tenderizes the meat well, and is almost tasteless, so the steak still tastes like steak.
Again, just like with pineapple, timing matters. In my test, 30 to 45 minutes was the sweet spot. After more than an hour in papaya mush, the steak started to turn mushy.
This method does come with a few downsides. First, you need a blender or food processor to make the papaya puree. Second, getting a nice crust is basically impossible because the surface stays too wet. Third, fresh papaya needs to be handled carefully, as its latex can irritate the skin.

Method 7: Pineapple and Salt
Tenderizing time: 12-24 hours
Overall rating compared to the control steak: 10/10
Best for: maximum tenderness when you have time
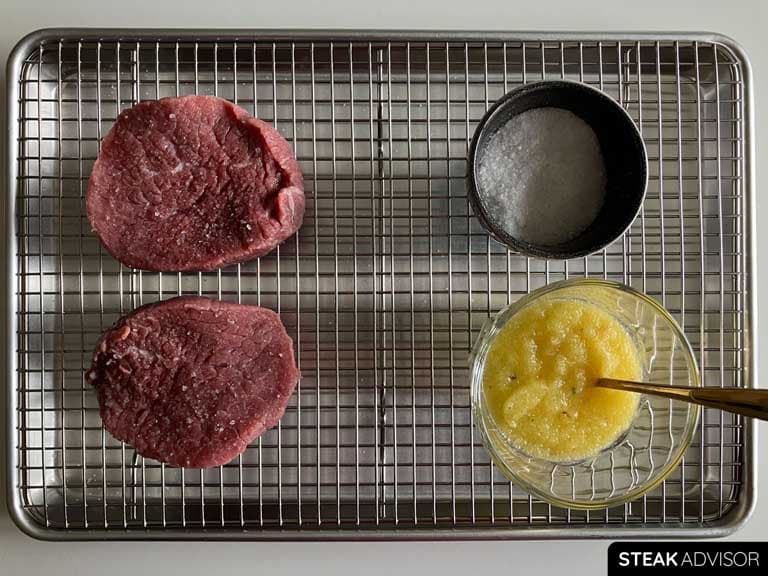
About this method: I blended pineapple chunks into a puree, spread it evenly over the steak, and let it sit in the fridge for 45 minutes. After that, I rinsed off the pineapple under cold water and dried the steak with paper towels. Then I generously seasoned both sides with kosher salt, placed the steak on a rack set over a baking sheet, and left it uncovered in the fridge overnight. I removed it from the fridge 30 minutes before cooking.
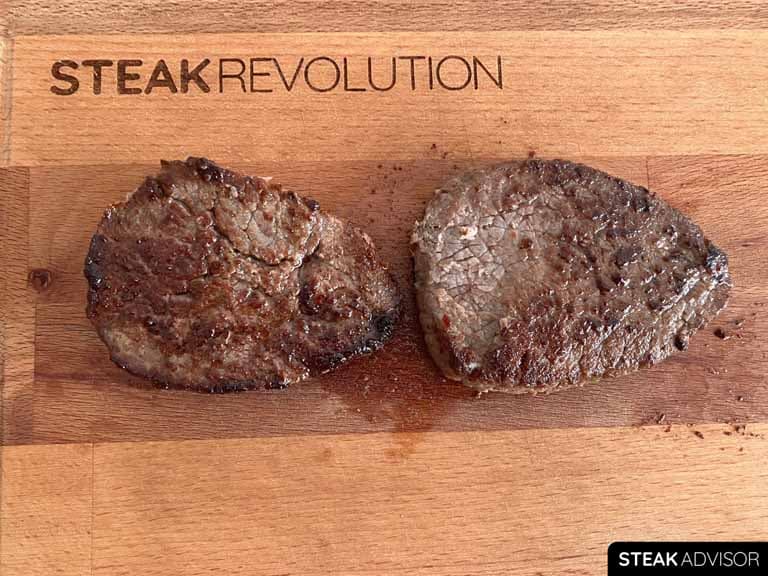
Results: I tried this method because pineapple, papaya, and baking soda all have the same major downside: they make it impossible to get a nice steak crust. Unfortunately, even after rinsing off the pineapple and salting the steak overnight, I still couldn’t get a proper crust in the pan. So in that regard, this test was a failure.
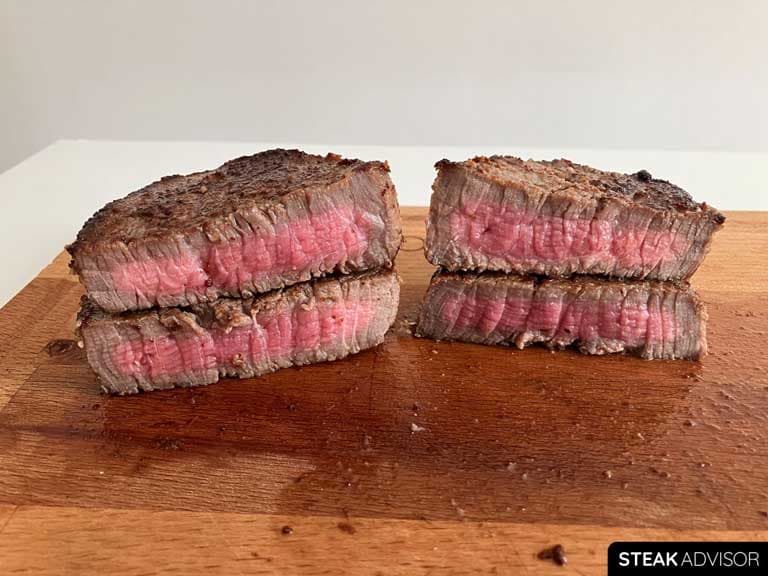
That said, this was the best tenderizing method I tested. The pineapple made the steak very tender, but more importantly, the salt made it much more flavorful overall. Together, pineapple and salt gave me the best balance of tenderness and flavor compared to the control steak.
The biggest downside is the time and effort this method requires. You need to blend the pineapple, rinse it off, dry the steak, salt it, and then leave it in the fridge overnight. Salting the steak for an hour will still add flavor if you’re in a hurry. However, if you want a more noticeable texture change, you need to salt it overnight.
I also noticed a much thicker gray band under the crust. That’s because the steak spent so much time dry-brining uncovered in the fridge.
Overall Key Takeaways
- Best single method: Marinate the steak in a fresh pineapple blend for about 45 minutes. In my tests, pineapple was the clear winner as a standalone tenderizing method. It made the biggest difference in tenderness on the eye of round steak I used for this test.
- Best overall result if you have time: Use both methods: pineapple first, then overnight salting. Marinate the steak in fresh pineapple for 45 minutes, rinse it under cold water, pat it dry, season it with salt, and leave it uncovered in the fridge overnight. The pineapple does most of the tenderizing, while the salt improves the flavor. In my test, this gave the best balance of tenderness and flavor.
- Fastest option: Marinate the steak in pineapple or fresh papaya at room temperature for 45 minutes, rinse it under cold water, pat it dry, season it with salt, and cook it right away. It’s not the best method for flavor or crust, but it works well when tenderness is the main goal, and you’re short on time.
- The least effective method for very tough cuts: Overnight salting. It improves flavor, helps dry the surface, and slightly improves the texture, but in my test, the change wasn’t noticeable enough for a very tough cut like eye of round. For cuts like that, I see it more as a supporting method than the main tenderizing technique.
For best results, keep the steak thin, ideally no thicker than 1 inch (2.5 cm). For very tough cuts, go even thinner, closer to 1/2 inch (1.3 cm).
Most tenderizing methods work better on thin steaks. Marinades are a good example because they mostly affect the surface of the meat, not the deep center. The thicker the steak, the less noticeable the result.
What Cuts of Steak Benefit From Tenderizing?
The cuts that benefit most from tenderizing are lean, hard-working muscle cuts with more connective tissue or coarse grain. Tenderizing makes them easier to chew and more pleasant to eat.
The best cuts to tenderize are:
- Bottom round steak
- Top round steak
- Eye of round steak
- Flank steak
- Inside skirt steak
- Chuck steak
- Shoulder steak
- Blade steak
- Tri-tip steak
- Bavette steak
The toughest cuts on that list are bottom round, top round, eye of round, chuck, shoulder, and blade steak. These benefit the most from an enzyme-based tenderizer method (pineapple or papaya) or a meat mallet.
Flank, skirt, and bavette are different. The problem with these cuts is not just toughness. It is the grain. They have long, pronounced muscle fibers, and if you slice with the grain, every bite is harder to chew, no matter how well you cooked the steak.
That’s why thin-slicing against the grain is so important. A marinade or light tenderizing improves the texture, especially with inside skirt steak, but it is not the most important step. With these cuts, proper cooking and slicing do most of the job.
I came in expecting the usual “use a mallet” advice, but the pineapple test was the surprise. I tried it on a cheap round steak and it was noticeably easier to chew after 45 minutes. Really useful comparison.
That one surprised me too. Thanks for sharing.
Really enjoyed the breakdown of each method! I’ve used the pineapple trick before and it really does make a difference. Might try the pineapple and salt next time.
I’ve tried almost all these methods in my kitchen, and I must agree that pineapple works wonders. But, I always advise people to watch the clock; overdoing it can turn your steak into mush. Moderation is key with tenderizers like pineapple and papaya.