
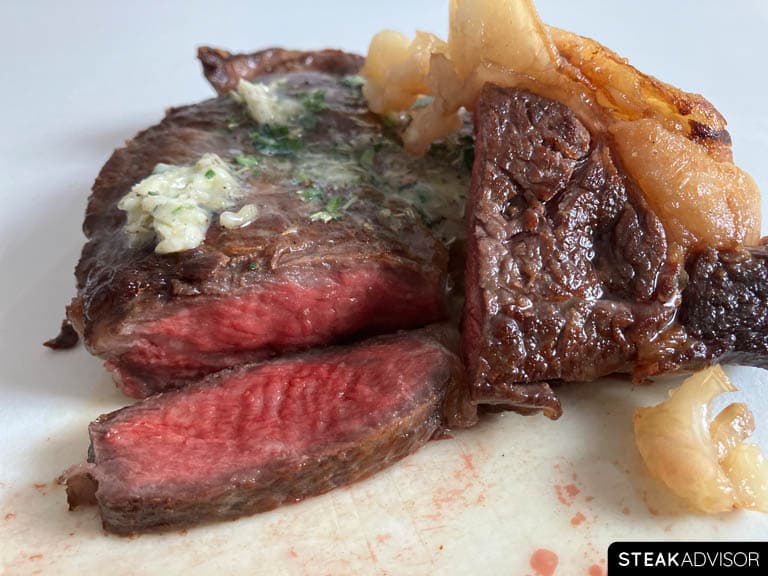
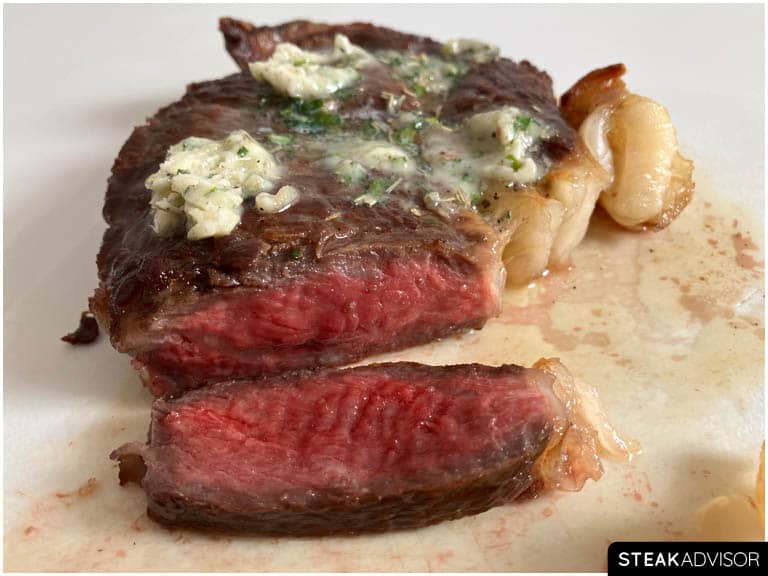
A hot cast-iron skillet, a well-seasoned steak, and garlic-herb butter are all you need for a restaurant-style steak at home: juicy inside, with a deep, crispy crust outside.
Important
I developed this recipe for steaks that are 3/4 to 1 1/2 inches (1.9-3.8 cm) thick. For thinner or thicker cuts, follow one of these guides instead:
For other cooking methods, see my full list of steak recipes.

Cooking steak in a cast-iron skillet is one of my favorite methods. It’s quick, reliable, works year-round, and delivers a deep, crispy crust hard to beat.
Over the past few years, I’ve cooked hundreds of steaks in a cast-iron skillet, testing different cuts, thicknesses, temperatures, and finishing methods. In this guide, I’ll show you the most reliable method I use to cook a great cast-iron skillet steak at home.
To make this recipe easier to follow and more consistent, I skip the butter basting and focus on searing the steak properly first. Then I finish it with garlic-herb compound butter. You still get that rich, buttery flavor, but with much less risk of overcooking the steak.
Ingredients You’ll Need
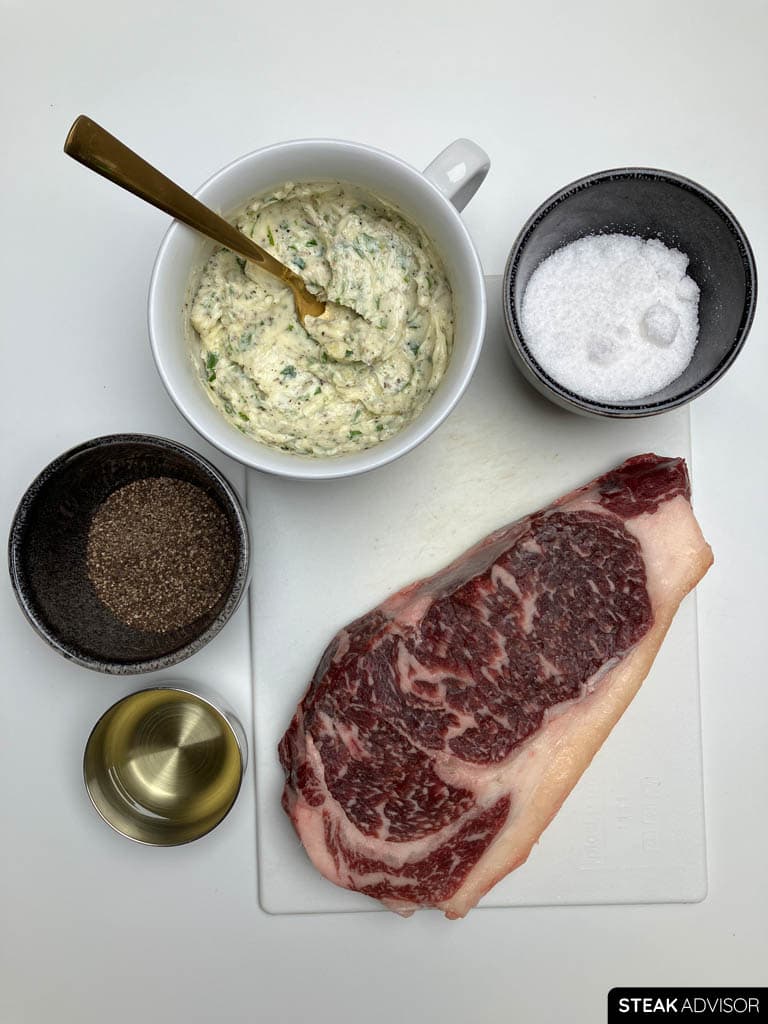
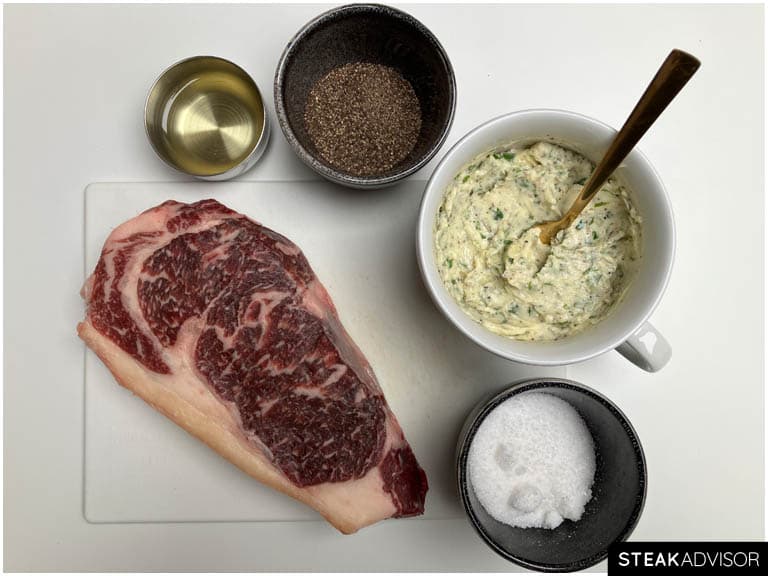
Here’s a quick visual overview of the key ingredients you’ll need for this recipe, along with important notes. For amounts, see the full recipe card below.
Ingredient Notes
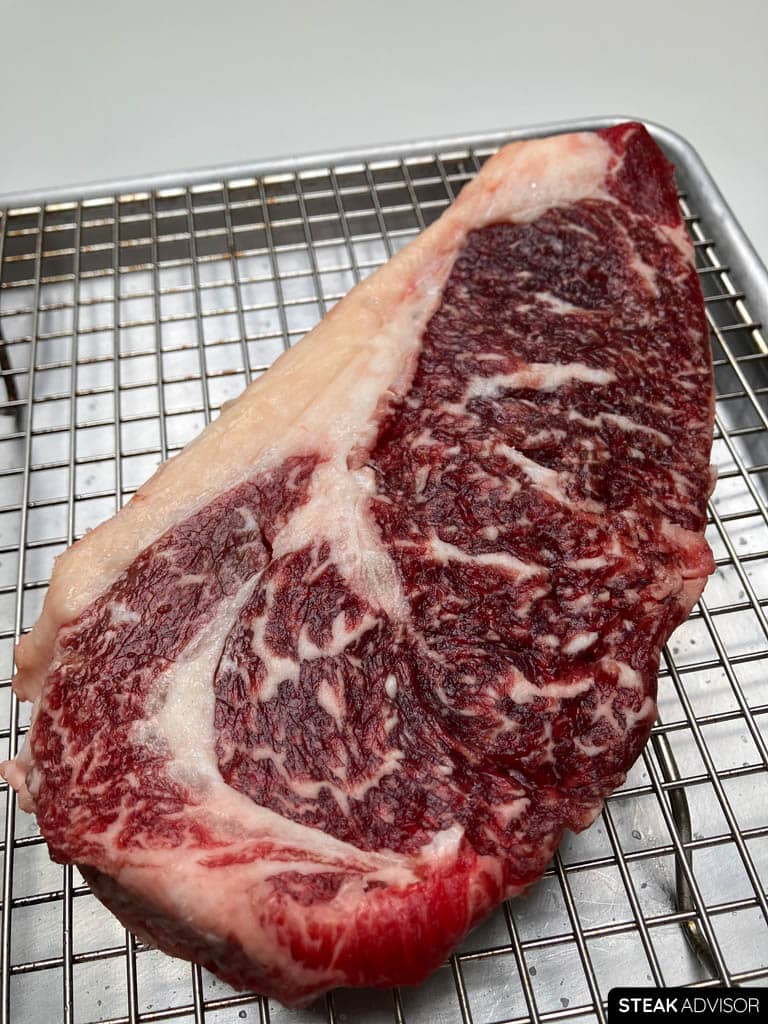
- Steak: Choose a naturally tender, flavorful cut, 3/4 to 1 1/2 inches (1.9–3.8 cm) thick, such as ribeye, strip steak, or tenderloin (filet mignon). For best results, aim for a cut closer to 1 1/2 inches (3.8 cm). See the FAQ section for more recommended cuts.
- Oil: Use high-smoke-point oil for searing. I like refined avocado oil because it has a neutral flavor and a high smoke point of about 500°F (260°C), which works well for hot pan searing. Don’t sear the steak in butter; it burns quickly over high heat.
- Salt: Use a coarse or flaky salt, such as kosher salt or Maldon sea salt. Avoid fine table salt because it’s much easier to overseason the steak with it. Use about 1% of the steak’s weight in salt, or up to 1.5% if you prefer a stronger, more seasoned flavor.
- Black pepper (optional): Use finely ground black pepper. It stays close to the surface, helping the steak make better contact with the pan. Coarsely cracked pepper can create small gaps between the meat and the pan, making it harder to get an even sear.
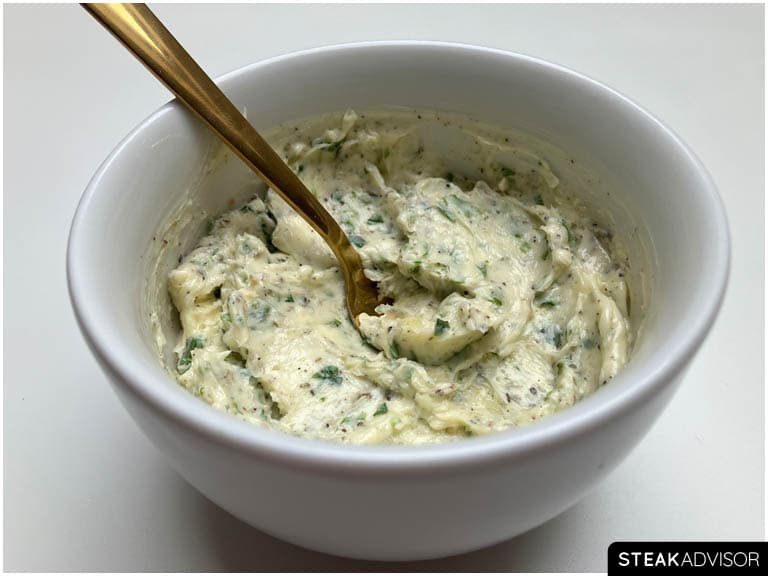
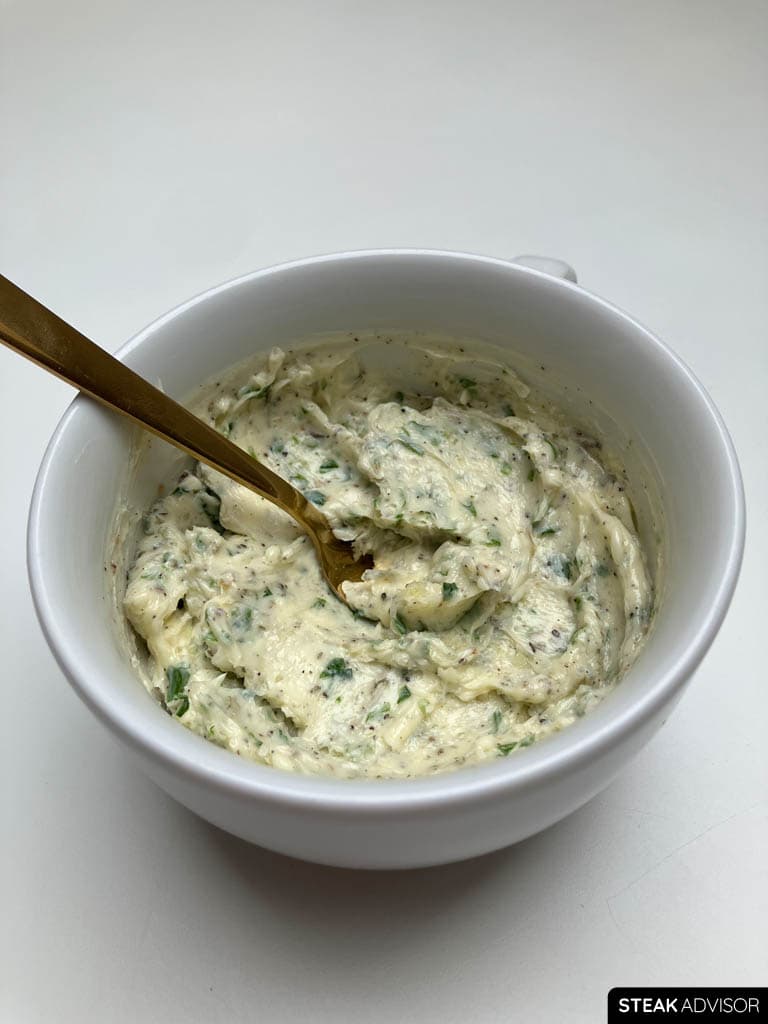
- Garlic-herb compound butter: A simple mix of softened butter, garlic, herbs, salt, and pepper. It gives you almost the same garlic-herb butter flavor as butter basting, but with less effort and better control over the steak’s doneness. You can also use a different type of compound butter if you prefer.
Note
If you don’t have compound butter on hand, you can make a quick garlic-herb butter in the same pan while the steak rests. After removing the steak, reduce the heat to medium and sear the garlic briefly until lightly browned. Add the herbs, then add the butter and let it melt. Turn off the heat and spoon the garlic-herb butter over the sliced steak before serving.
Tools You’ll Need
- Wire rack with baking sheet (optional): Helpful if you plan to dry-brine the steak. It keeps the steak raised rather than sitting flat on the tray, allowing air to circulate around it and drying the surface more evenly on all sides.
- Cast-iron skillet: Use a skillet large enough to fit the steak comfortably. The steak should sit flat against the pan, with full contact across the surface, so it can brown evenly and develop a proper crust.
- Tongs: Use whatever type you prefer, as long as they’re long enough to flip the steak comfortably and keep your hands away from the intense heat and oil splatter.
- Meat thermometer: You can use either an instant-read thermometer or a leave-in probe thermometer. Both work well, but a leave-in probe gives you more control because it lets you track the steak’s internal temperature from start to finish.
How to Cook Steak in a Cast-Iron Skillet
Here’s a bird’s-eye view of the process, but to ensure success, I highly recommend following the step-by-step instructions, with photos and ingredient quantities, in the recipe card below. Also, be sure to read the “Recipe Success Tips” and FAQs section below.
- Prep the steak: Pat the steak dry with paper towels, then season all sides with kosher salt. Place it uncovered on a wire rack set over a baking sheet, and refrigerate for at least 1 hour, or ideally 4–6 hours, for the best balance of flavor, crust, and a minimal gray band. Take it out of the fridge 15 minutes before cooking.

- Optional: Make the compound butter. While the steak is dry-brining, mix softened butter with salt, black pepper, garlic, and herbs. Cover it and refrigerate until needed.
- Heat the pan: Place a cast-iron skillet over medium-high heat and let it preheat for 3–4 minutes. Add a high-smoke-point oil and let it heat for about 1 more minute. While the oil heats, pat the steak dry one more time and season it with black pepper, if using.
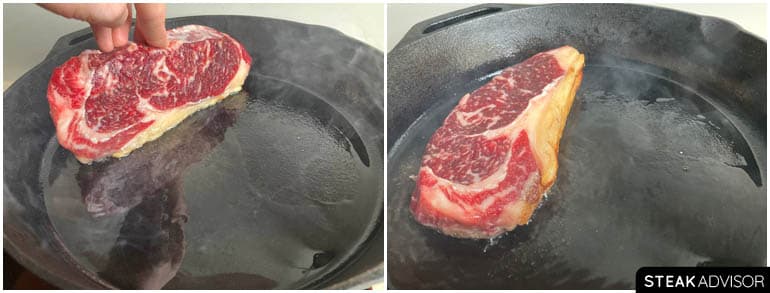
- Sear the steak: If you’re cooking a steak with a thick fat cap, such as a strip steak or picanha, start by rendering the fat cap for 60–90 seconds or until it’s nicely browned. Then lay the steak flat in the pan and sear it, flipping every 30 seconds, until the internal temperature is about 15-20°F (8-11°C) below your target doneness (see the temperature chart below). Remove it from the pan and let it rest for 5 minutes.
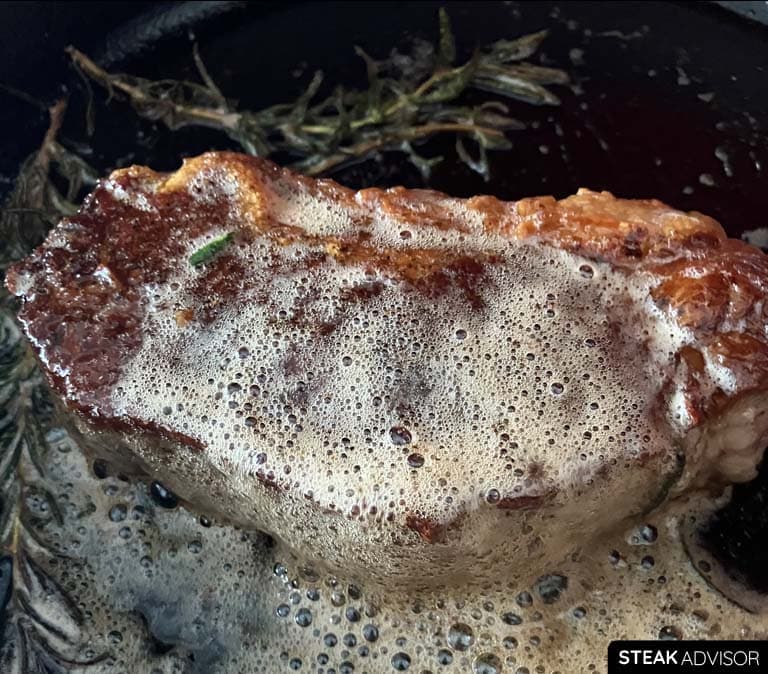
- Finish the steak: While the steak is resting, you can leave it as is, top it with compound butter, or make a quick garlic-herb butter in the same pan.
- Optional: Make the garlic-herb butter. Reduce the heat to medium and lightly brown the garlic in the same skillet. Add the herbs and butter, let the butter melt, then turn off the heat. Once the steak is ready to slice, spoon the garlic-herb butter over the top.
Cast-Iron Skillet Steak Temperature Chart
These guidelines apply only to steaks seared in a cast-iron skillet from start to finish as described in this recipe. Use the charts below as a pull-temperature guide, not a final-temperature chart.
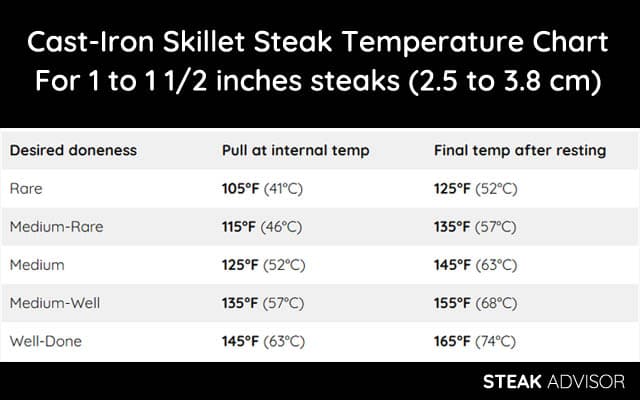
For steaks 1 to 1 1/2 inches (2.5 to 3.8 cm) thick
With this recipe, I expect about 20°F (11°C) of carryover cooking during a 5-minute rest for steaks 1 to 1 1/2 inches (2.5–3.8 cm) thick. That’s why I pull the steak from the pan before it reaches the final target temperature.
| Desired doneness | Pull at internal temp | Final temp after resting |
| Rare | 105°F (41°C) | 125°F (52°C) |
| Medium-Rare | 115°F (46°C) | 135°F (57°C) |
| Medium | 125°F (52°C) | 145°F (63°C) |
| Medium-Well | 135°F (57°C) | 155°F (68°C) |
| Well-Done | 145°F (63°C) | 165°F (74°C) |
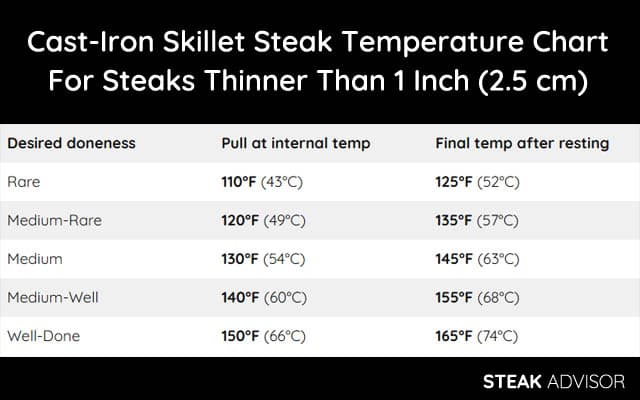
For Steaks Thinner Than 1 Inch (2.5 cm)
For steaks thinner than 1 inch (2.5 cm), expect less carryover cooking during the same 5-minute rest. Pull them from the skillet about 15°F (8°C) below your target final temperature.
| Desired doneness | Pull at internal temp | Final temp after resting |
| Rare | 110°F (43°C) | 125°F (52°C) |
| Medium-Rare | 120°F (49°C) | 135°F (57°C) |
| Medium | 130°F (54°C) | 145°F (63°C) |
| Medium-Well | 140°F (60°C) | 155°F (68°C) |
| Well-Done | 150°F (66°C) | 165°F (74°C) |
Tips for the Best Cast-Iron Skillet Steak
Always Pat the Steak Dry Before Cooking
Moisture is the biggest enemy of a good sear.
The goal of this recipe is to brown the outside quickly while keeping the inside juicy and cooked to your preferred doneness. To do that, the steak needs to be as dry as possible before it hits the pan.
If the steak goes into the pan wet, the surface moisture has to evaporate first before the steak can start browning properly. This hurts the sear on any steak, but the problem is especially noticeable with thinner cuts, around 1 inch (2.5 cm) thick or less. They cook so fast that by the time the surface starts to brown properly, the inside may already be close to your target doneness. That’s one of the main reasons people struggle to get a really good crust.
Pat the steak dry thoroughly with paper towels on all sides before seasoning, then pat it dry one more time right before searing.
It’s a simple step, but it makes one of the biggest differences in building a better crust on steak, assuming the cast-iron skillet is properly preheated before the steak goes in.

Salt the Steak The Right Way
The best way to salt a steak is to season it on all sides and place it on a wire rack set over a baking sheet.
- If you’re short on time, let it rest for at least 1 hour.
- For a much better balance of flavor and crust, refrigerate it uncovered for 4–6 hours.
For most 1–1.5 inch (2.5-3.8 cm) steaks, 4–6 hours is my preferred window.
Let me explain why this works so well.
After you salt a steak, the salt draws moisture to the surface, then dissolves in that moisture, creating a salty liquid on the steak’s surface. Within 2–3 minutes after salting, the steak starts to look wet, and this usually peaks around 15–20 minutes. Over the next 20–30 minutes, most of that salty liquid gets reabsorbed into the meat, and the surface starts to dry again. In total, this process takes about 45–60 minutes. Once it’s done, the steak will have a noticeably drier surface.
If you leave the steak uncovered in the refrigerator for a few more hours, the surface will dry even more due to air exposure. At the same time, the salt has more time to penetrate the meat, giving it a deeper, better-seasoned flavor that pairs perfectly with the natural beefy taste.
That’s why I recommend waiting at least 1 hour after salting before cooking, although this is really just the bare minimum. After that time, the steak will brown much better and taste noticeably better.
The difference between a dry-brined steak and a steak salted right before cooking is huge.
That said, don’t dry-brine the steak too long unless you know what to expect. A very long dry brine, especially around 24 hours, gives the steak a deeper flavor and an even drier surface, but it also creates a thicker gray band under the crust. Not everyone likes that stronger, saltier flavor either. For the best overall result, stick to 4–6 hours.
If you don’t have at least 1 hour to let the steak rest after salting, don’t salt it in advance. Either season the steak right before placing it in the pan, or salt it after searing.
I tested this side-by-side and published a case study on how to salt a steak, with photos, timing notes, and an explanation of exactly why I recommend salting the steak ahead of time rather than right before cooking.
Preheat the Cast-Iron Skillet Well
A cast-iron skillet is great for searing steak because it can reach very high temperatures and holds heat well. But you need to remember one thing: for searing, heat is everything. If the pan isn’t hot enough, you won’t get a good crust, no matter how well you prepared the steak before cooking.
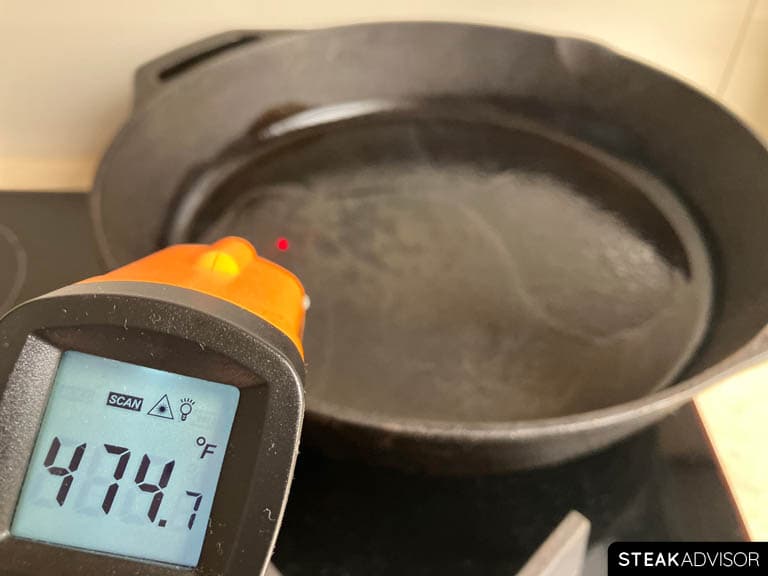
The Maillard reaction, responsible for browning, starts around 285–340°F (140–170°C). The problem is that the pan cools down the moment the steak touches it. That’s why you need to preheat it hotter than that, ideally to about 450–500°F (232–260°C). This helps the pan stay hot enough to sear the steak properly, even after the initial temperature drop.
In my experience, a cast-iron skillet usually needs about 4–5 minutes over medium-high heat to reach that range. You can use an infrared thermometer to check the temperature of your pan. It’s a cheap tool that shows exactly how hot your skillet gets on your stove.
Use the Right Oil
Another key factor is the oil. For pan-searing, always start with a neutral oil with a high smoke point. The pan needs to reach at least 400°F (204°C), and ideally closer to 500°F (260°C), so you can’t use just any oil.
Many common cooking oils start to burn at those temperatures, which can leave the steak with a bitter flavor. That’s why I recommend using an oil with a smoke point around 500°F (260°C). My go-to is refined avocado oil because it has a high smoke point and a neutral flavor, but there are several other good options too. See the table below.
| Type of Fat | Smoke Point ºF/ºC | Flavor profile |
|---|---|---|
| Refined Avocado Oil | 520ºF / 271°C | Neutral to very mild |
| Refined High-Oleic Safflower Oil | 510ºF / 266°C | Neutral |
| Refined High-Oleic Canola Oil | 475°F / 246°C | Neutral |
| Refined Pecan Oil | 470ºF / 243°C | Mildly nutty |
| Refined Canola Oil | 468°F / 242°C | Neutral |
| Refined Olive Oil | 465°F / 241°C | Mild to neutral |
| Refined Peanut Oil | 450ºF / 232°C | Neutral to mildly nutty |
| Refined Soybean Oil | 450°F / 232°C | Neutral |
| Clarified Butter / Ghee | 450°F / 232°C | Rich, buttery, mildly nutty |
| Refined Rice Bran Oil | 450°F / 232°C | Neutral to mildly nutty |
| Refined Corn Oil | 450°F / 232°C | Neutral to slightly sweet |
| Refined High-Oleic Sunflower Oil | 450°F / 232°C | Neutral |
| Refined Sunflower Oil | 450°F / 232°C | Neutral |
Smoke points are approximate and may vary depending on the product, degree of refinement, freshness, and method of measurement.
Do not sear the steak in butter. Butter burns quickly over the kind of heat you need for a proper sear. If you want that butter flavor, add it later, once the steak is already seared. You can melt it in the pan and pour it over the sliced steak, or simply place a slice of compound butter on top while the steak rests.
Render the Side Fat
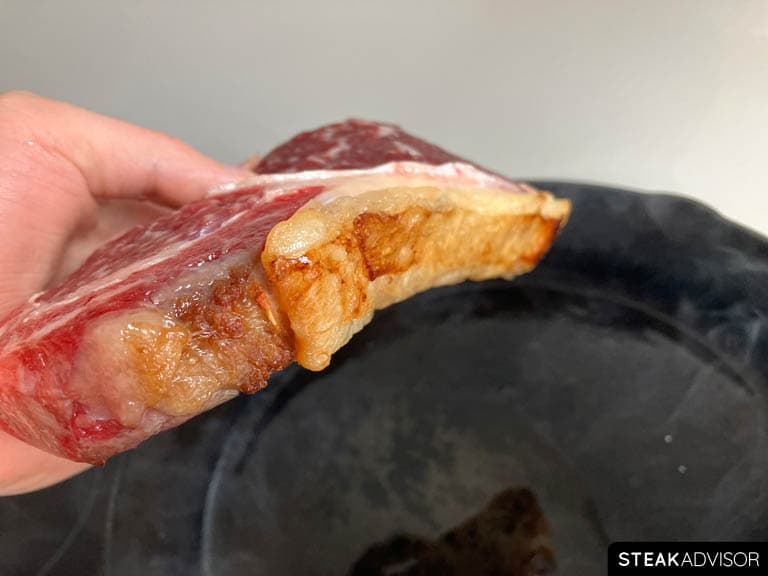
If your steak has a side fat cap, like a strip steak or picanha, I highly recommend rendering it first before searing the meat side, just as I do in this recipe.
Properly rendered fat should be nicely browned and slightly crispy, not pale and chewy. Over high heat, it doesn’t take long, usually about 1–2 minutes, depending on how thick the fat cap is and how hot your pan is.
You can also render the fat cap near the end of cooking, but I prefer doing it at the beginning. As the fat renders, some of it melts into the pan, adding extra flavor. It also makes the whole cooking process easier to control. Once the steak gets close to your target temperature, you don’t have to keep it in the hot pan to finish rendering the fat cap. That extra time in the pan can lead to more carryover and a higher risk of overshooting your target doneness.
Flip the Steak More Often
The advice to flip a steak only once doesn’t make much sense in most cases. Based on my tests, it’s much better to flip the steak every 30 seconds.
Letting the steak sit too long on one side can make it cook less evenly, especially with thicker cuts around 1 1/2 inches (3.8 cm) thick.
Flipping every 30 seconds helps the steak cook more evenly from both sides and gives you better control over the crust. It also helps reduce the gray band under the crust. Each side gets a short break from direct pan contact between flips, so the outer layers don’t stay extremely hot for too long. The result is a more even doneness inside.
Skip the Butter Basting
Yeah, I know, this is a bit controversial. But unless you’re very comfortable cooking steak in a pan, or you’re okay with a little less control over the final doneness, I recommend skipping the butter basting.
I’m skipping it in this recipe because it makes the cooking process harder, especially with thinner steaks. It looks simple, but in practice, you have to add butter, lower the heat, tilt the pan, spoon hot butter over the steak, and keep an eye on the internal temperature. That’s a lot to control when the steak is already cooking fast. One small error is enough to overshoot your target doneness.
Butter basting also changes how the steak cooks. When you flip the steak every 30 seconds, the side facing up gets a short break from direct contact with the pan and cools slightly. But when you keep spooning hot butter over it, that cooling effect is much smaller. The steak cooks faster, the outer layers get hotter, and the carryover increase is usually stronger after you remove it from the pan.
That’s why, for this recipe, I don’t think butter basting is worth the extra effort or the extra risk. You can get almost the same rich garlic-herb butter flavor in a much simpler way. Place a slice of compound butter on top of the steak as it rests, or melt butter with garlic and herbs in the pan after searing, then pour it over the sliced steak.
You also save a lot of butter, because classic butter basting usually requires a lot of it, and much of that butter stays in the pan anyway. It’s also not very practical when cooking more than one steak. With compound butter, things are much easier: place a slice on top of each steak while it rests, and you’re done.
Use a Meat Thermometer, Don’t Cook by Time
Please note that I don’t provide strict timing in this recipe. Why? There are too many variables: steak thickness, cut, pan temperature, stove power, starting temperature, and your target doneness. Relying on time alone is one of the easiest ways to overcook a steak.
That’s why I strongly recommend using a meat thermometer. Track the steak’s internal temperature and remove it from the pan early enough to account for carryover cooking. Even a basic instant-read thermometer or probe-style thermometer will do the job. They’re not expensive, but they make a huge difference.
Tip: When using a meat thermometer, insert the probe into the center of the thickest part of the steak for the most accurate reading.

Also, don’t rely on the touch test to check doneness. Some chefs still recommend pressing the steak and comparing its firmness to the fleshy part of your hand, but this method is unreliable unless you cook dozens of steaks every day. Different cuts feel different: filet mignon is much softer than strip steak, and a well-marbled ribeye won’t feel the same as a leaner cut. On top of that, everyone’s hand feels different, so using it as a reference point makes no sense if you want accurate results.
A thermometer removes the guesswork. It’s one of the most useful tools in my kitchen, and I use it every time I cook steak, especially with high-quality, more expensive cuts.
Remove the Steak Early and Let It Rest
The steak doesn’t stop cooking the moment you take it out of the pan. As it rests, heat from the outer layers continues to move toward the center, so the internal temperature continues to rise. This is called carryover cooking, and with fast, high-heat methods like pan-searing, the increase can be much bigger than most people expect.
With this recipe, the steak’s internal temperature can rise by about 15–20°F (8–11°C) within 5 minutes after you remove it from the pan, depending on the steak’s thickness and how hot the skillet was. That’s why you need to remove the steak before it reaches your target temperature. If you wait until it hits your final doneness in the pan, it will keep cooking as it rests and overshoot your target doneness.
Here’s an example. The graph below shows what happened after I removed a 1 1/4-inch (3.2 cm) thick steak from the pan: how much the internal temperature increased, how long it continued to rise, and what final temperature it reached after a few minutes.
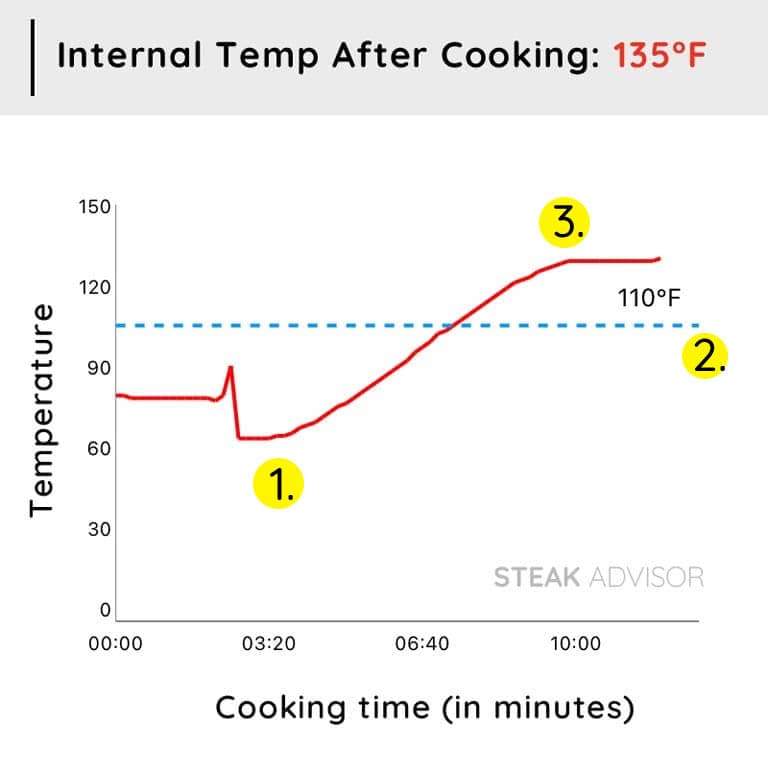
Here is a description of what the image above shows:
- This is the moment I inserted the probe into the steak and placed it in the pan. The probe first showed room temperature, and the sharp drop marks the moment it went into the steak and started reading the steak’s internal temperature.
- The blue line marks 110°F (43°C), the temperature at which I removed the steak from the pan and let it rest.
- After that, you can see how the internal temperature continues to rise over the next few minutes due to carryover cooking, until it finally stabilizes.
For resting, 5 minutes is enough for this recipe. Don’t cover the steak with foil. Just place it on a wire rack, cutting board, or even a plate, and leave it untouched.
For more details on resting time and carryover cooking, check out my guide: Resting Steak After Cooking: Why You Should and for How Long.
FAQs
Why is a cast-iron skillet so good for cooking steak?
There are two main reasons. First, cast-iron can handle very high heat, which is exactly what you need for a strong sear. Second, it holds heat really well. It takes longer to preheat than most pans, but once it’s hot, it stays hot.
That matters because the pan cools down the moment you place a cold steak in it. A properly preheated cast-iron skillet retains heat better, so the steak starts searing right away instead of sitting in a pan that’s too cool. That’s exactly what you need if you want a deep, crisp crust on the outside while keeping the center juicy and medium-rare to medium.
What are the best steak cuts for cooking in a cast-iron skillet?
You can cook almost any steak in a cast-iron skillet, but for the best results, choose cuts that are naturally tender, well-marbled, and about 1–1 1/2 inches (2.5–3.8 cm) thick. That thickness gives you enough time to build a beautiful golden-brown crust while keeping the inside medium-rare to medium.
Some of the best cuts for cast-iron include ribeye, New York strip, filet mignon, picanha, hanger steak, flat iron steak, porterhouse, T-bone, Denver steak, chuck eye steak, and teres major.
Thinner steaks, under 1 inch (2.5 cm), can be cooked in a cast-iron skillet too, but they cook much faster. Because of that, it’s harder to build a deep crust while keeping the inside medium-rare to medium. This is especially true for naturally thin cuts like outside skirt steak, ribeye cap, flank steak, flap steak (bavette), spider steak, or tri-tip. They can still turn out great in a skillet, but the pan needs to be very hot, and the searing time needs to be short to avoid overcooking the steak.
Can I sear a thicker steak in a skillet, for example, 2 inches (5 cm) thick?
Technically, yes. The problem is that once you go thicker than about 1 1/2 inches (3.8 cm), the steak starts to cook unevenly when seared from start to finish in a skillet.
With a steak that thick, the outside cooks much faster than the center. Depending on the thickness, you can end up with a very dark crust, a thicker gray band under the surface, and a center that is still undercooked. With steaks thicker than 2 inches (5 cm), the crust can even start to burn before the inside reaches your target doneness.
When you slice into a thick steak cooked this way, the doneness gradient is usually uneven. It goes from gray near the surface, through some pink, to a red or undercooked center. See the example below.

For thicker steaks, it’s better to combine hot-and-fast searing with a slower cooking method. Use reverse sear, forward sear, or sous vide instead. These methods give you better control over the inside while still letting you build a great crust.
Is it a good idea to preheat a cast-iron skillet in the oven before cooking?
Technically, yes. Preheating a cast-iron skillet in the oven heats the whole pan more evenly. That means fewer hot and cold spots once you move it to the stove and start searing.
You can see the difference clearly with an infrared thermometer. On a gas stove, the flame heats the spots where it hits the bottom of the skillet, so the pan develops hotter and cooler zones. In the oven, the heat surrounds the skillet from all sides, so the surface heats more evenly.
That said, I personally don’t see a big enough difference to make oven preheating worth the extra time for this recipe. When I preheat the cast-iron skillet on the stove for 4–5 minutes over medium-high heat, the steak still turns out great every time. So I stick to the easier and quicker option: preheating the skillet directly on the stove.
To what doneness should steak be cooked?
That’s very personal, and it also depends on the type of steak. Personally, for most steaks, I like the final internal temperature to land around 135–145°F (57–63°C), which is the upper side of medium-rare or the lower side of medium.
As a general rule, leaner cuts like filet mignon are best cooked to rare or medium-rare, definitely no higher than 140°F (60°C). Since they don’t have much intramuscular fat, they don’t benefit much from higher doneness. Once you push them past medium-rare, they quickly lose moisture and become noticeably less juicy and tender. For example, for filet mignon, many people prefer a temperature closer to 130-135°F (54-57°C),
Well-marbled cuts, such as a USDA Prime ribeye, are a little different. For those, in my opinion, the best doneness is the upper side of medium-rare or the lower side of medium, around 140°F (60°C). At that temperature, the intramuscular fat, or marbling, melts more noticeably, making the steak juicier and more flavorful. If you cook a well-marbled steak too rare, the fat doesn’t have enough time to melt properly and can feel firm, cold, or waxy.

If you’re not sure which doneness you prefer, check out my steak doneness and temperatures guide. I show the temperature range for each doneness level, explain the texture differences, and include real photos so you can see exactly how steak looks at each stage.
One important food safety note: according to the USDA, whole cuts of beef should reach at least 145°F (63°C) and rest for at least 3 minutes to be considered safe to eat.
I also have an article on eating raw steak, explaining whether it’s safe and what risks you should know about.
What should I do if the steak reaches my target temperature in the skillet?
If the steak reaches your target temperature while it’s still in the skillet, remove it immediately and slice it right away. Don’t let it rest.
At that point, the steak is already at your desired doneness. If you let it rest, carryover cooking will push the temperature even higher, and the steak will overshoot your target doneness. Slicing it right away releases heat faster and helps prevent the steak from overcooking further.
Why does steak seared in a cast-iron skillet have a thicker gray band?
A thicker gray band is normal with cast-iron searing because the steak cooks over very high direct heat. The meat near the surface gets much hotter than the center, so that outer layer cooks more before the inside reaches your target doneness.
You can’t avoid it completely with hot-and-fast pan searing, but you can minimize it. And this recipe already does that in two important ways: dry-brining for 4–6 hours instead of overnight, and flipping the steak every 30 seconds while searing. This helps you build a good crust while keeping the gray band as thin as possible.
Print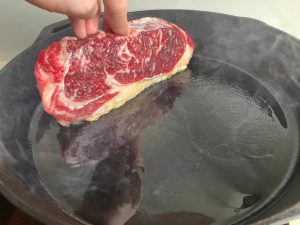
Cast-Iron Skillet Steak Recipe
- Prep Time: 10 minutes
- Dry-Brine Time: 1 to 6 hours
- Cook Time: 15 minutes
- Total Time: 1 hour 25 minutes
- Yield: 1 steak
Description
A simple cast-iron skillet steak recipe with a deep crust and a tender, juicy center. Finished with garlic-herb compound butter for rich flavor, it tastes like a restaurant-quality steak made at home.
Ingredients
For steak:
- Aim for a naturally tender steak 3/4 to 1 1/2 inches (1.9–3.8 cm) thick, such as ribeye, strip steak, or filet mignon.
- 2 tablespoons (30 ml) high-smoke-point oil (I recommend refined avocado oil)
- 1–2 teaspoons (5–10 g) kosher salt per steak (1-1.5% of the steak’s weight in salt)
- 1/2 teaspoon of finely ground black pepper per pound (454 g) of steak (optional)
For garlic-herb compound butter
- 1/4 pound (113 grams) unsalted butter
- 1–2 garlic cloves, finely chopped or pressed
- 1/4 teaspoon salt
- 1/2 teaspoon black pepper, finely ground
- 1 tablespoon parsley, finely chopped (fresh or dried)
- 1 tablespoon rosemary, finely chopped (fresh or dried)
For the butter-garlic-herb mixture finish (optional)
- 2 tablespoons (30 g) unsalted butter
- 2–3 garlic cloves, peeled and lightly crushed
- 2 sprigs fresh rosemary or thyme
Tools
- Wire rack and baking sheet (optional)
- Cast-iron skillet
- Tongs
- Meat thermometer (instant-read or leave-in probe thermometer)
Instructions
- Before you start, decide how you want to finish the steak. I highly recommend compound butter because it’s the easiest option and adds great flavor to the steak. If you don’t have time to prepare it, you can make a quick butter-garlic-herb mixture in the same pan while the steak rests.
- After that, gather your ingredients and tools, then follow the steps below.
Prepare the Steak
-
Pat the steak dry on all sides with paper towels, then season it evenly on all sides with 1–2 teaspoons of kosher salt total (about 1–1.5% of the steak’s weight).
-
Place it uncovered on a wire rack set over a baking sheet. Then choose the next step based on how much time you have and the results you want:
-
If you’re short on time: Leave the salted steak at room temperature for about 1 hour. That’s the bare minimum for dry-brining.
-
If you have a few hours: Let it sit uncovered in the fridge for 4–6 hours. This is the best option if you want great flavor, a beautiful crust, and a minimal gray band under the crust. I highly recommend this option.
-
Want to dry-brine it longer? See notes. If you don’t have at least 1 hour to let the steak rest after salting, don’t salt it in advance. Either season it right before it goes into the pan, or salt it after searing.
Make the Compound Butter (Optional)
- While the steak is dry-brining, prepare the compound butter. In a bowl, combine softened butter with salt, finely ground black pepper, finely chopped or pressed garlic clove, and finely chopped parsley or rosemary (fresh or dried).
- To soften butter quickly, microwave it in 5-second intervals, checking after each one, until it’s soft but not melted. Alternatively, cut it into small cubes and leave it at room temperature until it softens.
- If you’re cooking more than two steaks, feel free to double the recipe. Want to use different ingredients or make a larger batch for later? See notes.
Preheat the Cast-Iron Skillet
-
Regardless of the salting method you choose, make sure the steak sits at room temperature for about 15 minutes before it goes into the pan.
-
Place a cast-iron skillet over medium-high heat and let it heat for 3-4 minutes. Then add 2 tablespoons of oil and let it heat for about 1 minute.
-
While the skillet is heating, pat the steak dry again.
-
Optional: If using black pepper, season all sides with about 1/2 teaspoon of finely ground black pepper per pound (454 g) of steak.
- Then immediately move on to the next step.
Sear the Steak in a Cast-Iron Skillet
- Searing produces a lot of smoke, so turn on your exhaust fan or open a window before you start.
-
If you’re cooking a steak with a thick fat cap, such as a strip steak or picanha, start by placing it fat-side down in the hot skillet. Sear for 1–2 minutes, until the fat is browned and crisp. Then lay the steak flat in the pan.
- If your steak doesn’t have a thick fat cap, place it flat in the hot skillet right away.
- Once the steak is flat in the pan, sear over medium-high heat, flipping every 30 seconds. Cook until a meat thermometer probe inserted into the center reads 20°F (11°C) below your final target temperature.
- For medium-rare, remove it from the pan at 115°F (46°C); for medium, 125°F (52°C); and for medium-well, 135°F (57°C).
- Let the steak rest for 5 minutes. For rare, well-done, and final rested temperatures, use the chart below.
- For steaks thinner than 1 inch (2.5 cm), use the same final temperatures but pull the steak about 15°F (8°C) below the target instead of 20°F (11°C). See the notes for the thinner-steak chart.
Compound Butter Finish
- Place a bit of compound butter on top of the steak right after you take it out of the pan and let it melt as the steak rests.
- Optional: If you don’t have compound butter, use the same pan you seared the steak in. Lightly brown a few peeled garlic cloves over medium heat, then add a couple sprigs of rosemary or thyme and 2 tablespoons (30 g) of unsalted butter. Let the butter melt, turn off the heat, and pour the garlic-herb butter over the sliced steak before serving.
Slice and Serve the Steak
- After the steak has rested for 5 minutes, thinly slice it. For well-marbled, naturally tender cuts, slice it however you like. For cuts like outside skirt, hanger, or flank steak, be sure to slice against the grain (see notes).
- Serve with your favorite sides.
Notes
Dry brining for 12-24 hours: You can dry-brine the steak for 12–24 hours, but expect a thicker gray band under the crust. The flavor and crust will be excellent, but not everyone likes the deeper, saltier flavor that develops after a long dry brine, especially when the steak sits closer to 24 hours. If you want to try a longer dry brine, I recommend starting with 12 hours first. Then, next time, you can go longer and see if you like the difference. Just keep in mind that the closer you get to 24 hours, the more noticeable the gray band under the crust becomes.
Compound butter: If you want to make a larger batch to keep on hand, roll it into a log and let it firm up in the freezer. It’s much easier to store this way, and you can slice off only what you need whenever you cook steak. If you’re looking for other flavor ideas, check out my compound butter recipes for steak, where I share different ingredient combinations with step-by-step instructions.
If you keep the compound butter in a bowl in the fridge, storage time depends on the ingredients. For garlic-herb compound butter, use it within 4 days. Follow the conservative rule recommended by the National Center for Home Food Preservation for homemade garlic-in-oil mixtures, because garlic stored in fat can be a botulism risk if handled incorrectly. Keep it refrigerated at 40°F (4°C) or lower. For longer storage, freeze it. You can keep compound butter frozen for a few months, but for the best quality, use it within 2–3 months.
For steaks thinner than 1 inch (2.5 cm), expect less carryover cooking during the same 5-minute rest. Pull them from the skillet about 15°F (8°C) below your target final temperature.
Slicing against the grain: This technique shortens the muscle fibers, making each bite easier to chew. It’s one of the simplest ways to make tougher, chewier cuts noticeably more tender because your teeth don’t have to work as hard to break through long muscle fibers. If you’re not sure how to find the grain direction or how to slice the steak properly, check out my guide to slicing steak against the grain.
The dry-brine step was worth it. Better flavor with very little extra work.
Really appreciate the feedback, Alex.
No fancy steps, just a really good steak from a skillet. Exactly what I was looking for.
Really appreciate the feedback.
Simple but really effective. Patting the steak dry right before the pan gave me a much better crust than I usually get. Definitely keeping this method.
Nice. That dry surface makes a big difference.
Tried this with a ribeye that was a little over 1 inch thick, and it turned out incredible. The crust was seriously good, and the steak stayed juicy inside. Great cast iron method.
Love to hear that, thanks!
The pat-dry step right before searing made a huge difference for me. I’m getting a much better crust now, and dry-brining the steak for a few hours gave it way more flavor. Simple method, but the results are seriously better.
Thanks, Kevin!
Great recipe! The steak turned out perfectly juicy with a beautiful crust.
Thanks, Michael! Really glad you enjoyed the recipe and that the steak turned out great.