| PREP TIME | REST TIME | COOK TIME |
| 10 mins | 1 to 6 h | 1 h |
Evenly cooked steak from edge to edge, with a beautiful, crispy crust – that’s what you get with the reverse sear method. In this guide, I’ll show you how to do the oven-to-pan reverse sear: start low and slow in the oven, then finish with a quick, high-heat sear in a pan. I’ll also show you how to boost the steak’s flavor with dry brining and extra aromatics.

Reverse searing is one of the best techniques for cooking really thick steaks. It’s simple and almost foolproof, though not as precise as sous vide. The big advantage is control – you can bring the steak to the desired doneness without much risk of overshooting. Reverse searing works best for steaks at least 1 1/2 inches (3.8 cm) thick, ideally about 2 inches (5 cm) thick. For thinner cuts, you’ll get better results with classic hot-and-fast cooking methods.
Reverse Sear Steak: What Is It?
Reverse sear is a two-stage method for cooking steak: first, low and slow, then hot and fast. You start by gently cooking the steak at low heat until its internal temperature is close to your target doneness. Then you finish it with a quick sear over high heat to build a nice, crispy crust on the outside. For the low-heat stage, you can use a smoker, the cool side of a two-zone grill, or a low-temperature oven. For the final sear, use a hot pan or blazing charcoal. Just use whatever setup gives you steady low heat at the start and intense high heat at the end – that’s what makes reverse sear work.
Below, I’ve listed the main advantages and disadvantages of reverse searing so you can decide if it’s the right method for the type of steak you’re cooking.
Advantages of the Reverse Sear Steak Cooking Method:
- Even cooking: Low-and-slow cooking gradually brings the steak up to temperature, allowing the heat to spread evenly throughout the meat. Instead of a thick gray band just under the crust and a thin strip of doneness in the center, you end up with an evenly cooked steak from edge to edge.
- Nice crust: A dry surface is the key to a great sear. Cooking the steak slowly at low heat gives its surface moisture time to evaporate. By the time you move to high, direct heat, the exterior is dry enough to brown quickly and evenly. The result is a crisp, flavorful crust that forms faster and with less of a gray band just beneath the surface.
- Minimal gray band: With classic high-heat cooking methods (grilling or pan-searing), it’s nearly impossible to avoid a wide gray band under the crust on steaks that are about 2 inches (5 cm) thick. The reason is simple: the steak spends too much time over direct, intense heat. With the reverse sear method, the steak spends most of its time cooking gently at low heat and is only seared quickly at the very end. Cooked this way, the inside stays pink from edge to edge with almost no gray band.
- No need to rest before cooking: With the reverse sear method, you don’t need to let the steak sit at room temperature before cooking. Since it starts cooking at low heat, the steak cooks evenly from edge to center without that step.
- Versatility: At home, the most common way for reverse searing is to use an oven for the low-heat stage and a pan for the sear. It’s easy, predictable, and works any time of day, in any weather. However, reverse sear isn’t limited to an oven and a pan. You can reverse sear a steak on a grill, in a smoker, or with any setup that lets you cook the steak low and slow, then finish it over direct high heat.
- No need for fancy tools: Reverse searing doesn’t require special equipment. Indoors or outdoors, all you need is an oven or grill, a cast-iron or stainless steel skillet, a rack set on a baking sheet, and a meat thermometer.
- Simple and forgiving: Reverse searing is one of the easiest ways to cook steak to the right doneness every time. It’s straightforward, novice-friendly, and very forgiving as long as you follow the steps and use a steak that’s at least 1 1/2 inches (3.8 cm) thick. Just keep in mind, it’s not completely foolproof. If you leave the steak in the oven for too long or sear it for more than the suggested 2 minutes, you can still overcook it.
Disadvantages of the Reverse Sear Steak Cooking Method:
- Time-consuming: Reverse sear takes longer than classic hot-and-fast methods. It’s straightforward, but you’ll spend much more time compared to just grilling or pan-searing. And sometimes, the payoff (that edge-to-edge doneness) doesn’t feel worth the extra effort. A thin gray band under the crust or slightly less-even cooking won’t ruin a steak.
- Not recommended for thin steaks: The reverse sear method works best for steaks that are at least 1 1/2 inches (3.8 cm) thick. At first, this might sound like a big disadvantage, but it’s not. With thinner cuts (around 1 inch / 2.5 cm), reverse sear just doesn’t make sense. It takes longer, and you can get the same (or even better) results much faster with classic hot-and-fast methods like pan-searing or grilling. Thin steaks also risk overcooking in the oven before you even get to the final sear.
Personally, I prefer the reverse sear method for steaks that really need it: thick, premium cuts like a 2-2 1/2-inch (5-6.4 cm) bone-in ribeye (cowboy steak or tomahawk steak), or a filet mignon. With those, the extra time pays off. For everyday cooking, though, hot-and-fast methods usually make more sense. If I want to speed things up, I sear the steak first, then finish in the oven (check out my full guide on how to cook a steak with the sear-first, oven-finish method). And when I want absolute consistency with no hassle, I go with the sous vide steak cooking method.
How to Reverse Sear a Steak: Ultimate Guide
The reverse sear method is simple as long as you stick to the basics. Gather all the ingredients and tools first, then follow the step-by-step instructions below.
Note
While developing this recipe, I ran many tests to figure out what works and what doesn’t. If you want more details on how reverse searing works, check the FAQs.

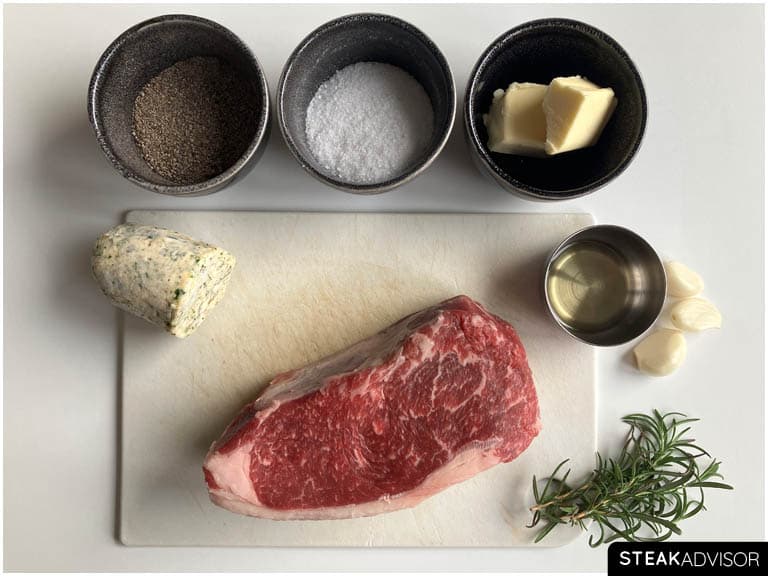
The Ingredients You’ll Need
For steak:
- Steak: At least 1 1/2 inches (3.8 cm) thick, ideally about 2 inches (5 cm).
- High-smoke-point oil: 2-3 tablespoons (30-45 ml), I recommend refined avocado oil, with a smoke point of 500°F (260°C) and neutral flavor.
- Kosher salt: 1-2 teaspoons (5-10 g), depending on the size of your steak. Use about 1% of the steak’s weight in salt, or go up to 1.5% if you prefer a deeper, saltier flavor.
- Black pepper (optional): 1/2 teaspoon per pound (454 g) of steak. Use only finely ground black pepper.
For aromatics in a pan (optional):
- Fresh herbs: A few sprigs of thyme or rosemary.
- Garlic: 2-3 cloves, peeled.
- Unsalted butter: 2 tablespoons (28 g).
Note: If you prefer to skip the step of adding butter, garlic, and herbs to the pan, you can use compound butter instead. Place a bit over the steak immediately after searing, and it’ll melt into the meat, adding the same richness with less effort.
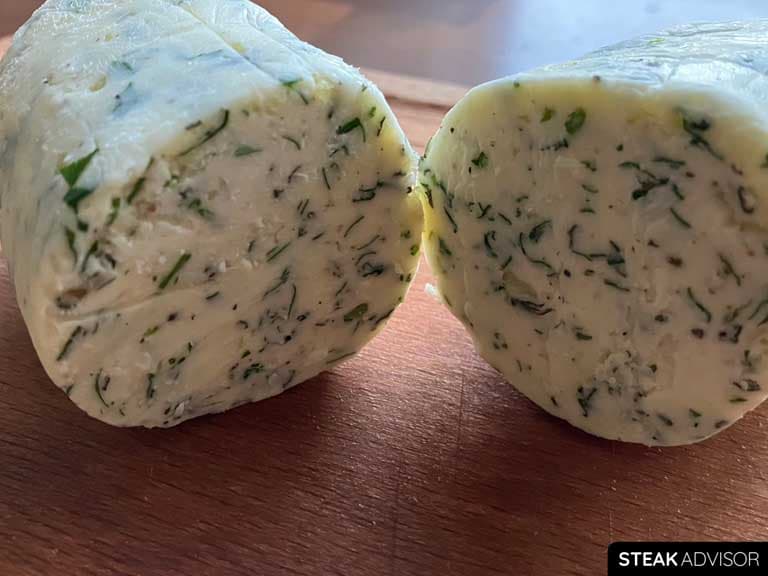
For compound butter (optional):
- Unsalted butter: 1/4 pound (113 grams), at room temperature
- Garlic: 1 clove, finely chopped or pressed
- Salt: 1/4 teaspoon
- Black pepper: 1/2 teaspoon, finely ground
- Parsley: 1 tablespoon, finely chopped (fresh or dried)
- Rosemary: 1 tablespoon, finely chopped (fresh or dried)
If you plan to cook more than two steaks, feel free to double the ingredients for the compound butter. If you want a larger batch, make it a day ahead. Roll it into a log and let it rest in the fridge until firm. That way, you can slice off what you need at any time.
The Tools You’ll Need
- Pan: A cast-iron or carbon steel skillet is your best choice for the final sear. They hold heat exceptionally well, making it easy to build a deep, crispy crust during the final sear. A heavy stainless-steel pan works too, if that’s what you have. You need something that can handle high heat for the final sear.
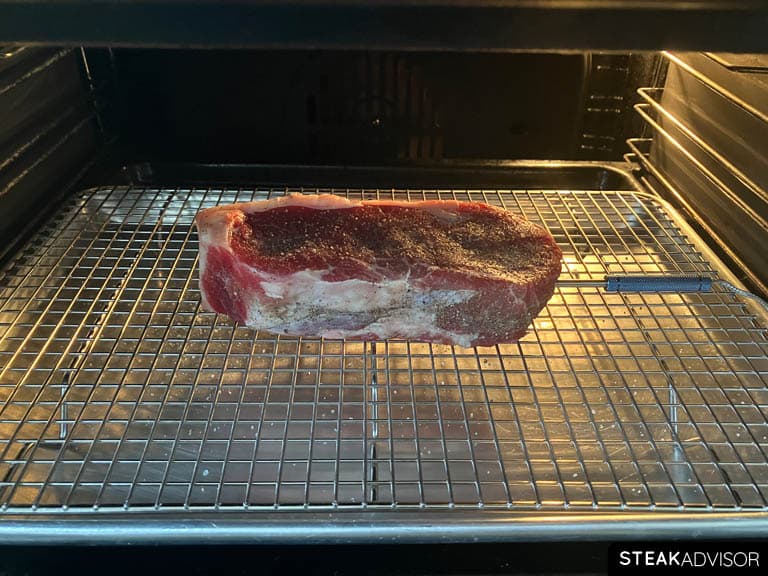
- Wire rack and baking sheet: You’ll need a wire rack set over a baking sheet for the oven stage.
- Meat Thermometer: A probe thermometer is your best option for this recipe because it continuously monitors the steak’s internal temperature while it’s in the oven. An instant-read thermometer works too, but you’ll have to open the oven more often to check the temp, and each time you do, a little heat escapes, which can make the cook take slightly longer.
- Tongs: For flipping and handling the steak safely during the final sear.
Step 1: Prepare the Steak
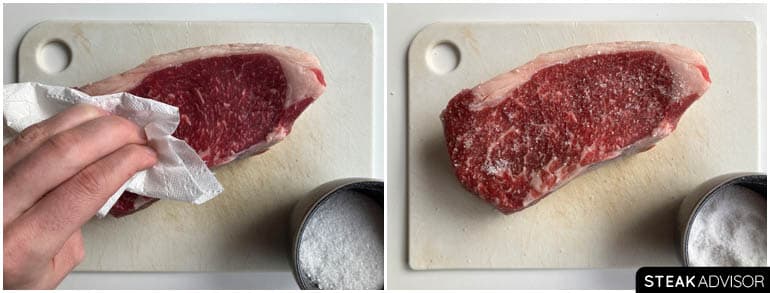
Pat the steak dry with paper towels, then season both sides generously with 1-2 teaspoons of kosher salt (1-1.5% of the steak’s weight) and optionally with finely ground black pepper on both sides (1/2 teaspoon per pound/454 g of steak). Place it on a wire rack set over a baking sheet and refrigerate uncovered for at least 1 hour, or ideally 4-6 hours for better flavor. You can leave the salted steak even longer for a deeper flavor. Keep in mind that the longer it sits with salt, the more noticeable that gray band under the crust becomes.
Note
My goal with this recipe is to maximize the benefits of the reverse sear technique. I see many people using the method in a way that ruins its biggest advantage: a steak that’s evenly pink from edge to edge when cooked to medium-rare or medium doneness. One of the biggest mistakes is dry-brining the steak for too long (1-2 days) and then complaining about the thick gray band that forms under the crust, even if you sear it perfectly at the end.
With classic hot-and-fast cooking methods like pan-searing or grilling, the main purpose of dry-brining is to dry out the surface for a better sear, with improved flavor as a secondary benefit. With reverse searing, the goal is to achieve a better flavor first, then a dry surface. Since the steak starts low and slow in the oven, the surface doesn’t need to be completely dry before cooking to build a nice crust.
The problem is that the longer a salted steak sits in the refrigerator, the thicker that gray band under the crust becomes. The biggest difference shows up after 1-2 days – at that point, the gray layer is very noticeable, and even if you nail the final sear, you’ve already lost one of the main benefits of reverse sear: a perfect pink gradient from edge to edge.
Here’s the good news: you can still get almost all of the benefits of dry-brining without forming up that gray band. The trick is to keep it short, no longer than about 6 hours. A 4-6-hour dry-brine is enough to enhance flavor, improve the sear, and slightly dry the surface, while keeping the inside evenly pink. If you go longer, you’ll get a much deeper flavor, but you’ll also see a thicker gray band, which, in my opinion, defeats the purpose of using reverse sear in the first place. Especially considering it already takes more time than classic pan-searing.

Step 2: Make the Compound Butter (Optional)
This step is optional, but I strongly recommend it. Make the compound butter while the steak is dry-brining. In a bowl, combine 1/4 pound (113 grams) softened butter with 1/4 teaspoon salt, 1/2 teaspoon finely ground black pepper, 1 finely chopped or pressed garlic clove, and 1 tablespoon finely chopped parsley or rosemary (fresh or dried). If you’re cooking more than two steaks, feel free to double the recipe.
If you want a larger batch, make it a day ahead. Roll it into a log and let it rest in the fridge until firm. That way, you can slice off what you need at any time (see my step-by-step recipe for garlic-herb steak butter)
If you’d rather skip making the compound butter ahead of time, you can also add the aromatics (garlic, herbs, and butter) directly to the pan after the final sear. Let them sizzle together, then pour the mixture over the sliced steak for a similar boost of flavor (more on that later in the recipe).
Note
A bit of compound butter, melted over the steak immediately after searing, is one of the easiest ways to take its flavor to the next level. Unlike basting, it doesn’t distract you during the cook – you can focus entirely on getting the steak just right, then finish it with butter as it rests. It’s less work, more control, and just as delicious.
Basting during reverse sear has a few disadvantages. It’s easy to overcook the steak or create a thicker gray band during basting. I often see people finish the quick sear, then keep cooking just to baste with butter. The result? More carryover cooking and a thicker gray band inside, since the steak spends too much time over direct heat.
Step 3: Start Cooking the Steak in the Oven
Preheat the oven to 225°F (110°C). Place the steak on a wire rack set over a baking sheet and put it in the center of the oven. Bake until a meat thermometer reads 20°F (11°C) below your target doneness (see the temperature chart below), then remove it from the oven. Don’t worry if the steak doesn’t look great at this point; the final sear will build a crust and bring it to its final temperature.
| Doneness | Remove at temp: | Final temp after searing: |
| Rare | 100-110°F (38-43°C) | 120-130°F (49-54°C) |
| Medium Rare | 110-120°F (43-49°C) | 130-140°F (54-60°C) |
| Medium | 120-130°F (49-54°C) | 140-150˚F (60-66°C) |
| Medium-Well | 130-140°F (54-60°C) | 150-160˚F (66-71°C) |
| Well Done | 140-150°F (60-66°C) | 160°F+ (71°C+) |
Cooking time depends on the steak’s thickness, how accurate your oven temperature actually is, and your target doneness. That’s why I recommend using a leave-in probe thermometer with an alarm – it makes the process much easier since you don’t have to keep checking the internal steak temperature with an instant-read thermometer.
Note
A wire rack is a must for this recipe. It lifts the steak off the baking sheet so hot air can move around it, helping the surface dry out and making it much easier to get that crisp, golden-brown crust later. Without a rack, the steak sits flat on the pan; the bottom overheats and cooks faster, while the top dries out, and the whole steak ends up cooking unevenly. Using a rack prevents those issues and keeps both sides cooking at the same rate.
When cooking steak in the oven, don’t go over 225°F (about 110°C). Cooking at this low temperature keeps carryover cooking to a minimum, which makes it much easier to hit your target doneness.
Based on my tests, the hotter the oven, the more carryover you’ll get. For example, if you cook the steak at 275°F (135°C), you can expect the steak’s internal temperature to increase by over 10°F (6°C) during the first 5-10 minutes of resting. To keep things simple and avoid overcooking, I recommend sticking with 225°F (110°C). At that temperature, carryover cooking is close to 5°F (3°C), making it much more predictable to cook the steak to your exact target temperature.

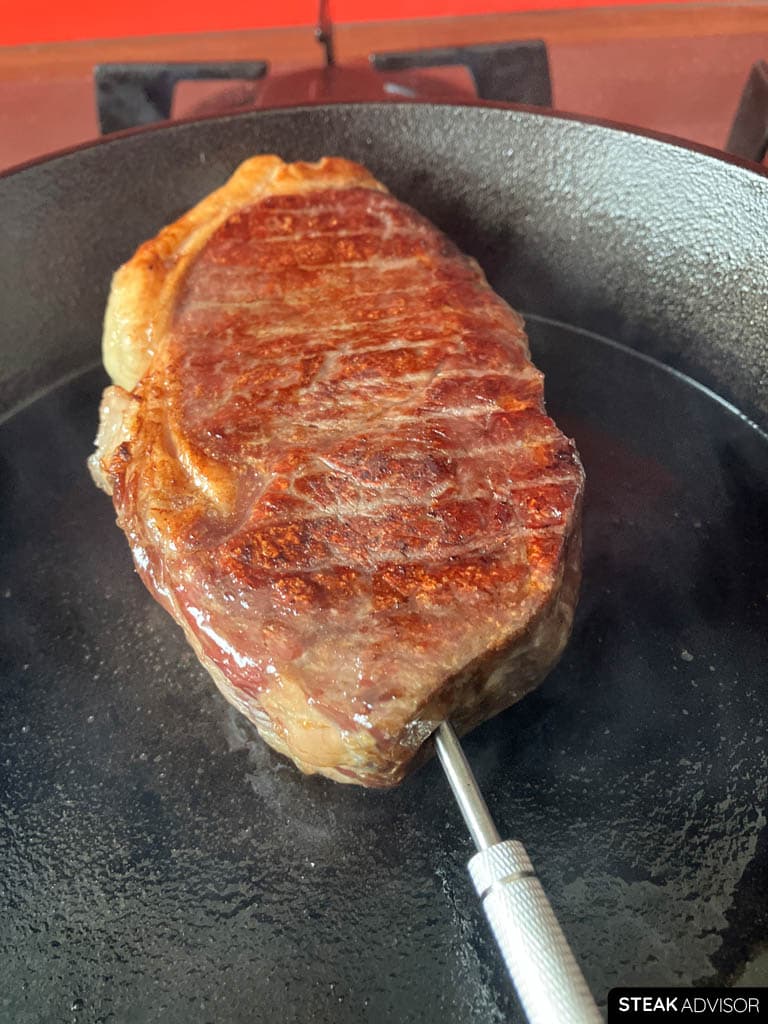
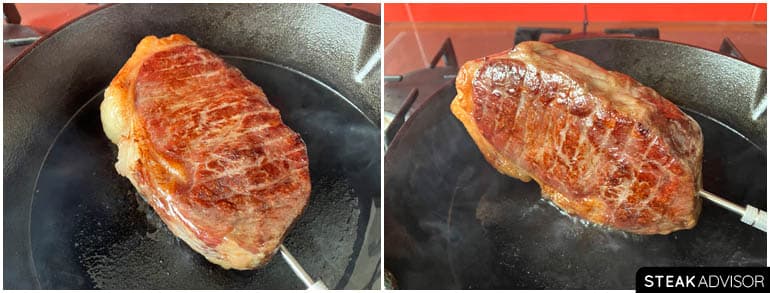
Step 4: Sear the Steak
Preheat a pan over medium-high heat for 3-4 minutes. Add 2-3 tablespoons of oil and let it heat for another minute. Place the steak in the pan and sear for 2 minutes total, flipping every 30 seconds. Each time you flip, press the steak gently against the pan to maximize contact and build a better crust.
If the steak has a fat cap (like a strip steak or picanha), sear it fat cap-side down for 60-90 seconds to render the fat. If there’s no fat cap, quickly sear the other edges for about 15-30 seconds. Once seared, remove the steak from the pan and let it rest for 5 minutes.
If you’re using compound butter, now’s the time to add a spoonful on top of the hot steak. In that case, skip the next step (aromatics) and go straight to serving.
Note
After dry-brining and cooking in the oven, the final sear is the most crucial step and also the one that many people get wrong. Done incorrectly, it results in an overcooked steak with a thick, gray band inside.
To do it right, first preheat the pan until it’s very hot, ideally around 450-500°F (232-260°C), which should take about 4-5 minutes over medium-high heat with a cast iron skillet on a gas stove. Then sear the steak for a total of no more than 2 minutes (1 minute per side), flipping every 30 seconds.
These details really matter: searing for too long or skipping the frequent flips almost always leads to a thicker gray band, and in the worst case, an overcooked steak.
Remember to use a high-smoke-point oil with neutral flavor (for example, refined avocado oil or one of the alternatives listed below) and
| Type of Fat | Smoke Point ºF | Smoke Point ºC |
|---|---|---|
| Refined Avocado Oil | 520ºF | 270ºC |
| Refined Safflower Oil | 510ºF | 266ºC |
| Beef Tallow | 480ºF | 250ºC |
| Pecan Oil | 470ºF | 243ºC |
| Refined Peanut Oil | 450ºF | 232°C |
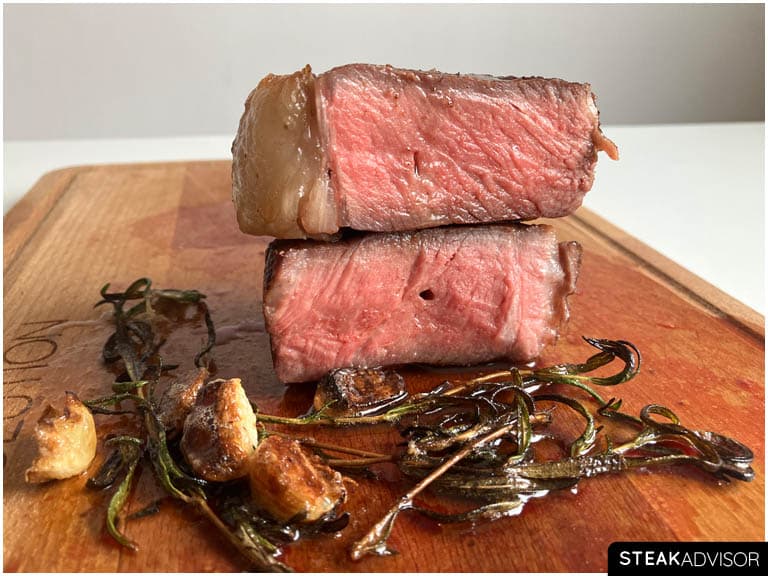
In this step, the goal is simple: to build a nice crust as quickly as possible, nothing more. That’s why I keep the aromatics and compound butter separate and focus only on searing; I want the steak to be perfectly pink inside (wall to wall), with no significant gray band. For me, that’s what a properly reverse-seared steak should look like, and it’s exactly why this technique is worth the extra time compared to regular searing.
With classic hot-and-fast cooking, you simply can’t achieve the same results. So if I’m going to reverse sear, I make sure to do it the right way – otherwise, what’s the point of spending the extra hour only to end up with results that aren’t much better than a classic few-minute pan sear?
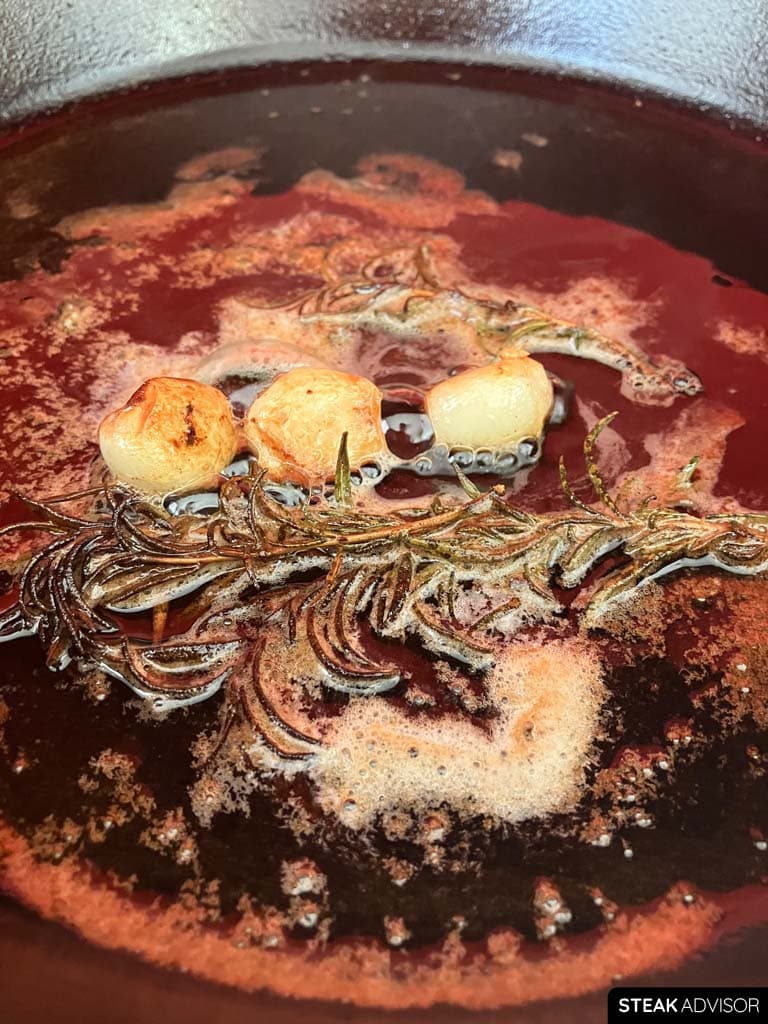
Step 5: Prepare the Aromatics (Optional)
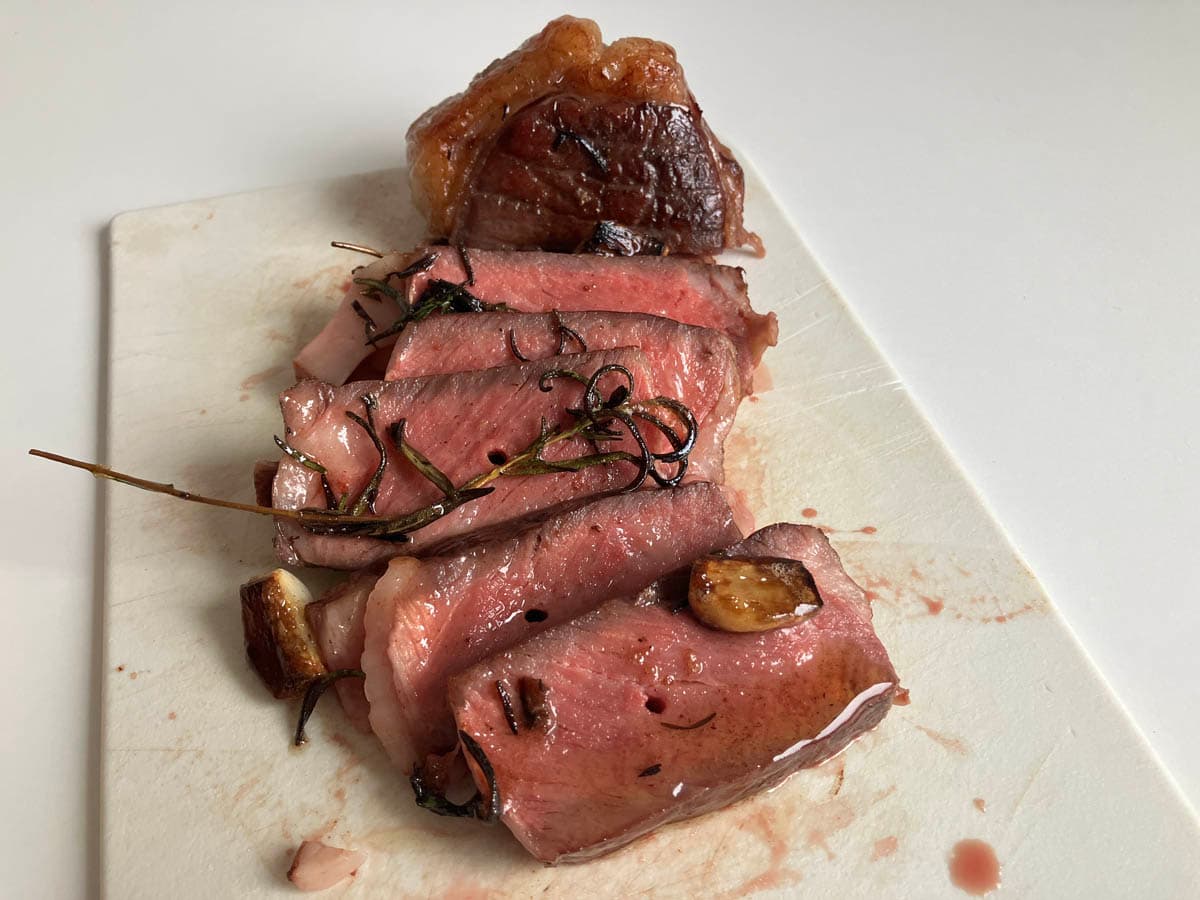
This step is optional for those who don’t have compound butter prepared. After searing the steak, keep the pan on the stove and add a few peeled garlic cloves and sprigs of fresh herbs. Let them cook over medium-high heat until the garlic turns a light golden color. Reduce the heat to medium-low, add the butter, and let it melt together with the aromatics. When the butter mixture is ready, move straight to the final step: serving.
Note
Basting a steak with butter is a popular technique, but in my opinion, it’s not the best choice for every cooking method. From my experience, it works well only with very thick steaks cooked entirely in a pan, where you have enough time to baste without worrying about overcooking. With reverse sear and similar methods, the final sear is very short, so I prefer to keep things separate: sear the steak, remove it from the heat to rest, then prepare the aromatics. This way, I can focus on one task at a time and avoid overcooking while still getting the benefits of garlic, herbs, and butter.
To me, there’s not much difference in flavor between butter basting and simply preparing aromatics after the sear, or even placing a bit of compound butter on the steak right after cooking. Basting may look impressive, but in most cases, I don’t think it’s worth the extra effort.
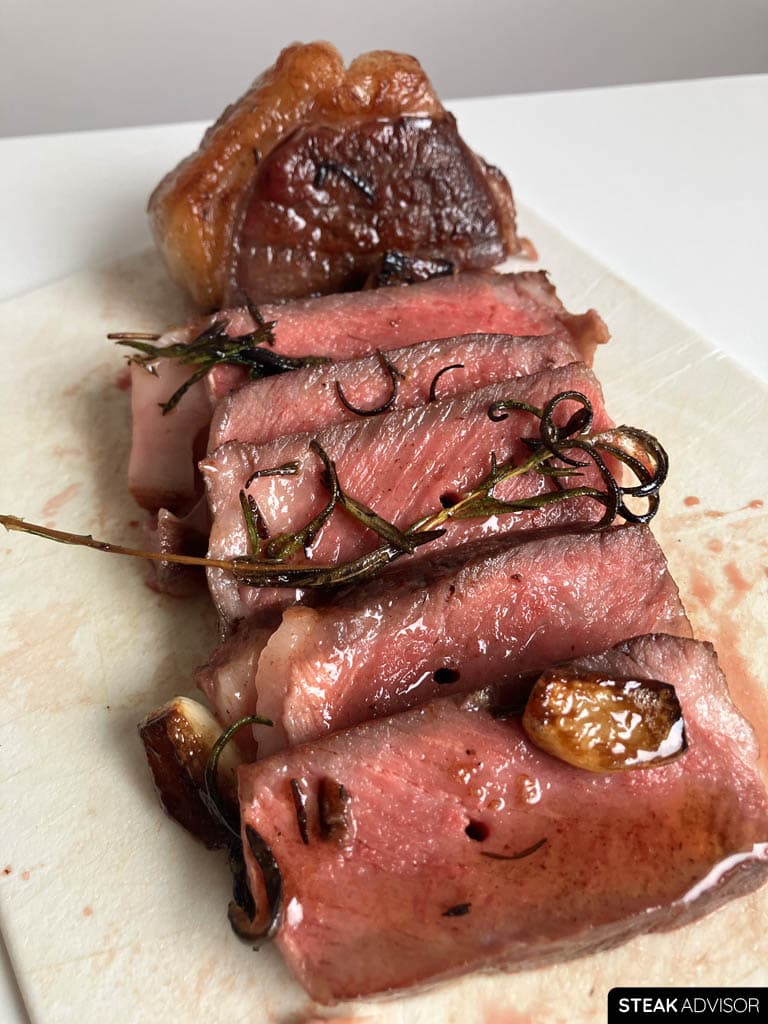
Step 6: Serve the Reverse-Seared Steak
Once the steak has rested for at least 5 minutes, slice it thin. If you skipped the compound butter and used the pan juices instead, spoon them over the sliced steak along with the garlic and herbs right before serving.
Note
As the steak rests after the final sear, its internal temperature will continue to increase due to the carryover cooking, usually by about 15°F (8°C) within 5-7 minutes. Searing a steak in a very hot pan always leads to noticeable carryover cooking. That’s why I mentioned earlier to take the steak out of the oven about 20°F (11°C) below your target doneness. After the quick final sear, carryover will bring it right to your target temperature.
From my tests with this recipe, using a cast-iron skillet heated over medium-high for 4-5 minutes total (including heating the oil), then searing the steak for 2 minutes, flipping every 30 seconds, consistently results in about 15-20°F (8-11°C) of carryover for steaks 1 1/2 to 2 inches (3.8-5 cm) thick.
So don’t skip the resting step after searing. Let the steak rest for at least 5 minutes and finish cooking on its own. While it rests, that’s a good time to quickly prep your sides or get any aromatics ready.
FAQs
What are the best cuts of steak for reverse sear?
The reverse sear method works best for thick, naturally tender steaks that are at least 1 1/2 inches (3.8 cm) thick, and ideally over 2 inches (5 cm) thick. Technically, you can reverse-sear a thinner 1-inch (2.5 cm) cut, but in my opinion, it’s not worth the effort. Thin steaks do much better with a classic pan-sear, where quick, high heat gets the job done. Reverse searing takes a lot of time, so save it for those premium, thick cuts that really benefit from the method, naturally tender cuts like ribeye, strip, or filet mignon.
Reverse sear shines with premium, thick steaks that are difficult to cook evenly using only high heat. If you try to cook a steak that’s over 2 inches (5 cm) thick only in a hot pan, the outside will burn before the inside has a chance to cook through. The result? An unevenly cooked steak with a thick gray band around the edges and a red center. Still tasty, but far from perfect. With reverse-searing, you start cooking the steak gently at a low temperature. This lets the inside cook evenly from edge to edge. Then, you finish with a quick sear to build a nice crust. The result? A perfectly cooked steak, juicy throughout, with beautiful wall-to-wall doneness and decent crust on the outside.
Do I need to let the steak rest at room temperature before cooking it with the reverse sear method?
No. One advantage of the reverse sear method is that you can cook the steak straight from the fridge. The low, gentle heat in the oven ensures a gradual temperature rise, so resting at room temperature isn’t necessary.
There is one small thing to keep in mind. From my tests, steaks that go into the oven straight from the fridge have very little carryover cooking (sometimes almost none). When I let the steak rest at room temperature for about 30 minutes before cooking, the carryover is usually higher, about 5°F (3°C). As for even cooking, it doesn’t really matter. With reverse searing, the steak cooks evenly on the inside, whether you rest it beforehand or not.
When’s the best time to take a reverse-seared steak out of the oven?
Take the steak out when it’s 20°F (11°C) below your target doneness. This buffer keeps it from overcooking during the final sear. You’ll find a complete temperature chart for reverse-seared steak below.
| Doneness | Remove at temp: | Final temp after searing: |
| Rare | 100-110°F (38-43°C) | 120-130°F (49-54°C) |
| Medium Rare | 110-120°F (43-49°C) | 130-140°F (54-60°C) |
| Medium | 120-130°F (49-54°C) | 140-150˚F (60-66°C) |
| Medium-Well | 130-140°F (54-60°C) | 150-160˚F (66-71°C) |
| Well Done | 140-150°F (60-66°C) | 160°F+ (71°C+) |
With the reverse-sear method (oven-to-pan), you can expect the steak’s temperature to rise by about 20°F (11°C) in total from start to finish. Here’s how it breaks down:
- As soon as the steak comes out of the oven, it will rise about 5°F (3°C) while it rests, and you preheat your pan.
- Then, during the final sear in a very hot pan, you’ll usually see another about 10-15°F (6-8°C) increase.
The exact rise depends on factors such as the steak’s thickness, oven temperature, and cooking time. But from the moment you take it out of the oven until it’s seared and ready to serve, expect an average carryover of 15-20°F (8-11°C).
Can I do the final sear on a grill?
Absolutely. The key is getting the grill as hot as possible before you start.
- Gas grill: Preheat with all burners on high, then place the steak directly over the hottest burner zone.
- Charcoal grill: Light a full chimney of charcoal and let the coals turn gray with a thin layer of ash. Concentrate them into one spot to create an intense heat zone, then sear the steak directly over the coals.
Once the grill is ready, follow the same rule as with pan-searing: sear over direct high heat for about 2 minutes total, flipping every 30 seconds.
What are the most common mistakes when reverse searing a steak?
- Taking the steak out of the oven too late: Always remove the steak from the oven well before it reaches your target temperature. Remember, the steak’s internal temperature will rise as it sears in a ripping hot pan and again while it rests. If you only take it out 5°F (3°C) below your goal, you’ll overshoot and end up overcooking it. The fix is simple: remove the steak at least 15°F (8°C) below your target doneness.
- Searing the steak in a pan for too long: This is one of the most common (and most important) mistakes to avoid when reverse-searing. The final sear should be quick and intense, just long enough to build a nice crust. Typically, it takes 2 minutes in total. Sear it any longer, and you risk forming a thick gray band inside the steak. In the worst case, the extra time spent at such high heat can cause a significant carryover, leaving you with an overcooked steak. Keep the sear short and keep it hot, and you’ll hit that perfect balance: a beautiful crust on the outside, and juicy and evenly cooked inside.
- Not flipping the steak during searing: If you let the steak sit too long on one side, the outer layer will absorb too much heat. The result? A thicker gray band under the crust. The fix is simple: flip the steak every 30 seconds. You’ll get a more even sear, a thinner gray band, and a beautifully cooked steak from edge to edge.
- Dry-brining the steak for too long: Dry-brining is a game-changer. It boosts flavor, slightly tenderizes the meat, and dries out the surface for a better sear. But it does have one disadvantage: the longer a steak sits salted, the thicker the gray band forms under the crust. It’s especially noticeable after an overnight rest in the fridge. To get the best of both worlds (great flavor and a dry surface, without the gray band), limit dry brining to about 4-6 hours.
- Basting the steak after the final sear: I prefer not to baste during the final step of reverse-searing, and the reason is simple: it can easily overcook the steak. That extra time in a ripping hot pan might build more flavor, but it also risks pushing the doneness too far and creating a thicker gray band inside. What I prefer to do is sear the steak first, let it rest, and then prepare the aromatics separately in the pan. I pour that butter mixture over the sliced steak right before serving (it tastes amazing). Even better, I often just go with a compound butter. It’s faster, easier, and gives me the same rich, aromatic flavor without risking overcooking.
- Not preheating the pan properly: If the pan isn’t hot enough, you’ll never get that deep, flavorful crust – the steak will just cook unevenly and steam on the surface. Let the pan heat until it’s very hot before adding the steak. Depending on your skillet and stove, it usually takes 4-5 minutes to reach the right temperature.
- Pan too crowded: Overcrowding is one of the easiest ways to ruin a sear. The moment a steak hits the pan, the temperature drops rapidly. Add two or three at once, and that drop can be big enough to ruin the sear. The solution is simple: make sure the pan is ripping hot before adding any steak, or better yet, sear one steak at a time. That’s the way I do it. The final sear only takes 2 minutes per steak, so even if you’re cooking several, it’s quick and keeps every steak perfectly seared.
- Using the wrong oil for searing: For high-heat searing, you need an oil with a high smoke point and a neutral flavor. Low-smoke-point oils (like unrefined olive oil or butter) burn quickly, leaving bitter flavors.
- Not using a meat thermometer: Reverse-searing is more predictable than most other steak cooking methods, but that doesn’t mean you should rely solely on time. Every steak cooks a little differently depending on its thickness, your oven, and your pan. The only way to guarantee perfect results every time is to use a meat thermometer to monitor the steak’s internal temperature throughout the process. It takes out the guesswork and makes hitting your target doneness much easier.
The goal of this recipe is simple: to maximize the benefits of the reverse-sear method. That means a steak that’s cooked perfectly from edge to edge with a beautiful, dark crust on the outside. To get there, follow the steps closely and be aware of the common mistakes listed above. Do that, and you’ll nail the reverse-sear every time.
What’s the difference between the forward sear and reverse sear steak cooking methods?
Forward sear and reverse sear are two different methods for cooking a steak. With the forward sear (front sear), you start by cooking the steak over high heat to build a crust, then finish it over lower heat until it reaches your target doneness. With reverse sear, you do the opposite: cook the steak slowly at low temperature first, then finish it with a quick sear over high heat.
One of the biggest differences between the two is cooking time. Forward searing is much faster (about half as long as reverse searing). The downside is that if you don’t flip the steak often enough (around every 30 seconds), you’ll usually end up with a slightly thicker gray band under the crust. That’s because with the forward-sear method, the steak spends much longer over high heat, whereas with the reverse-sear method, the final sear over high heat takes only about 2 minutes.
Reverse searing does have a clear advantage when it comes to even doneness and juiciness. Since most of the cooking happens at lower temperatures, the steak tends to retain slightly more moisture and cook more evenly from edge to center. For many people, this also makes reverse searing a bit more forgiving and easier to control. That doesn’t mean you can’t get an evenly cooked, juicy steak with a forward sear; you absolutely can. It just takes a bit more attention and timing, and there’s less room for error compared to reverse searing.
Resting is another difference. With the forward-sear method, you must let the steak rest at room temperature for about 30 minutes before cooking to help it cook more evenly (without a red center). With reverse sear, you can skip that step and cook the steak straight from the fridge.
That said, forward sear does have one major advantage: crust. Because the steak is seared over high heat first, it develops a deeper crust that looks great and adds a lot of flavor. Cooking method also matters here. On a grill, reverse searing takes longer than forward searing, but that extra time over low heat can give the steak a stronger smoky flavor.
For me, the choice between the forward sear and reverse sear mostly comes down to time. If I have the extra hour and don’t mind a slower process while I prep the sides, I’ll go with reverse sear. If I need something faster, a forward sear works just fine. Both methods are great for thick steaks. The main difference is how much time you have. For a very expensive, thick steak (around 2 1/2 inches / 6.3 cm), especially something like a heavily marbled ribeye, I usually prefer reverse sear for consistency. For a good-quality but less premium 2-inch (5 cm) steak, I often choose to forward-sear it. It’s faster and still delivers great results when done right.
Which is better: sous vide or reverse sear?
Sous vide is the better choice if consistency is your main goal. It’s the easiest way to cook steak to the same temperature every time, and you don’t even need a meat thermometer. The downside is the additional investment in a sous vide machine and the fact that steaks come out with a wet surface after cooking. Even if you pat them dry, the surface never crisps as well as it does with reverse sear. Reverse searing, on the other hand, naturally dries the surface during the oven stage, making it easier to achieve a crisp, flavorful crust. It’s still a relatively foolproof method, but you need to remember to pull the steak from the oven at the right time to avoid overcooking.
Both reverse sear and sous vide give you the same edge-to-edge gradient inside; the difference lies in control and convenience. So, here’s the rule of thumb: if you want the best crust, choose the reverse sear method. For absolute precision with minimal effort, choose sous vide.
Print
Reverse Sear Steak Recipe
- Prep Time: 10 minutes
- Rest Time: 1 to 6 hours
- Cook Time: 60 minutes
- Total Time: 1 hour 10 minutes
- Yield: 1 steak
Description
Perfect edge-to-edge doneness with a crisp, beautifully browned crust – that’s what you get with the reverse sear method. Start the steak low and slow in the oven, then finish with a quick sear in a hot pan to build that amazing crust. Add a little butter, garlic, and some fresh herbs at the end for extra flavor, then slice and serve right away.
Ingredients
For steak:
- Any tender steak that’s at least 1 1/2 inches (3.8 cm) thick
- 2–3 tablespoons (30–45 ml) high-smoke-point oil (I recommend refined avocado oil)
- 1–2 teaspoons (5-10g) kosher salt (use roughly 1-1.5% of the steak’s weight in salt)
- 1/2 teaspoon finely ground black pepper per 1 pound (453 g) of steak (optional)
For aromatics in a pan (optional):
- A few thyme sprigs or rosemary (optional)
- 2–3 peeled garlic cloves (optional)
- 2 tablespoons (30 g) unsalted butter (optional)
For compound butter (optional):
- 1/4 pound (113 grams) unsalted butter, at room temperature
- 1 garlic clove, finely chopped or pressed
- 1/4 teaspoon salt
- 1/2 teaspoon black pepper, finely ground
- 1 tablespoon parsley, finely chopped (fresh or dried)
- 1 tablespoon rosemary, finely chopped (fresh or dried)
Tools:
- Pan (cast-iron, carbon steel or heavy-bottomed stainless steel skillet)
- Wire rack
- Baking sheet
- Meat Thermometer (A leave-in probe thermometer is best for oven cooking, but an instant-read thermometer works too)
- Tongs
Instructions
- Before you start, decide which aromatics you want to use (compound butter, pan juices made after the final sear, or none at all).
- Gather all your tools and ingredients, then follow the steps below.
Prepare the Steak
- Pat the steak dry with paper towels, then season both sides generously with 1-2 teaspoons of kosher salt (1-1.5% of the steak’s weight) and optionally with finely ground black pepper on both sides (1/2 teaspoon per pound/454 g of steak).
- Place it on a wire rack set over a baking sheet and refrigerate uncovered for at least 1 hour, or ideally 4-6 hours for better flavor (see notes).
Make the Compound Butter (Optional)
- In a bowl, combine 1/4 pound (113 grams) softened butter with 1/4 teaspoon salt, 1/2 teaspoon finely ground black pepper, 1 finely chopped or pressed garlic clove, and 1 tablespoon finely chopped parsley or rosemary (fresh or dried). If you’re cooking more than two steaks, feel free to double the recipe.
- If you want a larger batch, make it a day ahead. Roll it into a log and let it rest in the fridge until firm (see my step-by-step recipe for garlic-herb steak butter).
- If you’d rather skip making the compound butter ahead of time, you can also add the aromatics (garlic, herbs, and butter) directly to the pan after the final sear. Let them sizzle together, then pour the mixture over the sliced steak for a similar boost of flavor (more on that later in the recipe).

Cook the Steak in the Oven
- Preheat the oven to 225°F (110°C).
- Place the steak on a wire rack set over a baking sheet and put it in the center of the oven. Bake until a meat thermometer reads 20°F (11°C) below your target doneness (see temperature chart below), then remove it from the oven.

- Don’t worry if the steak doesn’t look great at this point; the final sear will build a crust and bring it to its final temperature.
- Cooking time depends on the steak’s thickness, the oven temperature, and your target doneness. That’s why I recommend using a leave-in probe thermometer with an alarm – it makes the process much easier since you don’t have to keep checking the internal steak temperature with an instant-read thermometer.

Final Sear
- Preheat a pan over medium-high heat for 3-4 minutes. Add 2-3 tablespoons (30-45 ml) of high-smoke-point oil and let it heat for another minute.
- Place the steak in the pan and sear for 2 minutes total, flipping every 30 seconds. Each time you flip, press the steak gently against the pan to maximize contact and build a better crust.
- If the steak has a fat cap (like a strip steak or picanha), sear it for 60-90 seconds to render the fat. If there’s no fat cap, quickly sear the other edges for about 15-30 seconds.
- Once seared, remove the steak from the pan and let it rest for 5 minutes.
- If you’re using compound butter, now’s the time to add a spoonful on top of the hot steak. In that case, skip the next step (aromatics) and go straight to serving.
Prepare the Aromatics (Optional)
- This step is for those who don’t have compound butter prepared.
- After searing the steak, keep the pan on the stove and add a few peeled garlic cloves along with sprigs of rosemary or thyme. Let them cook over medium-high heat until the garlic turns a light golden color. Then lower the heat to medium-low, add the butter, and let it melt together with the aromatics.
- Once the aromatics are ready, move straight to the final step: serving.
Serve the Steak
- Once the steak has rested for at least 5 minutes, slice it thin.
- If you skipped the compound butter and used the pan juices instead, spoon them over the sliced steak along with the garlic and herbs right before serving.
Notes
Dry-brining
You can leave the salted steak even longer than 4-6 hours for deeper flavor. Keep in mind that the longer it sits with salt, the more noticeable that gray band under the crust becomes.