If you want a steak with a deeply browned, crispy crust on the outside and a juicy, tender center (cooked perfectly to medium-rare or medium), this guide is for you. I’ll walk you through the process step by step and show you exactly how to sear a steak the right way.
Whether you’re working with a thick ribeye or a thin skirt steak, the core techniques are the same. Once you understand the basics and learn how to avoid the most common mistakes, you’ll be able to nail it every time.
I’ve included two versions of this guide:
- A short recipe version, for when you want the quick steps without all the extra info (click the “Jump To Recipe” button below).
- A detailed searing guide with photos that explains why each step matters. (Click the “Read the Full Searing Guide” button below).
If you really want to take your searing skills to the next level, I highly recommend reading the full guide. It’s one of the most comprehensive steak-searing resources online. Packed with tested tips, practical knowledge, and insights from my own experience.

What is Searing?
Searing is a cooking technique where the surface of a steak is cooked over direct high heat to build that deep brown crust everyone loves. When done right, searing gives you the best of both worlds: a beautifully crispy, flavorful exterior and a tender, juicy interior.
To get a proper sear, the surface of the steak needs to reach at least 150°C (300°F). That’s why it’s so important to dry the steak’s surface completely before it hits the pan. Water boils at just 100°C (212°F), way below the temperature needed to build a crust. So if the surface is wet, the moisture turns to steam instead of browning. That’s exactly why you’ll always hear this rule: “Moisture is the enemy of a good sear.”
Why Should You Sear Your Steak?
Searing forms a flavorful, crispy crust while keeping the inside tender and juicy. It makes the steak look ten times better, but it’s more than just browning. It’s the Maillard reaction in action, a chemical process that transforms simple proteins and sugars on the steak’s surface into hundreds of new flavor compounds. That’s where all that rich aroma and crisp texture come from. So why sear a steak? Simple, to build a beautiful, flavorful crust that takes the whole experience to the next level.
Now’s a good time to clear up a common myth: “Searing locks in juices”. No, searing doesn’t lock in juices. That’s a myth. In fact, seared meat loses more juices, not less. We don’t sear to trap moisture; we sear for that deep, flavorful crust that adds incredible flavor.

What Are the Most Common Mistakes When Searing?
Before we move on to the key tips for searing steak properly, let me quickly list the most common mistakes that can ruin a good sear (I’ll break down each one later in the article).
- Searing the steak while it’s still wet,
- Not preheating the pan or grill enough,
- Too high temperature,
- Overcrowding the pan,
- Not flipping often,
- Using the wrong pan or oil,
- Not letting the steak rest at room temperature before cooking,
- Choosing a steak that’s too thin or too thick.
How to Sear a Steak: Ultimate Guide
To get a better sear on your steak, follow these essential tips. They’ll help you achieve a beautifully browned, flavorful crust, no matter which cooking method you use.
I’ll use the pan-searing technique as an example to explain why each of these tips matters. However, keep in mind that most of what you’ll read below applies to any method of searing steak, whether you’re cooking in a pan, on a grill, or using another technique.
1. Choose the Right Cut
The right cut depends on what results you’re after, your cooking method, and your skill level. But if you want a better sear with less effort, go with a thicker steak, especially if you like it cooked to medium-rare.
For the best balance between crust and doneness, go for a steak that’s 1 to 1 1/2 inches (2.5 to 3.8 cm) thick. If you don’t cook steak often or you’re still building confidence, aim for about 1 1/2 (3.8 cm) thick. Thicker cuts need more time to cook through, which gives you more time to build that deep, beautiful crust before the inside hits your target doneness.
Thin cuts (less than 1/2 inches / 1.27 cm) cook too fast to form a proper crust. On the other hand, extra-thick steaks (2 1/2 inches / 6.4 cm or more) are too thick to sear using direct heat alone – you’ll likely burn the outside before the inside’s even close to ready.
I know, this first tip isn’t exactly a searing technique, but it’s still one of the most important factors that affect how well your steak sears.

2. Choose the Right Pan
Whatever you do, don’t use a non-stick pan for searing steak. Searing requires very high heat, which can damage the coating and release harmful chemical fumes. Instead, use a pan that can handle and retain high heat. The best options are:
- Cast-iron skillet
- Heavy-bottomed stainless steel skillet
- Carbon steel skillet
Personally, I prefer a cast-iron skillet for a hard, straight sear. It handles high heat extremely well and holds onto that heat once it’s hot. Sure, it takes a little longer to preheat, but once it’s ready, it stays hot and distributes heat evenly – exactly what you need for a proper sear. Plus, it’s affordable; you can get a solid medium-sized one for around $30, and it’ll last for decades.
If you plan to make a sauce or deglaze the pan, go with a heavy-bottomed stainless steel skillet. It doesn’t hold heat quite as well as cast iron, but it’s still great for searing, easier to clean, and more versatile overall. It’s also more expensive, but worth it if you like cooking sauces right after searing.
The best of both worlds is carbon steel. It’s lighter and more comfortable to handle than cast iron, retains heat beautifully, and delivers an excellent sear. The only downside? It’s more expensive.

3. Choose the Right Oil
Always use an oil that won’t burn at high temperatures and has a neutral flavor. One of the most common mistakes is using olive oil for searing. While great for salads or low-heat cooking, it’s a poor choice for searing because of its low smoke point, around 325–375°F (165–190°C). You don’t want the oil burning within minutes and giving your steak a bitter, unpleasant flavor. That’s why you should always use a high-smoke-point oil for searing.
Important: Don’t start searing with butter! I’ll explain why later in this article.
For hard searing, go with oils that have the highest smoke points, like refined avocado oil (my personal favorite). It has a neutral flavor and a smoke point of around 500°F (260°C), which makes it perfect for pan-searing over high heat.
If you’re doing a quick sear (like after sous-vide or reverse sear), you can get away with oils in the 400–450°F (204–232°C) range. But when possible, it’s always better to use the highest smoke point oil.
You don’t need much oil for searing. I usually use about 1 tablespoon (15 ml) for well-marbled cuts, and around 2 tablespoons (30 ml) for leaner steaks. Of course, you can adjust this based on your cooking style, but remember that you don’t need a lot of oil to get a great sear. And one more thing: always add the oil once the pan is hot, then let it heat for about a minute before placing the steak in the pan.
Below, I’ve included a quick reference table of high smoke point oils you can use for searing:
| Type of Fat | Smoke Point ºF | Smoke Point ºC |
|---|---|---|
| Refined Avocado Oil | 520ºF | 270ºC |
| Refined Safflower Oil | 510ºF | 266ºC |
| Beef Tallow | 480ºF | 250ºC |
| Pecan Oil | 470ºF | 243ºC |
| Refined Peanut Oil | 450ºF | 232°C |
4. Prepare the Steak Properly
This step is one of the most important when it comes to getting a good sear. You can’t just take a steak out of the fridge, sprinkle some random spices on it, and throw it in a pan. To build a beautiful crust, you must prepare the steak the right way – especially when it comes to seasoning and drying the surface. Trust me, this step has a huge impact on your sear.
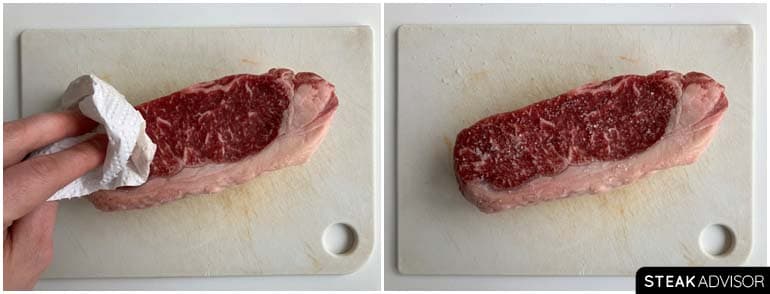
Always pat the steak completely dry with paper towels. Do it just before seasoning, and again right before cooking. It’s one of the most effective but often overlooked steps for getting a better sear. And yes, it makes a big difference. That’s why in the “Common Mistakes” section above, I listed “Searing the steak while it’s still wet” right at the top. Moisture on the steak’s surface prevents the crust from forming because the water needs to evaporate before the surface can get hot enough to brown. If the steak is wet, you waste a lot of energy just boiling off that water instead of searing the meat. What you want is to get to browning as fast as possible, and the best way to do that is by starting with a dry surface.
When it comes to seasoning, keep it simple: just kosher salt and pepper. That’s all you need if you’re working with a good, well-marbled cut of meat. But how you season is even more important than what you season with.
For pepper, use finely ground black pepper so it sticks well to the steak’s surface and helps it make better contact with the pan. Salt, however, is a different story. A lot of people salt the steak just before cooking, and that’s a big mistake. You can do that with pepper, but not with salt. Salting the steak a few minutes before cooking will ruin your sear. The surface will get wet, and you won’t get a good crust.
Here’s why:
A few minutes after salting, the steak’s surface starts to look wet as the salt pulls liquids out of the meat through osmosis. That liquid then dissolves the salt, forming a thin brine on the steak’s surface. Over time, that brine is reabsorbed back into the meat through a process called diffusion, carrying the salt deeper inside. The result? A steak that’s seasoned more evenly, more flavorful, and even slightly more tender with a dry surface, perfect for searing. Sounds great, right? The catch is that this process takes time. Until it’s finished, the surface stays wet, and that’s exactly what you don’t want when building a crust. Based on my tests, it takes about an hour for most of that surface liquid to be reabsorbed by the meat. But if you want to see a huge difference, let the salted steak rest uncovered in the refrigerator for about 4-6 hours.
The worst time to sear a steak is between 2 and 40 minutes after salting it. During that window, the salt has already drawn moisture out but hasn’t had enough time to let it reabsorb, leaving the steak’s surface wet.
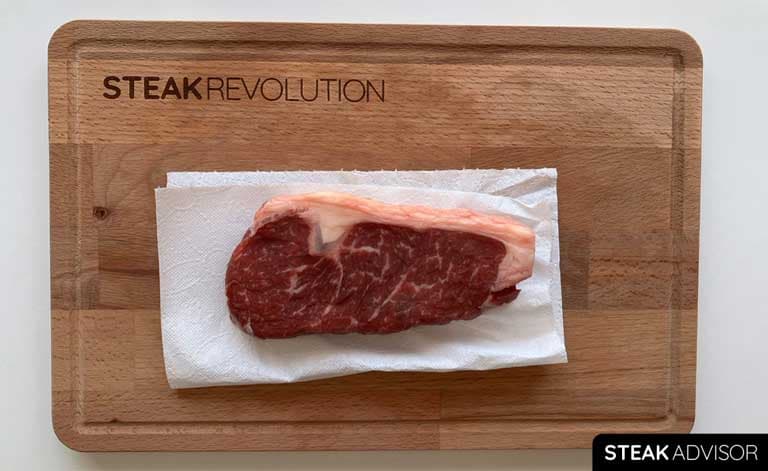
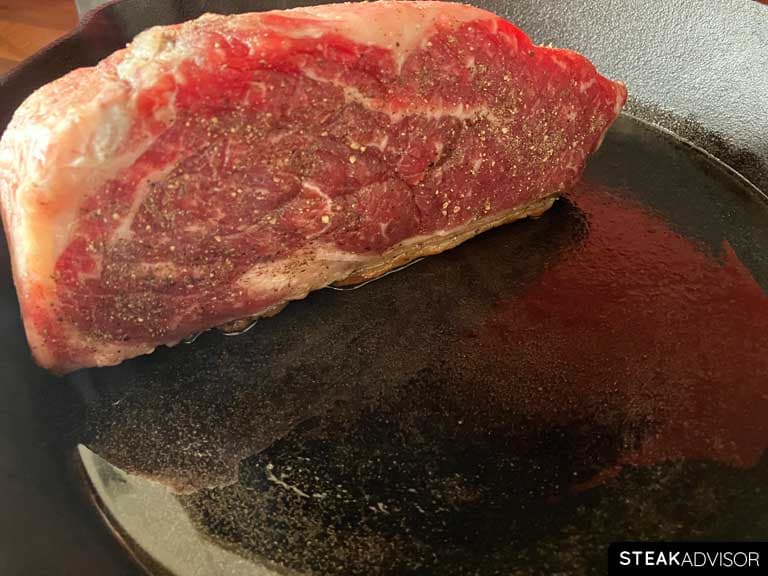
Below, you can see two photos that show exactly why this step matters.
- The first image shows the steak about 10 minutes after salting – the surface looks wet
- The second image shows the steak after 5-6 hours uncovered in the fridge – the surface is dry and perfect for searing.


For a really beautiful crust, salt the steak several hours before cooking (ideally 4 to 6 hours) and let it rest in the refrigerator uncovered. That’s exactly what I do, and it’s one of the main reasons why my steaks always have such a deep, beautiful crust. If you’re short on time, a 1-hour dry brine is the absolute minimum. And if you don’t even have that, it’s better to skip pre-salting entirely and season the steak right after cooking instead.

If you want to dive deeper into how and when to salt your steak, I highly recommend reading these articles:
5. Let the Steak Rest Before Cooking
Resting the steak before cooking doesn’t improve the crust, but cooking steak isn’t just about the crust. You also want the inside to cook as evenly as possible. When you skip this step and go straight from the fridge to the pan, here’s what happens: the steak cooks unevenly, with a cold, red center and more of a gradient from raw to overcooked.
Please take a look at the first photo below. It shows a steak cooked directly from the refrigerator. Notice the contrast between the outer edge and the center – that’s how an unevenly cooked steak looks inside.

This step is especially important for thicker cuts seared over high heat. You want a beautiful crust and an even gradient inside (from edge to center) with a minimal gray band. That’s why it’s important to let your steak rest at room temperature before cooking.
Here’s a quick guide:
- Let the 1/2-inch (1.3 cm) thick cuts rest for about 20 minutes
- Let the 1 1/2-inch (3.8 cm) thick cuts rest for about 30 minutes
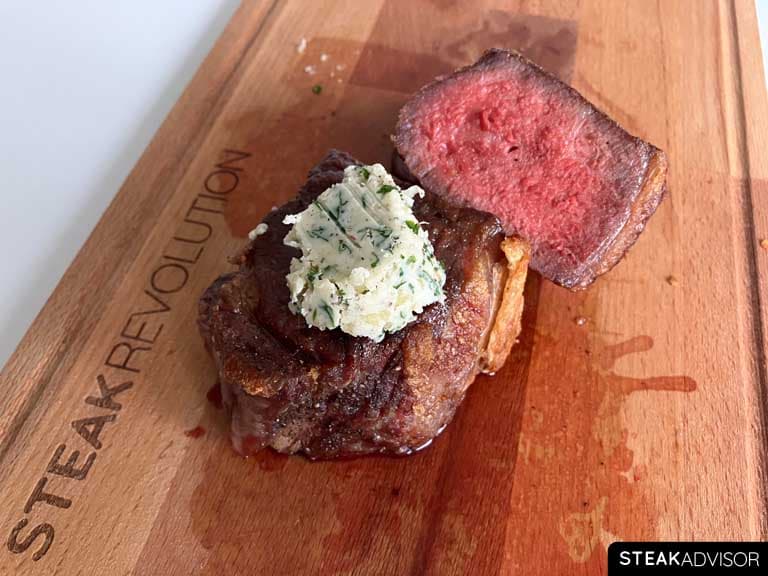
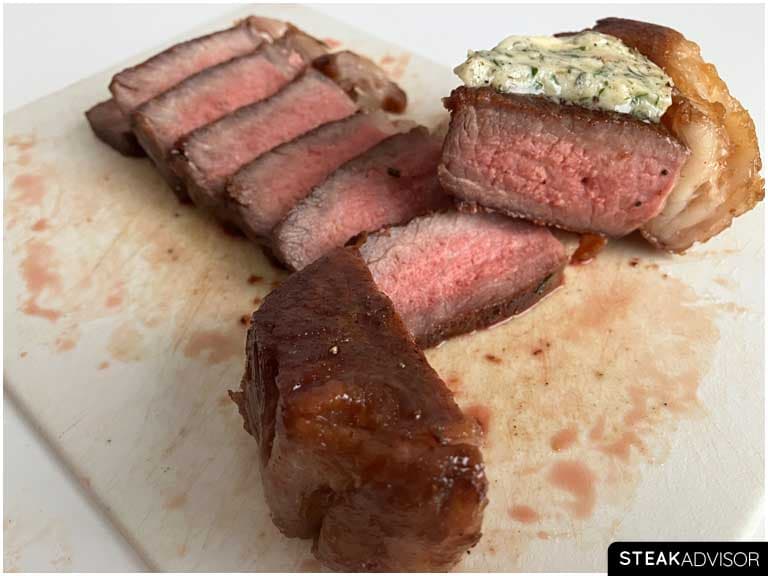
Look at the second photo below – this is what a properly rested and seared steak should look like. An even doneness gradient, minimal gray band, and crust that looks as good as it tastes.

6. Preheat the Pan or Grill
For a proper sear, the pan or grill must reach the right temperature, ideally around 450–500°F (232–260°C). One of the most common mistakes is barely preheating the pan (or only giving it a minute or two). That’s just not enough. You won’t get a good crust if the surface temperature is too low. That said, you don’t need extreme heat for thicker cuts, not something like 700°F (370°C) or so (this doesn’t apply to quick sears, like finishing a steak after reverse sear or sous vide cooking).
I mentioned earlier that the steak’s surface needs to hit at least 150°C (300°F) for the Maillard reaction to kick in and start browning. But keep in mind, the moment you place the steak in the pan, the temperature under the steak drops rapidly. I’ve checked this with an infrared thermometer, and it can drop by about 100°F (or more) for thicker cuts. The exact drop will vary depending on your pan and the steak, but it shows how important it is to preheat your pan or grill properly before you start searing.
If the pan isn’t hot enough, the surface temperature will drop too low, and the steak won’t have the chance to form a deep brown crust. Instead, the steak will come out gray at worst or lightly browned – not what you’re aiming for.
So the takeaway is simple: preheat the pan or grill hot enough from the start. That’s the only way to keep the sear strong when the steak hits the surface. In my experience, it takes about 4–5 minutes to reach 450–500°F (232–260°C) using a cast-iron skillet over medium-high heat on a gas stove.
If you want to be precise, you can use an infrared thermometer to check the surface temperature. Don’t worry, they’re not expensive. A basic one costs about $10; if you cook steak often, it’s a small investment that helps a lot.

7. Sear the Steak
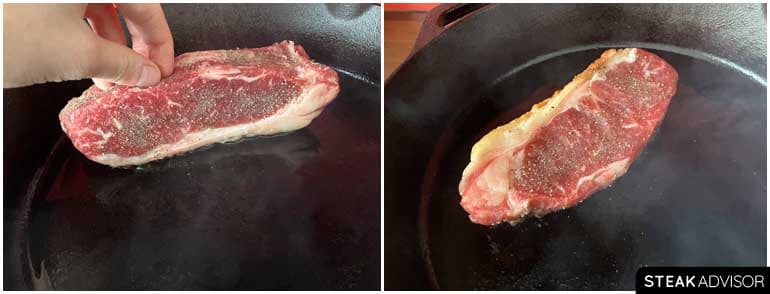
Right before placing the steak in the pan, pat it dry again with paper towels to remove any remaining moisture. This is also the perfect time to add a bit of finely ground black pepper if you like. Then, carefully place the steak in the pan and press it down with tongs to ensure even contact with the surface. The oil will be very hot, so take care to avoid splashing. Once the steak is in, start searing. If your steak has a fat cap, start by placing it fat-side down and sear it for 1–2 minutes to help render and brown that fat before searing the flat sides.
Keep the heat on medium-high and flip the steak every 30 seconds until the steak’s internal temperature is about 15–20°F (8–10°C) below your target doneness for cuts 1 to 1 1/2 inches (2.5 to 3.8 cm) thick. When it reaches that point, remove the steak from the pan and let it rest:
- About 5 minutes for steaks around 1 inch (2.5 cm) thick
- About 6–7 minutes for steaks around 1 1/2 inches (3.8 cm) thick
Taking the steak out at the right time and letting it rest is just as important as searing. As the steak rests, the internal temperature will continue to rise due to carryover cooking by as much as 15–30°F (8–17°C) during the first 5–10 minutes of resting. In general, for steaks 1 to 1 1/2 inches (2.5 to 3.8 cm) thick, expect the temperature to increase by around 15–20°F (8–10°C) as it rests (see the temperature chart below).
| Doneness | Remove at temp: | Final temp: |
| Rare | 100–110°F (38–43°C) | 120–130°F (49–54°C) |
| Medium Rare | 110–120°F (43–49°C) | 130–140°F (54–60°C) |
| Medium | 120–130°F (49–54°C) | 140-150˚F (60–66°C) |
| Medium-Well | 130–140°F (54–60°C) | 150-160˚F (66–71°C) |
| Well Done | 140–150°F (60–66°C) | 160°F+ (71°C+) |
8. Aromatics
Aromatics like butter, garlic, and fresh herbs (typically rosemary or thyme) take the steak’s flavor to another level. I highly recommend using them as they pair beautifully with the natural flavor of beef.
There are several ways to add aromatics to your steak, but the most common one you’ll see is butter basting (spooning melted butter with herbs and garlic over the steak while searing). It looks great and smells even better, but I have a few issues with it:
- It’s wasteful. I don’t like using a large amount of butter just to baste the steak.
- It increases carryover cooking: Pan-searing already exposes the steak to high heat on one side. When you add hot melted butter over the other, it raises the overall temperature difference between the outside and the inside. As a result, carryover cooking during resting becomes more intense, increasing the risk of overcooking if you don’t remove the steak from the pan at the right moment.
- It’s difficult for beginners. Managing the sear, temperature, and basting at the same time is not easy. One small mistake, and you can easily overcook your steak.
- Butter burns easily. Butter has a low smoke point, so if it’s left too long in a hot pan, it can burn and turn bitter, ruining the flavor.
Now, don’t get me wrong, butter basting looks fancy, adds flavor, and can even help build a slightly better crust. In short, yes, it can work great. But in my opinion, it only makes sense for thicker steaks (about 1 1/2 inches / 3.8 cm thick), where there’s more margin for error. For thinner cuts, it’s just not worth the risk or the extra effort. There are simpler, cleaner, and more economical ways to get that same buttery flavor without the stress or waste.
And as for the crust, trust me, you can build a beautiful, deep crust without butter basting. Just follow the tips I’ve shared in this article, and you’ll get the same results.
If you decide to baste your steak, remember to add the butter only at the end of the cooking process. The smoke point of butter is around 300°F (149°C), while proper searing happens at much higher temperatures. Adding butter too early will cause it to burn, leaving a bitter flavor and ruining the taste of your steak. That’s why butter should always go in right at the end, once the crust has already formed. For example, when the steak’s internal temperature reaches about 90–100°F (32–38°C), that’s the perfect time to add the butter.

Better Alternatives to Basting
I prefer to separate searing from aromatics. Here’s what I recommend instead, especially for steaks about 1 1/2 inches (2.5 cm) thick:
- Compound butter: Make it ahead of time, slice it, and place it on top of the hot steak immediately after searing (ideally while it rests).
- Simple melted butter: Add a tablespoon or two of butter on top of the hot steak immediately after searing and let it melt slowly.
- Pan Sauce: While the steak rests, use the hot pan (or a small pot) to make a quick garlic herb butter sauce, then pour it over the sliced steak.
Each of these methods gives you that same rich garlic-herb-butter flavor without the risks that come with basting during searing – no overcooking, no burned butter, and no wasted ingredients.
My personal favorite is the compound butter. It’s extremely versatile – great on steak, chicken, vegetables, or even bread. Just make a batch ahead of time, and store it in the fridge for up to 7 days, or freeze it for up to 3 months. Another bonus is the creative freedom you have with it. You’re not limited to the classic garlic-herb butter – try experimenting with different flavor combinations like chimichurri butter, spicy chili-lime butter, black garlic butter, sun-dried tomato butter, or jalapeño-lime butter.
If you’re cooking steak using the reverse sear or sous vide method, I strongly recommend skipping butter basting altogether. Those cooking methods already bring the internal temperature very close to the target, and basting afterward just increases the risk of overcooking the steak. Instead, focus on a final sear first to build a great crust, then finish the steak with one of the alternative options above (like compound butter or pan sauce).
Additional Steak Searing Tips
Here are a few extra tips and techniques that can help you take your sear to the next level:
Avoid overcrowding the pan
When the steak hits the pan, the pan surface temperature drops rapidly. That’s why you should never crowd the pan. Stick to one or two big steaks in a large skillet. Cooking too many steaks at once will lower the temperature and ruin the sear. That’s also one of the main reasons we preheat the pan so well in the first place.
Flip often
You’ve probably heard the old myth: “Don’t touch the steak.” Forget it. Flipping the steak every 30 seconds helps it cook more evenly, reduces the gray band inside, and gives you better control over how the crust develops.
Use only half of your pan
When flipping, don’t place the steak back in the same spot. Instead, move it from one edge of the pan to the other side – an untouched, hotter area that hasn’t cooled down yet from the steak.

Don’t use seasonings with sugar
Avoid seasoning your steak with anything that contains sugar, such as paprika or most BBQ rubs, if you’re planning to cook it entirely over direct high heat (especially with thicker cuts). Sugar has a low smoke point and burns quickly at searing temperatures. Instead of adding flavor, it’ll leave a bitter taste and ruin your crust.
If you’re cooking the steak over lower or indirect heat and finishing with a quick high-heat sear, then it’s generally fine to use those sugar-based seasonings. But for classic pan-searing or grilling directly over high heat, stick to salt and pepper only. Also, avoid using too much seasoning overall. A thick layer can create a barrier between the meat and the pan (or grill grates), preventing proper browning and crust formation.
Press the steak gently
When placing a steak in the pan, gently press it down with your hands or tongs to ensure maximum contact between the steak and the hot surface. If you prefer a hands-free option, consider using a cast-iron press (they’re inexpensive) or anything heavy and heat-safe to place gently on top of the steak.
This simple step helps the entire bottom of the steak sear more evenly across the entire surface, giving you a more even, beautiful crust. You usually don’t need to do this with thicker cuts, but for thinner steaks or quick sears that take only 2–3 minutes, it can make a noticeable difference. Of course, this is completely optional, just a simple extra step you can try to see if it improves your sear. Try it a few times and see if it’s worth adding to your routine.

Use a meat thermometer
Remember, while searing, you also need to focus on cooking the steak properly inside, not just building the crust. To make sure you don’t overcook your steak, I highly recommend using a meat thermometer to monitor the internal temperature.
You can use either:
- An instant-read thermometer, or
- A remote, leave-in probe thermometer – these usually cost a bit more but give you much better control throughout the cooking process.
Skip the touch test or guessing based on cooking time. There are too many variables (steak thickness, pan type, heat level, starting temperature, etc.) that affect how fast your steak cooks. If you really want to cook a perfect steak every time, invest in a reliable thermometer.
Move the steak in the pan often
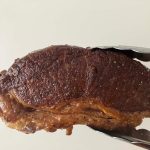
This tip is mainly for very thin steaks, about 1/2 inch (1.27 cm) thick, or for quick sears that take only 2–3 minutes – for example, the final sear after sous vide or reverse sear cooking.
The moment you place a steak in the pan, the surface temperature under it drops rapidly, which makes searing less effective. For thicker cuts, this isn’t a big deal as they have more time to brown. But for thin cuts, that temperature drop matters. Here’s the trick: instead of leaving the steak in one spot, move the steak from one edge of the pan to another (from the cooler spot to a hotter one) every 15 seconds, and flip it every 30 seconds. This keeps the steak in contact with the hottest parts of the pan and helps build a deeper, more even crust, even on thin cuts.
I’ve written a full article explaining this technique in detail, complete with a recipe, photos, and step-by-step instructions. I highly recommend checking it out. The results honestly surprised even me. Here is the article:
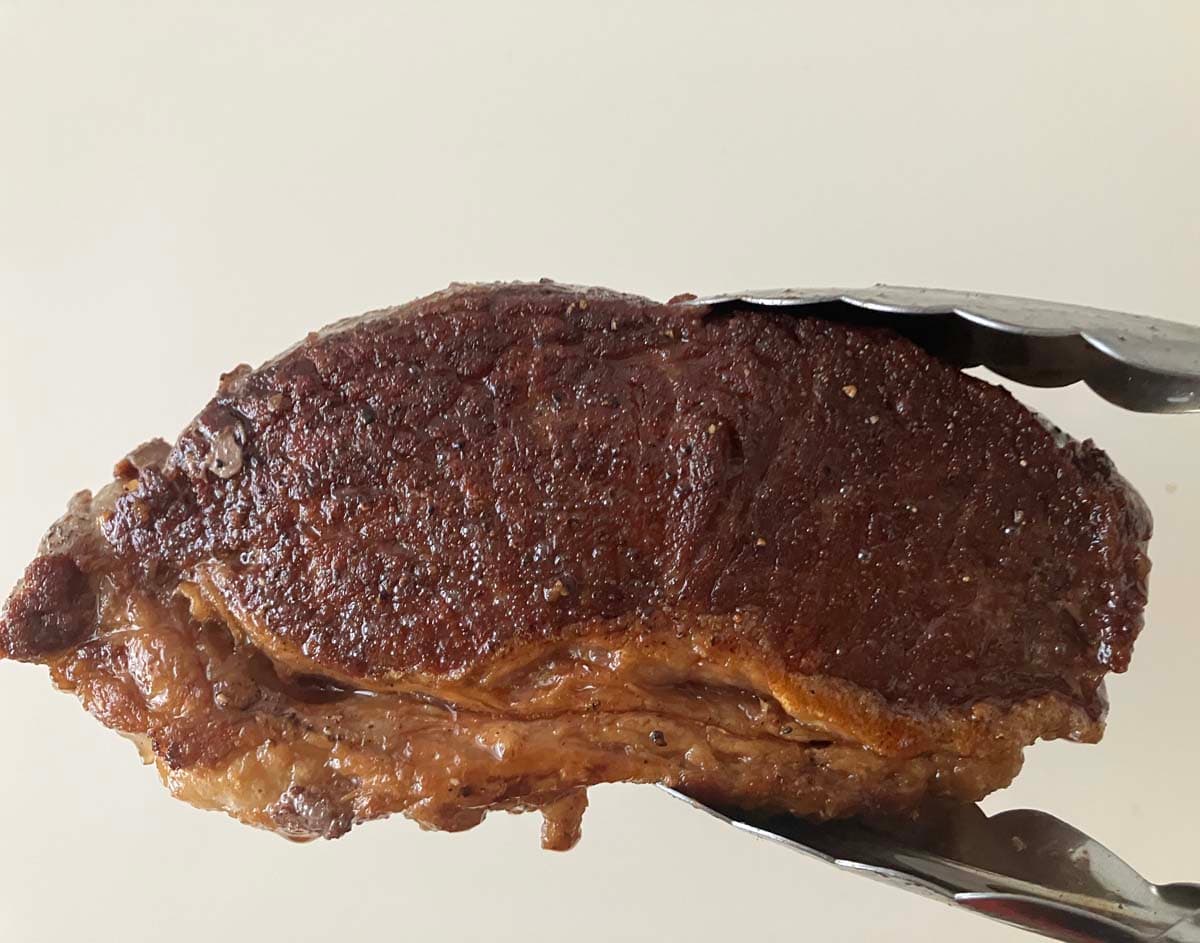
Below, you can see the photo of a steak about 1/2 inch (1.27 cm) thick, cooked using this exact technique.

How to Perfectly Sear a Steak: Easy Recipe
- Prep Time: 15 minutes
- Rest Time: 1 to 6 hours
- Cook Time: 15 minutes
- Total Time: 30 minutes
- Yield: 1 steak
Description
This is my go-to method for searing any steak. It’s reliable, easy to follow, and gives you a beautifully browned crust with a juicy, medium-rare to medium center every time. Below, you’ll find versions for both pan-searing and grilling.
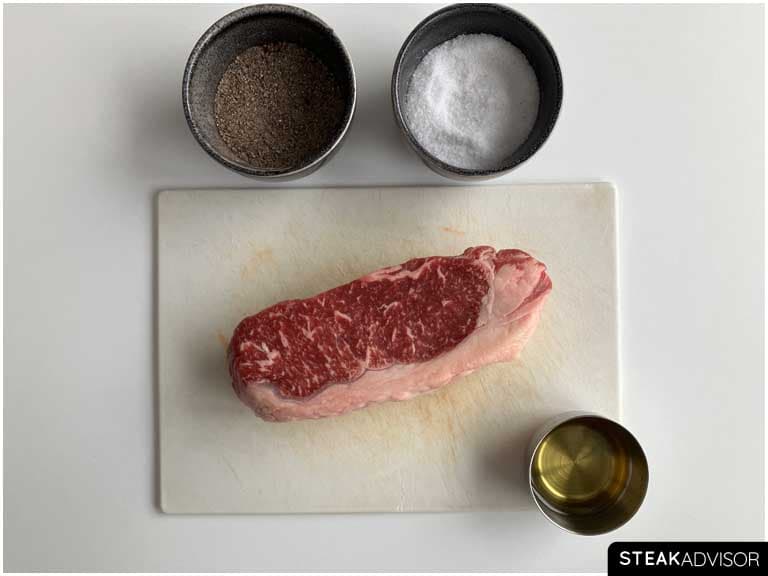
Ingredients
For steak:
- 1/2 to 1 1/2 inch (1.27–3.8 cm) thick steak
- 2 tablespoons (30 ml) of high-smoke-point oil (I recommend refined avocado oil)
- 1–2 teaspoons (about 5–10 g) kosher salt (1-1.5% of the steak’s weight in salt)
- 1/2 teaspoon finely ground black pepper per pound (454 g) of steak (optional)
For Aromatics (optional):
- A few thyme sprigs or rosemary (optional)
- 2–3 garlic cloves (optional)
- 2 tablespoons (30 g) unsalted butter (optional)
- compound butter (optional)
Instructions
- Before we start. This recipe is all about getting a good crust while keeping the inside at a medium-rare to medium doneness. If you’re feeling confident and want to add aromatics, keep one thing in mind: avoid butter-basting steaks that are less than 1 1/2 inches (3.8 cm) thick, or any steak you’re only giving a quick sear to, like after a reverse sear or sous vide. It’s very easy to overcook them.
- Instead, put a bit of compound butter on the steak while it rests, or cook your aromatics in the pan after you finish searing and spoon them over the sliced steak. You’ll still get great flavor without risking pushing the steak past your target doneness.
Prepare the Steak
- Trim off any excess fat or silver skin if needed. If you’re cooking a long, whole muscle cut, such as a skirt or flap (bavette), and it doesn’t fit in your pan or on your grill, cut it into smaller pieces. If your steak already looks good and doesn’t require trimming, continue to the next step.
- Pat the steak dry with paper towels on both sides, then season it with 1-2 teaspoons of kosher salt (1-1.5% of the steak’s weight). Place the steak on a wire rack set over a baking sheet and refrigerate uncovered for 4 to 6 hours for the best balance of crust, flavor, and minimal gray band inside.
- If you’re short on time, a 1-hour dry brine is the absolute minimum. You can dry-brine the steak for 12-24 hours for a much better flavor and crust, but keep in mind that steaks dry-brined longer than 8 hours form a significantly thicker gray band under the crust.
To Sear in a Pan
- If you refrigerate the salted steak, take it out 30 minutes before cooking and let it sit at room temperature.
- Turn on the exhaust fan or open a window (pan-searing creates a lot of smoke).
- Place a heavy skillet over medium-high heat and let it warm for 3-4 minutes. Add 2 tablespoons of a high-smoke-point oil and heat for an additional minute.
- While the pan heats, pat the steak dry with paper towels and, optionally, season both sides with finely ground black pepper (1/2 teaspoon per pound/454 g of steak). Once the pan and oil are hot, you’re ready to start searing.

- Carefully place the steak in the pan and gently press it down with tongs to ensure even contact with the surface. For cuts like strip steak or picanha, start fat-side down to render some of the fat and crisp it up. Sear the fat side for 1-2 minutes, or until browned to your liking. Then flip the steak and continue searing, flipping every 30 seconds.
- Cook the steak until its internal temperature is about 20°F (11°C) below your target doneness for steaks 1 to 1 1/2 inches (2.5 to 3.8 cm) thick, or about 15°F (8°C) below for steaks under 1 inch (2.5 cm) thick (see notes for the temperature chart). Then remove it from the pan and let it rest.
- Let the steak rest for 5 minutes if it’s up to 1 inch (2.5 cm) thick, or 6–7 minutes for steaks about 1 1/2-inch (3.8 cm) thick. As it rests, you can add a bit of compound butter on top (optional) or cook your aromatics in the pan and spoon them over the sliced steak (see notes below).
- Once the steak has rested, slice it thinly and serve. For cuts with coarse muscle fibers, such as skirt, hanger, flap/bavette, or flank steak, always slice against the grain (see notes below).
As for the aromatics, you have three options:
- Once you’ve built the crust you can, melt some butter and spoon it over the steak each time you flip it (butter basting method). This method works best with the front-sear technique and thicker cuts (at least 1 1/2 or 3.8 cm thick), as thinner steaks can overcook quickly.
- Place a few slices of compound butter on top of the steak while it rests (the easiest one).
- Melt butter with chopped herbs and minced garlic in a small bowl or in a pan over direct heat on the grill, then pour it over the sliced steak.
To Sear on the Grill
- Again, if you refrigerate the salted steak, take it out 30 minutes before cooking and let it sit at room temperature.
- Light a full chimney of charcoal. Once the coals are fully lit and covered with gray ash, pour them out and arrange them on one side of the charcoal grate. Set the cooking grate in place, cover the grill, and let it preheat for about 5 minutes, or until the lid temperature reaches about 500°F (260°C).
- If you’re using a gas grill, set half of the burners to their highest heat setting, close the lid, and preheat for about 10 minutes, or until the grill reaches a temperature of around 500°F (260°C).
- Pat the steak dry with paper towels, then place it directly over the hot side of the grill. Cook it while flipping every 30 seconds. Each time you flip, you can also rotate the grill grate to bring a cooler section over the coals and set the steak on that spot. This helps you build an even, well-browned sear instead of dark, burned grill marks.
- Grill the steak over direct heat, adjusting the method based on its thickness:
For steaks thicker than about 1 inch (2.5 cm): Use the front-sear method. Start by building a good crust over direct heat, flipping the steak every 30 seconds. Once the crust looks nice to you (ideally golden-brown), move the steak to the cooler side of the grill, close the lid, and let it finish gently over indirect heat. Take it off the grill when it’s about 10°F (6°C) below your target doneness, then let it rest for 6–7 minutes. - For steaks up to 1 inch (2.5 cm) thick: Keep the steak over direct high heat and flip every 30 seconds. Remove it when the internal temperature is about 20°F (11°C) below your target doneness (see notes for the temperature chart), then let it rest for 5 minutes before slicing.
- Keep an eye on the steak as it cooks to ensure it doesn’t catch on fire from flare-ups. If it does, move it to the cooler side of the grill, let the flames die down, and then return it to the heat to continue searing.
- For the aromatics, follow the same tips I mentioned earlier in the pan-searing section.
To Sear After Sous Vide or Reverse Sear
- For this, please check out my separate guides on sous vide and reverse searing. It’s easy to overcook a steak during the final sear if it’s not done correctly. In this recipe, I’m keeping things simple and focusing only on the classic methods (pan-searing and grilling) to keep the instructions clear and the overall recipe shorter.
Notes
Temperature Chart

Aromatics
I’m not against using aromatics, but over the years, the butter-basting technique has been hyped a lot. It’s a great technique, but only if you’re confident with high-heat cooking or if you’re cooking a steak that’s at least 1 1/2 inches (3.8 cm) thick. With thinner steaks, it’s very easy to overcook them while butter-basting, especially over direct heat. Additionally, the hot melted butter keeps the surface warm even when that side isn’t facing the heat, which increases carryover cooking.
That’s why I suggest learning how to sear a steak on its own first. Start with easier aromatics, like adding compound butter while the steak rests or making a quick garlic-herb butter after you take it off the heat. Once you feel comfortable, you can try butter-basting. But honestly, I usually stick with compound butter. It’s easier, quicker, and still adds plenty of flavor.
Slicing technique
Slicing against the grain shortens the muscle fibers, which makes each bite much easier to chew. This is especially important for cuts with long and coarse fibers, like skirt, flank, hanger, or flap/bavette steak. If you slice these cuts with the grain, the fibers stay long and the meat ends up tough and chewy – it’s one of the most common mistakes people make with these steaks. Cuts like ribeye, filet mignon, or strip steak are naturally tender, so the slicing direction doesn’t matter as much. You can slice them however you like.
Explore Other Guides:
If you enjoyed this article, you might also like these related guides:
- What Is the Gray Band in Steak (and How to Minimize It)
- Steak Doneness Guide
- How to Slice Steak
- Types of Steak Cuts
- The Best Ways to Cook a Really Thick Steak
I also highly recommend checking out the steak recipes section, where you’ll find a collection of unique, tested recipes divided into categories based on steak type and cooking method. It’s a great place to explore new ideas and improve your skills.