| PREP TIME | REST TIME | COOK TIME |
| 5 mins | 1 to 6 h | 10 mins |
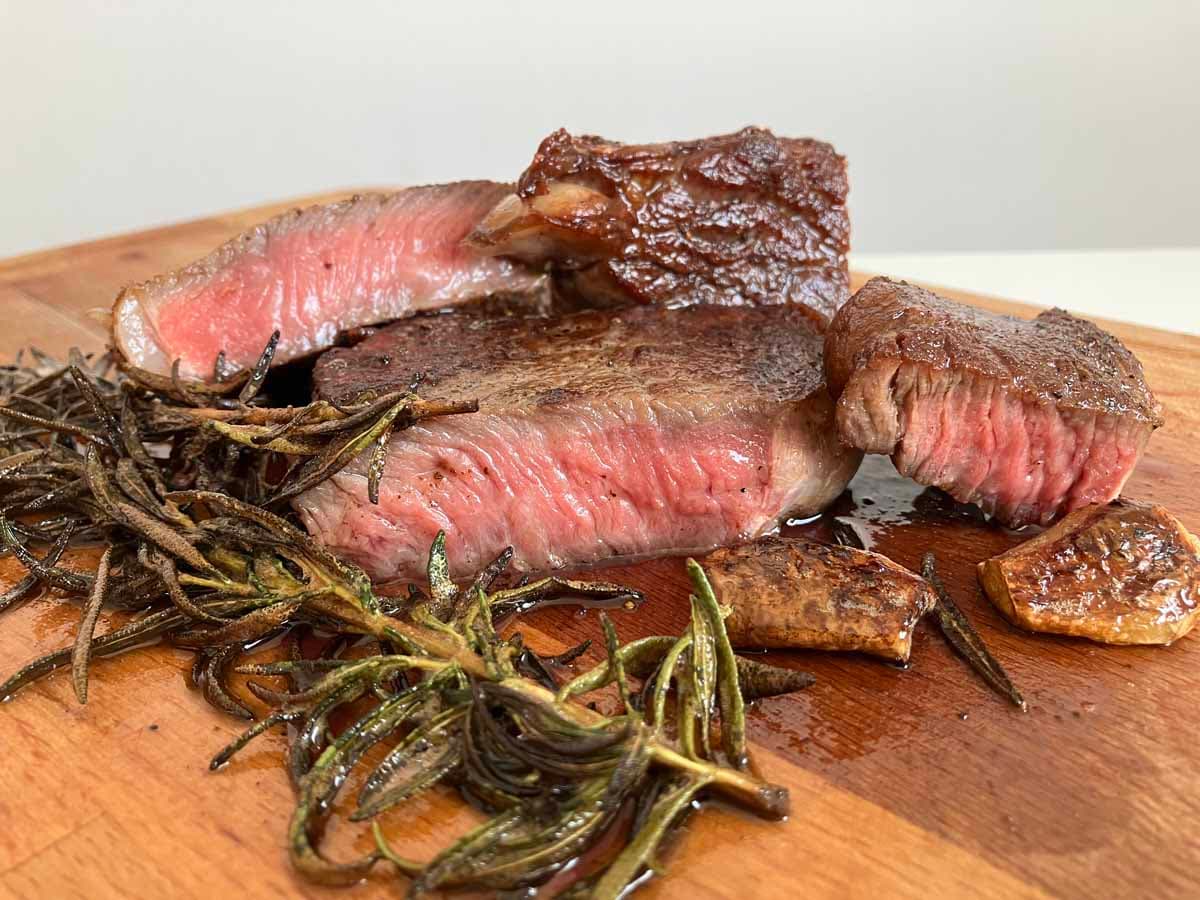
Getting a good crust on a thin steak (about 1 inch / 2.5 cm thick) isn’t easy. Thin cuts cook fast, so you don’t have much time to build that nice golden-brown sear before the inside starts to overcook. This recipe takes care of that. You’ll get a steak with a flavorful, well-browned crust on the outside and a juicy, medium-rare center inside. Finished with garlic, herbs, and melted butter, it’s one of the most flavorful steaks you can make at home.
This recipe is available in two versions: a short version with the most important steps, and a detailed, step-by-step guide with photos and additional tips.
Important
This recipe works best for steaks that are about 1 inch (2.5 cm) thick. If your steak is thinner or thicker, you’ll get better results by following one of my other recipes:
If your steak is closer to 2 inches (5 cm) or even thicker, check out my How to Cook a Thick Steak guide. It has tips and recipes for cooking those really thick cuts.

The Ingredients You’ll Need
- Steak: About 1-inch (2.5 cm) thick steak. Ideally, a tender, flavorful cut such as ribeye, strip, picanha, skirt, flank, teres major, hanger, porterhouse/T-bone, flat iron, chuck eye, or denver steak.
- High-smoke-point oil: 2 tablespoons (30 ml). I recommend refined avocado oil.
- Kosher salt (or another coarse salt): 5–10g kosher salt, depending on the size of your steak (go with about 1% of the steak’s weight in salt, or up to 1.5% if you like a stronger, more seasoned flavor).
- Black pepper: 1/2 teaspoon finely ground black pepper per 1 pound (453 g) of steak.
- Herbs (optional): A few thyme sprigs or rosemary.
- Garlic (optional): 2–3 garlic cloves.
- Butter (optional): 2 tablespoons (30 g) unsalted butter.
- Compound butter (optional)
The Tools You’ll Need
- Pan: Cast-iron, carbon steel, or heavy-bottomed stainless steel skillet
- Tongs
- Instant Read Thermometer
How to Cook a Thin Steak – Ultimate Guide
Gather all the necessary ingredients and tools, and then follow the steps below. Each step includes a Note with extra details that explain why the technique works.

Step 1: Prepare the Steak
Trim off any excess fat or silver skin, and cut the steak into smaller pieces if needed, so it fits easily in the pan. This is especially important for cuts like skirt, flap/bavette, hanger, or flank, since they’re often available as one long, uneven piece rather than pre-cut, ready-to-cook steaks. If your steak is already well-trimmed and evenly sized, move on to the next step.
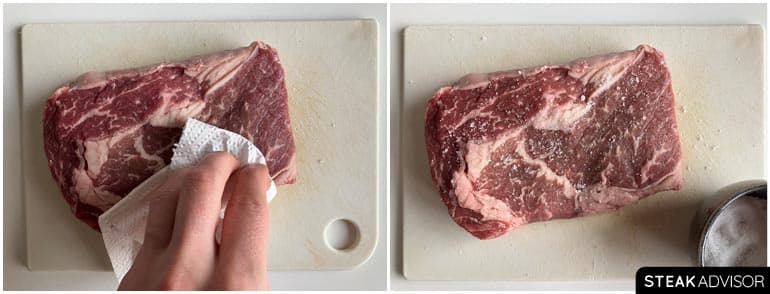
Next, pat the steak dry with paper towels on both sides to remove surface moisture. Season generously with kosher salt (about 1/2 teaspoon per side), then place the salted steak on a wire rack set over a baking sheet and let it rest for 1 to 6 hours.
One hour at room temperature is the bare minimum. For a much better crust and flavor, refrigerate it uncovered for 4–6 hours. Important: Before cooking, remove the steak from the refrigerator and let it sit at room temperature for about 30 minutes.
Note
For the best flavor and crust, stick to the 4–6 hour dry brine method. Here’s why:
Thin steaks are harder to cook than thick ones because they cook through so quickly. There’s little time to build a proper crust before the center reaches doneness. The solution is simple: start with a dry surface. For that, you need to understand how to dry-brine a steak properly.
Salt first pulls liquids out, then over the next 45–60 minutes, most of that liquid is reabsorbed along with the salt. This process seasons the meat more evenly and leaves the surface drier than before salting, which is exactly what you want for searing. The 1-hour rest is just the bare minimum. For better results, let the steak rest uncovered in the refrigerator for 4–6 hours. The longer the rest, the more thoroughly the surface dries, resulting in a deeper flavor and a better crust.
Why not longer than 6 hours? You can dry brine even for up to 24 hours, but there’s a small downside. The longer the salted steak sits, the more noticeable the gray band just under the crust becomes. It doesn’t affect tenderness or flavor, but many people find it less appealing visually. That’s why 4–6 hours is the sweet spot: a dry surface, deeper flavor, and minimal gray band inside.

Step 2: Preheat the Pan
Heat a heavy skillet over medium-high heat for 3 minutes. Add 2 tablespoons of a high-smoke point oil and let it heat for another minute. While the pan is preheating, pat the steak dry one more time, then season both sides with finely ground black pepper (don’t use coarse pepper). Once the pan and oil are hot, the steak is ready to cook in the next step.
Note
Preheating the pan properly is even more important than the dry-brining. Aim for a surface temperature of about 450°F (232°C), which in my case takes about 4 minutes in total (with a cast-iron skillet and gas stove set to medium-high heat).
Why this temperature? The Maillard reaction (browning), which creates that flavorful crust, proceeds rapidly as the meat surface temperature reaches from 280 to 330°F (140 to 165°C). However, the moment the steak touches the pan for the first time, the temperature drops. Therefore, starting closer to 450°F (232°C) keeps the pan surface hot enough to stay in the ideal browning zone. There’s no need to go hotter. Go hotter, and the oil will burn. Go much below 280°F (140°C), and the steak surface will turn gray instead of forming a golden-brown crust.
High-heat cooking requires the right pan and oil. A cast-iron skillet is the best choice because it can reach high temperatures and retain heat exceptionally well. A carbon steel skillet or a thick-bottomed stainless steel pan also works if you don’t have a cast-iron pan. For oil, always choose one with a high smoke point. Refined avocado oil is my top pick, with a smoke point of about 500°F (260°C). I’ve listed a few alternative high-smoke point oils below.
| Type of Fat | Smoke Point ºF | Smoke Point ºC |
|---|---|---|
| Refined Avocado Oil | 520ºF | 270ºC |
| Refined Safflower Oil | 510ºF | 266ºC |
| Beef Tallow | 480ºF | 250ºC |
| Pecan Oil | 470ºF | 243ºC |
| Refined Peanut Oil | 450ºF | 232°C |

Step 3: Pan-Sear the Steak
Pan-searing creates a lot of smoke, so turn on the exhaust fan or open a window to ventilate the area. Place the steak in the hot pan and press gently with tongs to ensure even contact with the surface. For cuts like picanha or strip steak, start fat-side down to render and crisp the fat. Then flip to the other side and continue searing.
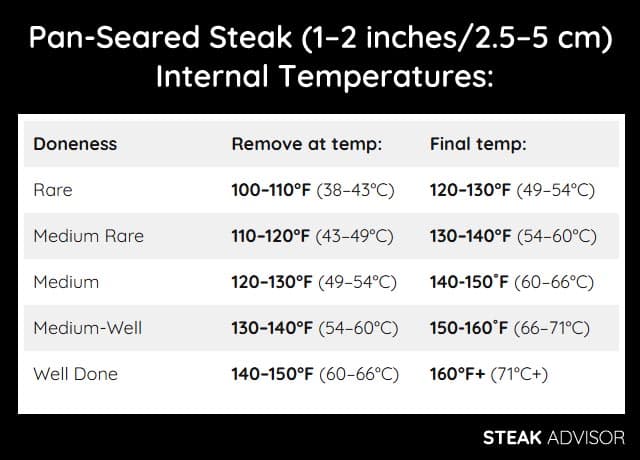
Flip the steak every 30 seconds until the internal temperature is about 20°F (11°C) below your target doneness (see the temperature chart below). Then, remove the steak from the pan and let it rest on a wooden cutting board or a rack for about 5 minutes before slicing. While the steak rests, move on to the next step and prepare the aromatics.
| Doneness | Remove at temp: | Final temp: |
| Rare | 100–110°F (38–43°C) | 120–130°F (49–54°C) |
| Medium Rare | 110–120°F (43–49°C) | 130–140°F (54–60°C) |
| Medium | 120–130°F (49–54°C) | 140-150˚F (60–66°C) |
| Medium-Well | 130–140°F (54–60°C) | 150-160˚F (66–71°C) |
| Well Done | 140–150°F (60–66°C) | 160°F+ (71°C+) |
Note
Starting fat-side down is optional, but it works well for cuts like strip or picanha if you enjoy a crispy fat cap. Turning the steak every 30 seconds gives better control over the cooking process, helps the meat cook more evenly, builds a uniform crust, and minimizes the gray band inside.
The most reliable way to cook steak in a pan perfectly is with a meat thermometer, never by time. Always measure the internal temperature instead of guessing. For steak cooked in a very hot pan, remove it about 20°F (11°C) below your target doneness. Why so early? A steak does not stop cooking once it leaves the pan; heat stored in the outer layers continues to move inward. Results? Within 5 minutes of resting, the internal temperature of a 1-inch (2.5 cm) thick steak typically rises by about 20°F (11°C).
Yes, carryover cooking is much greater with pan-searing than with slower methods such as reverse searing, oven roasting, or smoking. If it sounds unreal, test it yourself with a thermometer: measure it immediately after cooking, then again after it has rested. I have a comprehensive article on this topic, with photos and detailed tests: Resting Steak After Cooking: Why You Should and for How Long.

Step 4: Add the Aromatics (Optional)
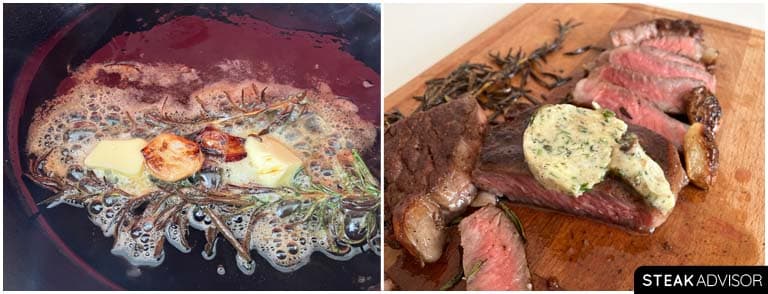
While the steak is resting, use the same pan to prepare the aromatics. Add the garlic and thyme/rosemary, and let the garlic brown lightly. Add the butter, then immediately reduce the heat to medium-low. Once the butter is melted and infused with flavor, turn off the heat and set the pan aside until the steak is ready to serve.
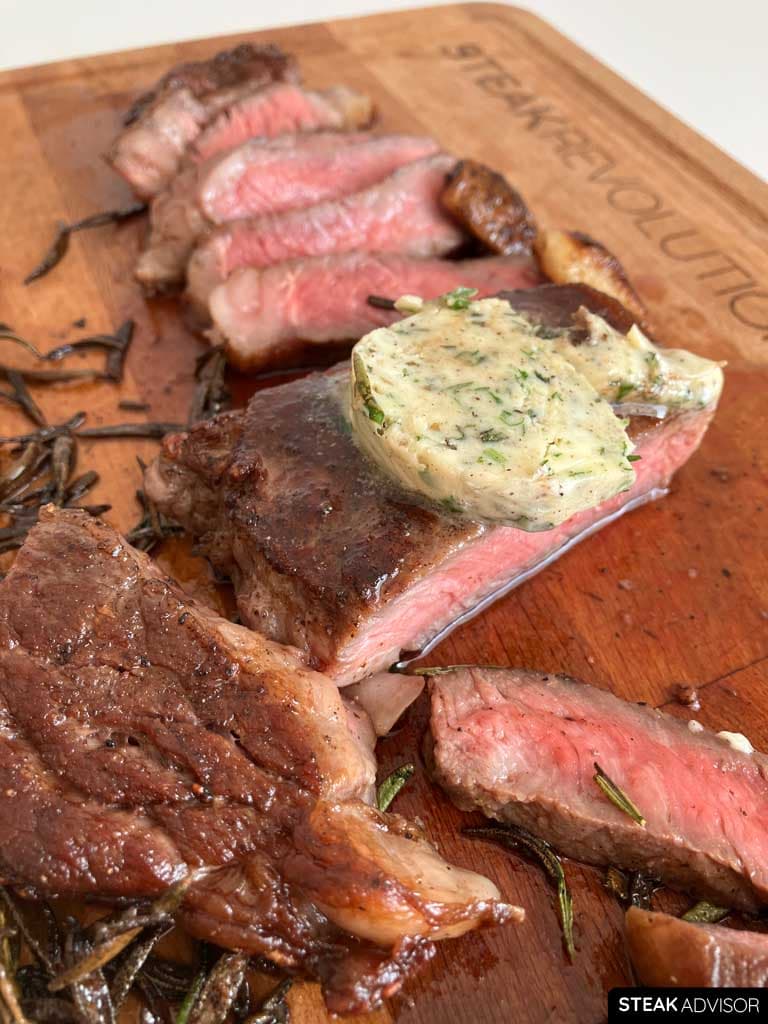
Alternatively, add a few thin slices of your favorite compound butter (I like the garlic-herb one) on top of the steak immediately after you remove it from the pan, and let it melt over the surface as the steak rests.
Note
Please remember to reduce the heat to medium-low once you add the butter, and turn it off as soon as the butter has melted. Butter has a low smoke point, so don’t risk burning it over high heat. A cast-iron skillet holds heat for a long time after searing, so the pan remains very hot even after you switch the burner off.
Skip adding butter and herbs during the sear on a 1-inch (2.5 cm) steak. At this thickness, the steak cooks very quickly over high heat; it’s just better to focus on cooking the steak first, then prepare the aromatics. Finishing the steak with butter and aromatics after searing gives essentially the same flavor as basting during cooking, while simplifying the entire process and reducing the risk of burning the butter or overcooking a thin steak.
Step 5: Serve the Steak
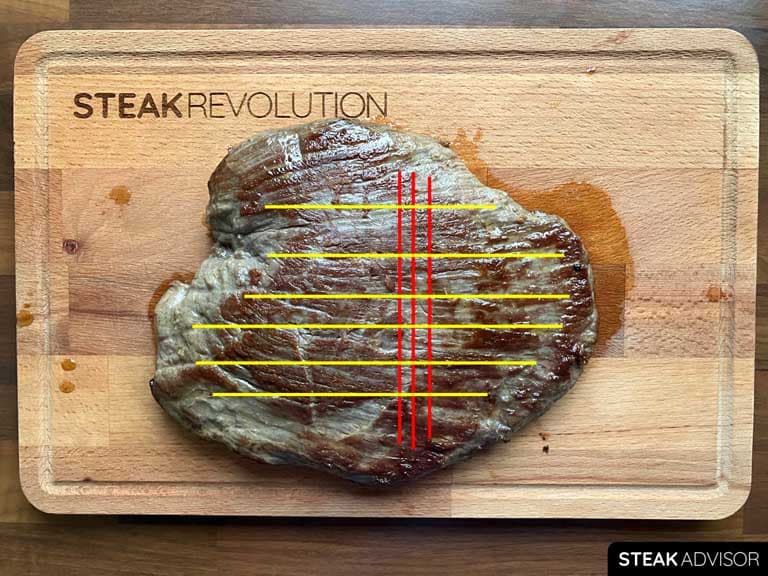
After resting, slice the steak and spoon the melted butter with garlic and herbs from the pan over the top (if you used it instead of compound butter). For cuts with coarse, long muscle fibers, such as skirt steak, picanha, flank steak, or hanger steak, always slice against the grain to keep the pieces easier to chew.
Note
Slicing against the grain makes the steak much easier to chew because it shortens the muscle fibers. Some cuts have long, coarse fibers, and if you slice them with the grain, the meat turns out tough and chewy. With naturally tender cuts like ribeye or filet mignon, this isn’t really an issue. You can slice them however you like. But with cuts like skirt or flank steak, it makes a big difference. If you’re not sure how to find the grain direction, take a look at my slicing steak guide.

Thin-Steak Recipe
- Prep Time: 5 minutes
- Rest Time: 1 to 6 hours
- Cook Time: 10 minutes
- Total Time: 15 minutes
- Yield: 1 steak
Description
A quick and reliable method for cooking thin steaks with a rich, golden-brown crust and a juicy, tender center. Finished with butter, garlic, and fresh herbs, this recipe guarantees maximum flavor with a simple, step-by-step approach.
Ingredients
For Steak:
- About 1-inch (2.5 cm) thick steak (ideally a tender, flavorful cut such as ribeye, strip, picanha, skirt, flank, teres major, hanger, porterhouse/T-bone, flat iron, chuck eye, or denver steak)
- 2 tablespoons (30 ml) of high-smoke-point oil (I recommend refined avocado oil)
- 1 teaspoon (about 5g) kosher salt (see notes)
- 1/2 teaspoon black pepper (finely ground)
- A few thyme sprigs or rosemary (optional)
- 2–3 garlic cloves (optional)
- 2 tablespoons (30 g) unsalted butter (optional)
- compound butter (optional)
Tools:
- Pan (Cast-iron, carbon steel, or heavy-bottomed stainless steel skillet)
- Tongs
- Instant Read Thermometer
Instructions
- Before we start: Gather all the ingredients and tools, and decide whether you prefer to make the aromatics in the pan after searing or use compound butter. If you’re using compound butter, make it ahead of time so it’s ready to go (ideally while the steak is dry-brining). Then follow the steps below.

Prepare the Steak
- Trim off any excess fat or silver skin, and cut the steak into smaller pieces if needed, so it fits easily in the pan. This is especially important for cuts like skirt, flap (bavette), hanger, or flank, since they’re often available as one long, uneven piece rather than pre-cut, ready-to-cook steaks. If your steak is already well-trimmed and evenly sized, move on to the next step.
- Pat the steak dry with paper towels on both sides to remove surface moisture. Season generously with kosher salt (about 1/2 teaspoon per side), then place the salted steak on a wire rack set over a baking sheet and let it rest for 1 to 6 hours.
- One hour at room temperature is the bare minimum. For a much better crust and flavor, refrigerate it uncovered for 4–6 hours.
- Before cooking, remove the steak from the refrigerator and let it sit at room temperature for about 30 minutes.
Preheat the Pan
- Heat a heavy skillet over medium-high heat for 3 minutes.
- Add 2 tablespoons of a high-smoke point oil and let it heat for another minute.
- While the pan is preheating, pat the steak dry one more time, then season both sides with finely ground black pepper (don’t use coarse pepper). Once the pan and oil are hot, the steak is ready to cook in the next step.
Cook the Steak
- Pan-searing creates a lot of smoke, so turn on the exhaust fan or open a window to ventilate the area.
- Place the steak in the hot pan and press gently with tongs to ensure even contact with the surface. For cuts like picanha or strip steak, start fat-side down to render and crisp the fat. Then flip to the other side and continue searing.

- Flip the steak every 30 seconds until the internal temperature is about 20°F (11°C) below your target doneness (see temperature chart below).
- Then, remove the steak from the pan and let it rest on a wooden cutting board or a rack for about 5 minutes before slicing.
- While the steak rests, move on to the next step and prepare the aromatics (optional).
Add the Aromatics (Optional)
- While the steak is resting, use the same pan to prepare the aromatics. Add the garlic and thyme/rosemary, and let the garlic brown lightly.
- Add the butter, then immediately reduce the heat to medium-low. Once the butter is melted and infused with flavor, turn off the heat and set the pan aside until the steak is ready to serve.
- Alternatively, add a few thin slices of your favorite compound butter (I like the garlic-herb one) on top of the steak immediately after you remove it from the pan, and let it melt over the surface as the steak rests.
Serve the Steak
- After resting, slice the steak and spoon the melted butter with garlic and herbs from the pan over the top (if you used it instead of compound butter).
- For cuts with coarse, long muscle fibers, such as skirt steak, picanha, flank steak, or hanger steak, always slice against the grain to keep the pieces easier to chew (see notes).
Notes
Slicing the Steak
Slicing against the grain makes the steak much easier to chew because it shortens the muscle fibers. Some cuts have long, coarse fibers, and if you slice them with the grain, the meat turns out tough and chewy. With naturally tender cuts like ribeye or filet mignon, this isn’t really an issue. You can slice them however you like. But with cuts like skirt or flank steak, it makes a big difference. If you’re not sure how to find the grain direction, take a look at my slicing steak guide. Below is an example of how to slice flank steak correctly.
Dry-Brining
As a general rule, use roughly 1% of the steak’s weight in salt, or up to 1.5% if you prefer a deeper, more seasoned flavor.
Explore Other Guides:
- How to Reverse Sear a Steak
- How to Cook a Dry-Aged Steak
- How to Cook Steak in the Oven (Front Sear Method)
- How to Sear a Steak