
| PREP TIME | REST TIME | COOK TIME |
| 5 mins | 1 to 24 h | 10-15 mins |
A cast-iron skillet, a good steak, high-smoke-point oil, and a sprinkle of salt are all you need to cook a restaurant-style steak at home. Add freshly ground pepper, a few garlic cloves, butter, and fresh herbs, and you’ll take it to the next level. The result? A steak with a juicy, tender center and a deep, crispy crust on the outside.
No fancy tools needed, just your cast-iron skillet, a pair of tongs, and an instant-read thermometer to monitor the steak’s internal temperature.
Important
I developed this recipe for steaks about 1 1/2 inches (3.8 cm) thick. If your steak is thinner or thicker, you’ll get better results by following one of my other recipes:
If your steak is closer to 2 inches (5 cm) or even thicker, check out my How to Cook a Thick Steak guide. It has tips and recipes for cooking those really thick cuts.
I developed this recipe to be simple, intuitive, and focused on the most important steps, without going too deep into pan-cooking details. If you’d like to learn more, check out my comprehensive guide on how to cook a steak in a pan. In that guide, I break down each step in detail and show you how to cook any steak in any type of pan, not just a cast-iron skillet. It’s a deeper dive into pan-searing for anyone who wants to go beyond the basics.
The Ingredients You’ll Need
- Steak (about 1 1/2-inch / 3.8 cm thick): Choose a naturally tender, flavorful cut such as ribeye, strip steak, or tenderloin (filet mignon). (See the FAQ section for more recommended cuts.)
- 2 tablespoons (30 ml) of high-smoke-point oil: I like refined avocado oil, which has a smoke point of around 500°F (260°C) and works perfectly for hot pan searing.
- 1 teaspoon salt: Use coarse salt (like kosher or Maldon sea salt). Avoid table salt as it’s too fine and makes it easy to overseason the steak.
- 1/2 teaspoon black pepper: Use only finely ground black pepper to ensure that the steak’s surface comes into full contact with the pan for a better sear.
- Thyme sprigs or rosemary: Adds a subtle, fresh herbal aroma to the steak.
- 2–3 garlic cloves: Garlic flavor perfectly blends into the butter and the steak’s flavor.
- 2 tablespoons (30 g) unsalted butter: Butter adds richness, juiciness, and a boost of flavor while also helping the steak brown. Always use high-quality unsalted butter, not margarine!
Note: Instead of adding garlic, butter, and herbs directly to the pan, you can make a garlic-herb compound butter and use it to finish the steak. This option is a bit easier for beginners, since you can focus only on cooking the steak. I usually stick to adding the extra ingredients in the pan, but when I’m feeling lazy, I just go with compound butter. Both methods work well and deliver great flavor, so it comes down to personal preference.
The Tools You’ll Need
- Cast-iron Skillet
- Tongs
- Instant Read Thermometer
- Cooling Rack with Tray
How to Cook a Steak in a Cast Iron Skillet – Step by Step Photos
Before you start cooking, gather all of your ingredients and tools. Having everything prepped ahead of time keeps the process simple and stress-free. This is also the moment to decide whether you’ll use garlic, herbs, and butter in the pan, or finish the steak with a compound butter instead.

Step 1: Prepare the Steak
Use paper towels to pat the steak completely dry, then season both sides with salt. From here, you have two options: let the steak rest at room temperature for 45–60 minutes, or place it on a rack in the refrigerator for 4–6 hours for a much better flavor and sear. Optionally: for the best results, leave it overnight. If using the refrigerator method, remember to remove the steak at least 30 minutes before cooking.
Note
The goal of this recipe is to build an impressive crust on the outside while keeping the inside perfectly medium-rare. To achieve this, the steak needs to be as dry as possible before searing, and that’s where proper salting and resting come into play.
When you salt a steak, a few things happen. First, it seasons the meat and helps tenderize it a bit. Second, it draws out the steak’s juices to the surface. Within just 2–3 minutes, you’ll notice the steak starting to look wet, and this moisture usually peaks around 15–20 minutes. Given more time, the juices slowly get reabsorbed, leaving the surface much drier and ready for a proper sear. This reabsorption takes at least 45 minutes, which is why I recommend waiting at least that long before cooking (though this is really the bare minimum).
For much better results, place the salted steak on a rack in the refrigerator for 4–6 hours. This dries the surface more thoroughly and builds deeper flavor, while keeping the “gray band” (the strip of cooked meat just under the crust) smaller. A longer dry brining (12 to 24 hours) will make the steak even more flavorful, but it also makes the gray band thicker. Personally, I don’t mind it, because it’s still tender and juicy (not like overcooked meat). However, for the best balance of flavor, crust, and minimal gray band, I find that 4–6 hours is the sweet spot.


Step 2: Preheat the Cast Iron Skillet
Place a cast-iron skillet over medium-high heat and let it heat for 3-4 minutes. Then add 1–2 tablespoons of oil and let it heat for about 1 minute. For thicker, well-marbled steaks, one tablespoon is enough.
While the pan heats, pat the steak dry one more time and season it with freshly ground black pepper. Once the oil is shimmering, the pan is ready, and it’s time to start cooking.
Note
For a good sear, the pan needs to be very hot, at least 400°F (205°C), and ideally closer to 450-500°F (230-260°C) or more. Cast iron is the best choice here because it not only reaches high temperatures but also retains heat exceptionally well. That’s why it’s the best pan for building a deep, flavorful crust. The downside is that it takes a few minutes to preheat. In my experience, it takes approximately 4–5 minutes for a cast-iron skillet to reach a temperature of around 450-500°F (230-260°C).
Technically, a crust can form at lower temperatures (around 330°F / 165°C), but when you place a cold steak in the pan, the skillet temperature drops sharply. Preheating to at least 450°F (230°C) ensures the skillet stays hot enough to sear properly even after the steak hits the surface.
Another key factor is the oil. Many common cooking oils start to burn at temperatures above 400°F (205°C). Always use a high–smoke point oil, ideally around 500°F (260°C). My go-to is refined avocado oil, but there are several other good options (see the table below).
| Type of Fat | Smoke Point ºF | Smoke Point ºC |
|---|---|---|
| Refined Avocado Oil | 520ºF | 270ºC |
| Refined Safflower Oil | 510ºF | 266ºC |
| Beef Tallow | 480ºF | 250ºC |
| Pecan Oil | 470ºF | 243ºC |
| Refined Peanut Oil | 450ºF | 232°C |


Step 3: Cook the Steak in Cast Iron Skillet
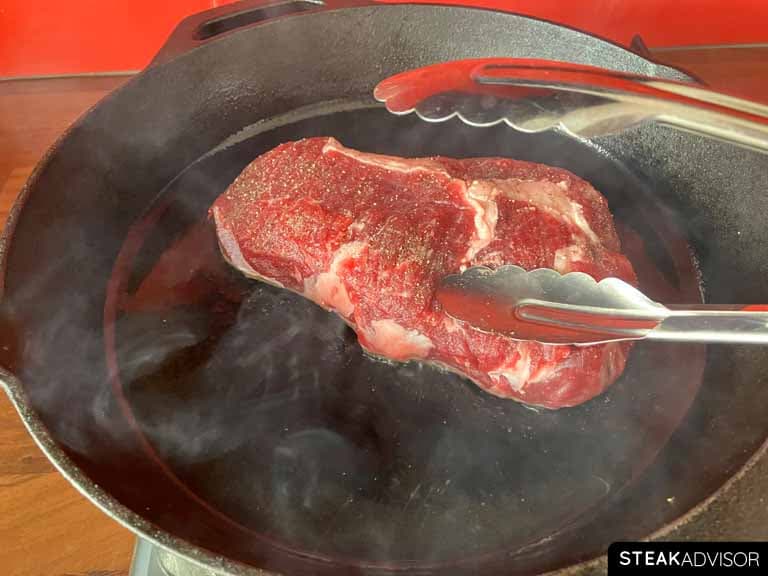
Searing produces plenty of smoke, so turn on your exhaust fan or open a window before you start. Using tongs, carefully place the steak in the hot cast-iron skillet and press it down gently to ensure full contact with the pan.
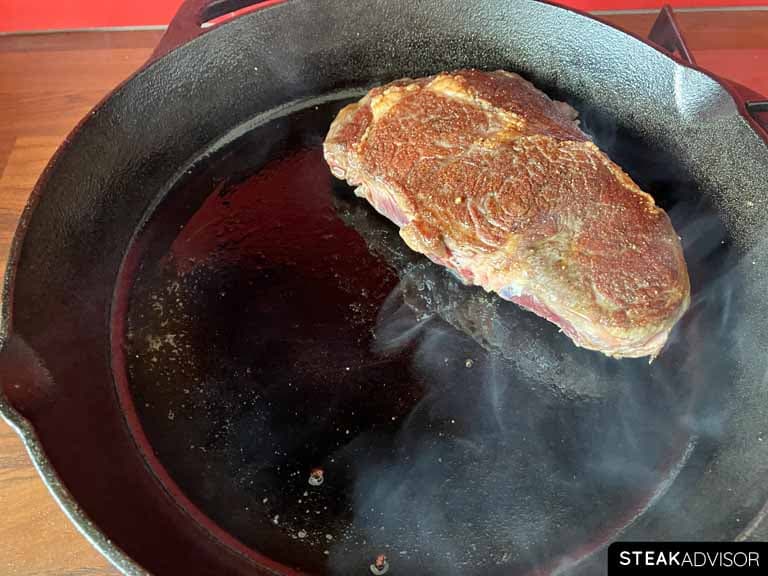
Cook over medium-high heat, flipping every 30 seconds to build an even crust. After 3–4 minutes, begin checking the internal temperature. Once the steak reaches approximately 90°F (32°C), move on to the next step.
Note
For cuts with a fat cap, like picanha or a strip steak, start by placing the fat side down in the skillet. Let it render to the level you like before searing the steak on the other sides.
I also strongly recommend using a meat thermometer to track the steak’s internal temperature. Even a basic instant-read thermometer or probe-style thermometer will do the job. Please note that I don’t provide strict timing in this recipe. Why? There are just too many variables (steak thickness, type of steak, pan temperature, desired doneness, and more). Relying on time alone is the easiest way to end up with an overcooked steak.
A thermometer eliminates the guesswork and guarantees perfectly cooked steak every time. It’s one of the most valuable tools in my kitchen, and I especially recommend it if you’re cooking high-quality, more expensive cuts of steak. I use it every time I cook steak.
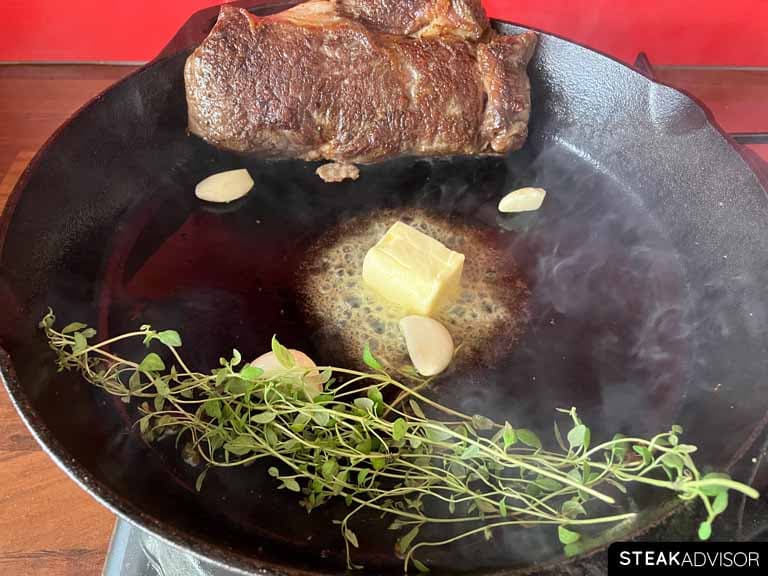
Step 4: Add Butter and Aromatics
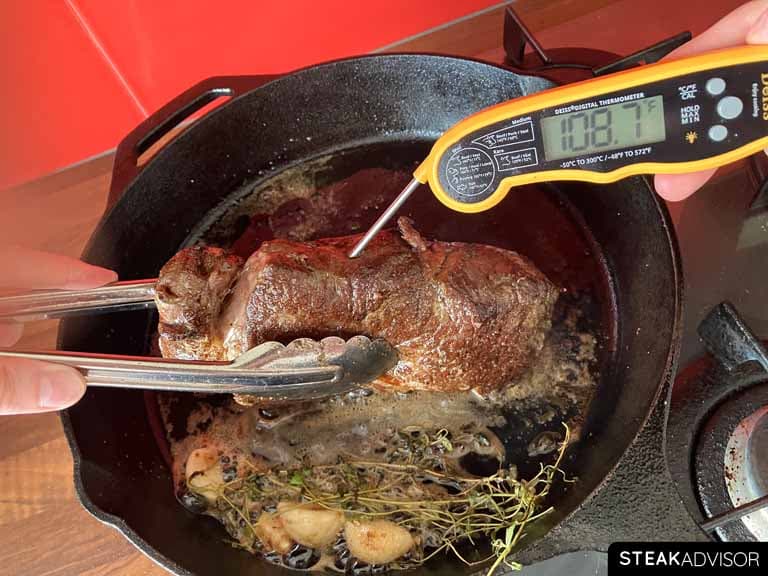
Add two tablespoons (30 g) of butter to the pan, along with a few sprigs of thyme or rosemary, and 2–3 garlic cloves. Lower the heat to medium-low and let the butter melt.
Carefully tilt the skillet so the butter pools at the bottom (use a kitchen towel or oven mitt as the handle will be extremely hot). Use a spoon to baste the steak with the hot, aromatic butter for 20–30 seconds per side. If you prefer not to baste, tilt the pan so the butter pools and place the steak directly in it, flipping every 30 seconds.
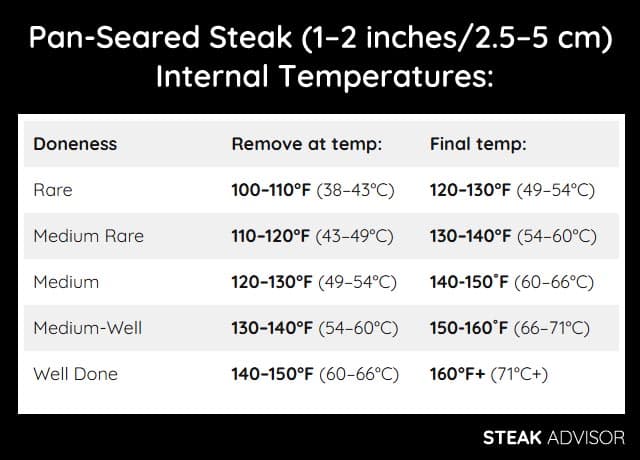
Continue to check the steak’s internal temperature as it cooks. Remove it from the skillet when it’s about 20°F (11°C) below your target doneness (see the temperature chart below), then turn off the heat and let the steak rest on a wood cutting board or, ideally, on a rack.
| Doneness | Remove at temp: | Final temp: |
| Rare | 100–110°F (38–43°C) | 120–130°F (49–54°C) |
| Medium Rare | 110–120°F (43–49°C) | 130–140°F (54–60°C) |
| Medium | 120–130°F (49–54°C) | 140-150˚F (60–66°C) |
| Medium-Well | 130–140°F (54–60°C) | 150-160˚F (66–71°C) |
| Well Done | 140–150°F (60–66°C) | 160°F+ (71°C+) |
Note
Butter has a low smoke point, which is why it should never be used at the start of cooking, as a hot skillet will burn it quickly. The safer method is to add it once the steak reaches about 90°F (32°C) and reduce the heat to medium-low. Use butter, garlic, and herbs only to add flavor, not to cook the steak – that’s why you add them at the end.
If you plan to cook the steak beyond medium-rare (for example, to medium-well or even well-done), add the butter a little later, around 100°F (38°C), to prevent it from burning during the longer cooking time.
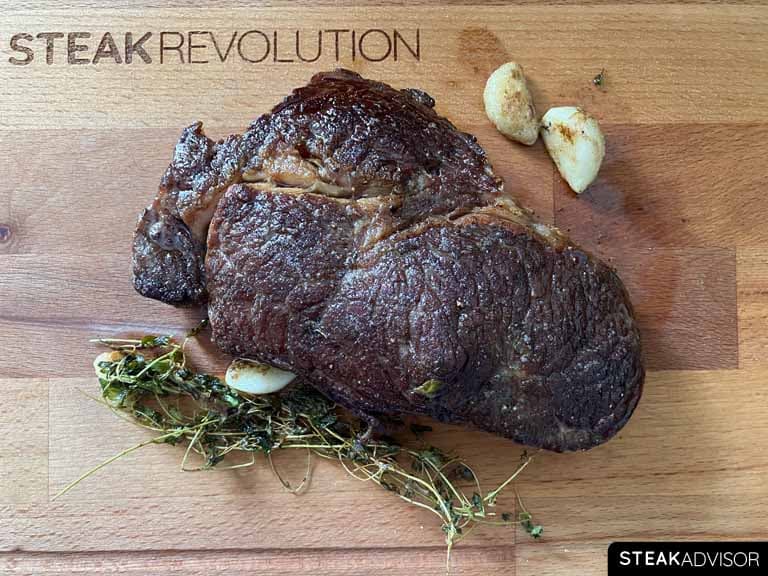
Step 5: Let the Steak Rest
Let the steak rest before slicing. About 5 minutes for cuts 1 inch (2.5 cm) thick, and 6–7 minutes for steaks about 1 1/2-inch (3.8 cm) thick. As the steak rests, the internal temperature will continue to rise due to carryover cooking by as much as 20°F (11°C) within just a few minutes.
Optional: If you skipped Step 4 (Add Butter and Aromatics) and chose to use compound steak butter instead, now is the time to add it. Slice the compound butter into thin discs and place them on top of the hot steak so they melt over the surface.
Note
Hot and strong sears have very high carryover temps. I know this may sound new or even unreal to some of you, but it’s true. With this recipe, the steak’s internal temperature can rise by about 20°F (11°C) within 5-7 minutes after you take it from the cast-iron skillet.
As for resting, 5–7 minutes is generally enough. Don’t cover the steak with foil; just place it on a wire rack, cutting board, or even a plate, and leave it untouched. If you miss your target doneness by accident, slice the steak immediately to stop the carryover cooking.
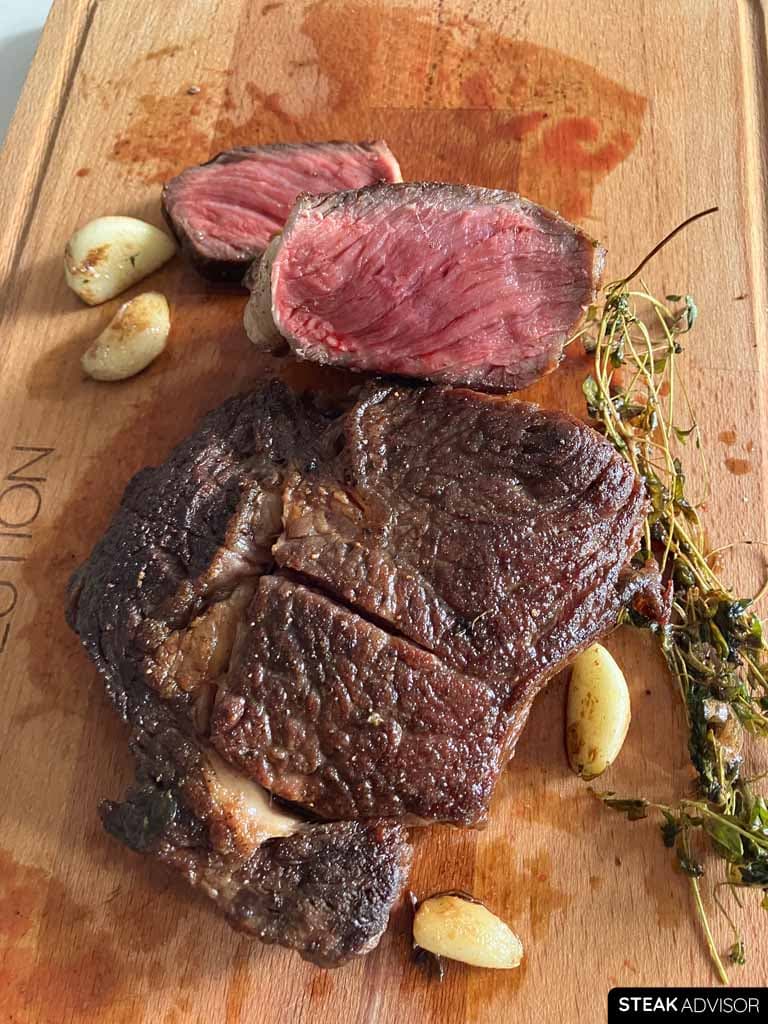
Step 6: Time to Serve the Steak
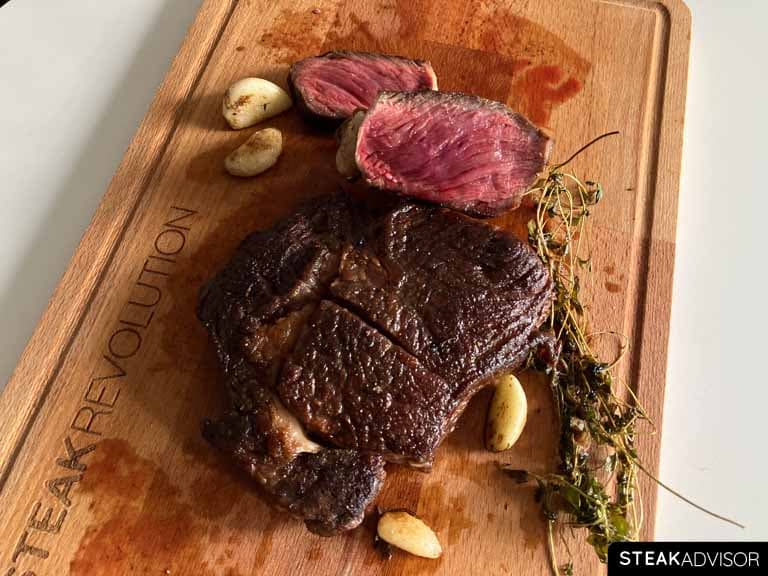
After the steak has rested, slice it thin. For cuts like picanha, hanger, or flank steak, be sure to slice against the grain (see my guide to Slicing the Steak). Serve with the pan leftovers (melted butter, herbs, and garlic) spooned over the top.
FAQs
When’s the best time to take a steak off the skillet?
The best time to take a steak off the skillet is when its internal temperature is about 20–25°F (11–14°C) below your target doneness. With this recipe, carryover cooking is high because of the hot sear. The steak’s temperature will continue to rise by 15 to even 30°F (8 to 17°C) as it rests for 5–7 minutes. The exact increase depends mainly on three factors: steak thickness, cooking time, and the cooking temperature (the temperature of the skillet). For a steak about 1 1/2 inches (3.8 cm) thick, the rise is typically around 20°F (11°C).
What are the cooking temperatures for a cast-iron skillet steak?
I’ve included a table with the different doneness levels, their final target temperatures, and the internal temperature at which you should remove the steak from the skillet.
| Doneness | Remove at temp: | Final temp: |
| Rare | 100–110°F (38–43°C) | 120–130°F (49–54°C) |
| Medium Rare | 110–120°F (43–49°C) | 130–140°F (54–60°C) |
| Medium | 120–130°F (49–54°C) | 140-150˚F (60–66°C) |
| Medium-Well | 130–140°F (54–60°C) | 150-160˚F (66–71°C) |
| Well Done | 140–150°F (60–66°C) | 160°F+ (71°C+) |
Remember, with this recipe, the steak’s temperature continues to rise by about 20°F (11°C) as it rests, so removing it at the right time is the key to achieving perfect doneness.
Which cuts of steak are best for cast iron skillet?
You can cook almost any steak in a cast iron skillet, but for the best results, choose cuts that are about 1 1/2 inches (3.8 cm) thick, naturally tender, and well-marbled. This way, you’ll have enough time to build a crust while keeping the inside medium-rare. Some of the best options include ribeye, new york strip (strip steak), tenderloin (filet mignon), picanha (coulotte), hanger steak, flat iron steak, porterhouse, t-bone, denver steak, chuck eye steak, and teres major.
Thinner steaks (under 1 inch / 2.5 cm) also work, but they cook through too quickly to get both a deep crust and medium-rare doneness. If you don’t mind that, or prefer steak cooked past medium-rare, cuts like skirt, ribeye cap (flat version), flank, flap (bavette), spider (oyster), or tri-tip can still turn out delicious in a skillet.
Why is the cast-iron skillet so good for cooking a steak?
There are two main reasons. First, cast iron can handle very high heat, much higher than most other pans. Second, it retains and distributes that heat evenly. Cast iron takes longer to preheat, but once it’s hot, it stays hot. So when you place a cold steak in the skillet, the pan doesn’t lose much heat, allowing you to get a strong, even sear instead of steaming. That’s exactly what you need for a steak with a crisp crust on the outside and a medium-rare center.
Preheating is key here. You can technically sear at around 350°F (175°C), but as soon as the steak hits the pan, the surface temperature drops rapidly. That’s why I recommend preheating a cast-iron skillet to about 450-500°F (230-260°C) before cooking; it ensures the pan stays hot enough for the perfect sear.
Print
Cast Iron Skillet Steak Recipe
- Prep Time: 5 minutes
- Rest Time: 1 to 24 hours
- Cook Time: 10 minutes
- Total Time: 15 minutes
Description
A simple cast-iron skillet recipe for a perfectly seared steak with a deep crust and a tender, juicy medium-rare center. Finished with butter, garlic, and fresh herbs for a rich flavor – restaurant-quality, made at home.
Ingredients
- Steak (about 1 1/2-inch / 3.8 cm thick)
- 2 tablespoons (30 ml) of high-smoke-point oil
- 1 teaspoon kosher salt
- 1/2 teaspoon black pepper
- Thyme sprigs or rosemary
- 2–3 garlic cloves
- 2 tablespoons (30 g) unsalted butter
Instructions
- Prepare the Steak: Use paper towels to pat the steak completely dry, then season both sides with salt. From here, you have two options: let the steak rest at room temperature for 45–60 minutes, or place it on a rack in the refrigerator for 4–6 hours for a much better flavor and sear. If using the refrigerator method, remember to remove the steak at least 30 minutes before cooking.
- Preheat the Cast Iron Skillet: Place a cast-iron skillet over medium-high heat and let it heat for 3-4 minutes. Then add 1–2 tablespoons of oil and let it heat for about 1 minute. For thicker, well-marbled steaks, one tablespoon is enough.
- Pepper the Steak: While the pan heats, pat the steak dry one more time and season it with freshly ground black pepper. Once the oil is shimmering, the pan is ready, and it’s time to start cooking.
- Place the Steak in the Skillet: Searing produces plenty of smoke, so turn on your exhaust fan or open a window before you start. Using tongs, carefully place the steak in the hot cast-iron skillet and press it down gently to ensure full contact with the pan.
- Cook and Flip the Steak: Cook over medium-high heat, flipping every 30 seconds to build an even crust. After 3–4 minutes (for cuts about 1 1/2 / 3.8 cm thick), begin checking the internal temperature. Once the steak reaches approximately 90°F (32°C), move on to the next step.
- Add Butter and Aromatics: Add two tablespoons (30 g) of butter to the pan, along with a few sprigs of thyme or rosemary, and 2–3 garlic cloves. Lower the heat to medium-low and let the butter melt.
- Baste the Steak: Carefully tilt the skillet so the butter pools at the bottom (use a kitchen towel or oven mitt as the handle will be extremely hot). Use a spoon to baste the steak with the hot, aromatic butter for 20–30 seconds per side. If you prefer not to baste, tilt the pan so the butter pools and place the steak directly in it, flipping every 30 seconds.
- Continue to check the steak’s internal temperature as it cooks. Remove it from the skillet when it’s about 20°F (11°C) below your target doneness, then turn off the heat and let the steak rest on a wood cutting board or, ideally, on a rack.
- Let the Steak Rest Before Slicing: Let the steak rest before slicing. About 5 minutes for cuts 1 inch (2.5 cm) thick, and 6–7 minutes for steaks about 1 1/2-inch (3.8 cm) thick. As the steak rests, the internal temperature will continue to rise due to carryover cooking by as much as 20°F (11°C) within just a few minutes.
- Optional: If you skipped Step “Add Butter and Aromatics”, and chose to use compound steak butter instead, now is the time to add it. Slice the compound butter into thin discs and place them on top of the hot steak so they melt over the surface.
- Time to Serve the Steak: After the steak has rested, slice it thin. For cuts like picanha, hanger, or flank steak, be sure to slice against the grain. Serve with the pan leftovers (melted butter, herbs, and garlic) spooned over the top.
Notes
More Steak Recipes To Try
- How to Cook a Dry-Aged Steak
- Steak and Potatoes Recipes
- Garlic Butter Steak Bites
- Cooking Steak in the Oven
- Reverse Sear Steak Recipe